
The Speedy Slice of Sunshine: 2-Minute Microwave Lime Cheesecake
There are moments, aren’t there, when a craving strikes with an almost primal urgency? Not for a full-blown, hours-in-the-making dessert, but for something specific, something indulgent, yet achievable in the blink of an eye. I remember one particularly sweltering afternoon, the kind where even the air conditioning seemed to sweat, and all I could think about was the bright, tangy kiss of lime and the creamy, comforting embrace of cheesecake. The thought of turning on the oven felt like a Herculean task. Then, like a culinary whisper from the universe, I remembered this ingenious little trick – a cheesecake, singular and sublime, born from the humble microwave. It’s a testament to how innovation can transform simple ingredients into pure, unadulterated joy, proving that sometimes, the quickest path to delicious is the most surprising.
Recipe Overview
- Prep Time: 5 minutes
- Cook Time: 2 minutes
- Total Time: 7 minutes (plus chilling time)
- Servings: 2
- Yield: 2 individual cheesecakes
- Dietary Type: Vegetarian
Ingredients
This recipe is wonderfully straightforward, relying on a few key players to deliver its magic.
For the Crust:
- 1/2 cup graham cracker crumbs (or a mixture of graham cracker and gingersnap crumbs for an extra spice note)
- 3 tablespoons butter, melted
- 1 tablespoon sugar
For the Filling:
- 8 ounces cream cheese, softened
- 1/3 cup sugar
- 1 lime, zest of (about 1 tablespoon)
- 2 tablespoons fresh lime juice (or 2 tablespoons key lime juice for an even more intense flavor)
- 1 egg
- 1 tablespoon potato starch (optional, but it helps with texture and stability)
Equipment Needed
For this speedy delight, you won’t need much. The stars of the show are:
- Two pint-sized Mason jars or large coffee mugs (ensure they are microwave-safe)
- A medium mixing bowl
- A whisk or fork
- A measuring cup and spoons
- A zester or fine grater
- A spatula
- A refrigerator
Instructions
The beauty of this recipe lies in its remarkable simplicity and speed. Follow these steps, and you’ll be enjoying your personal cheesecake in no time.
-
Prepare the Crust: In your medium mixing bowl, combine the graham cracker crumbs, melted butter, and 1 tablespoon of sugar. Stir everything together with a fork or spatula until the crumbs are evenly moistened and resemble wet sand. This sandy texture is what will help the crust hold its shape.
-
Assemble the Crusts: Divide the crumb mixture evenly between your two chosen vessels – pint-sized Mason jars or large coffee mugs work perfectly. Use the back of a spoon or your fingers to firmly pack the crumbs down into the bottom of each jar or mug, creating an even layer. This compact crust forms the foundation of your mini cheesecakes.
-
Create the Filling: In the same mixing bowl (no need to wash it!), add the softened cream cheese and 1/3 cup sugar. Stir these together until they are well combined and relatively smooth. Next, stir in the zest of the lime and the fresh lime juice.
-
Incorporate the Egg: Add the egg to the cream cheese mixture. Stir vigorously until everything is thoroughly incorporated and the filling is smooth and creamy. If you are using the potato starch, whisk it in now until fully blended. The starch helps to give the cheesecake a more traditional set.
-
Fill the Jars: Carefully divide the lime cheesecake filling evenly between the two prepared crusts in your jars or mugs. Smooth the tops gently with your spatula, if desired.
-
Microwave Magic: Place the filled jars or mugs into your microwave. Cook on high power for 2 minutes. Crucially, if your microwave does not have a rotating turntable, you will need to pause after 1 minute and turn the vessels 90 degrees to ensure even cooking.
-
Check for Doneness: After the initial 2 minutes, observe the cheesecakes. The tops should appear dry. If they still look wet or jiggly in the center, continue to cook in 30-second intervals, checking after each interval, until the tops look set. Be cautious not to overcook, as this can lead to a rubbery texture.
-
Chill to Perfection: Once cooked, carefully remove the hot jars or mugs from the microwave (use oven mitts!). Allow them to cool at room temperature for a few minutes before transferring them to the refrigerator. They need to chill for at least 1 hour to fully set and develop their classic cheesecake texture. As the cheesecake cools, you’ll notice the top will develop a characteristic dimple; this is perfectly normal.
Expert Tips & Tricks
- Soften Your Cream Cheese: For the smoothest filling, ensure your cream cheese is truly at room temperature. If you’re in a hurry, you can soften it by removing it from its foil wrapper and placing it on a microwave-safe plate, then microwaving on low power for 15-20 second intervals, checking frequently, until pliable but not melted.
- Zest with Care: When zesting your lime, aim for the green part of the peel only. The white pith underneath can be bitter.
- The Power of the Dimple: Don’t be alarmed by the dimple that forms as your cheesecake cools. It’s a natural occurrence. As mentioned, a dollop of whipped cream or a scattering of fresh berries is the perfect way to camouflage and elevate it.
- Microwave Variance: Microwave wattages vary, so the cooking time might need slight adjustment. It’s always better to err on the side of slightly undercooked and add more time, rather than overcook.
Serving & Storage Suggestions
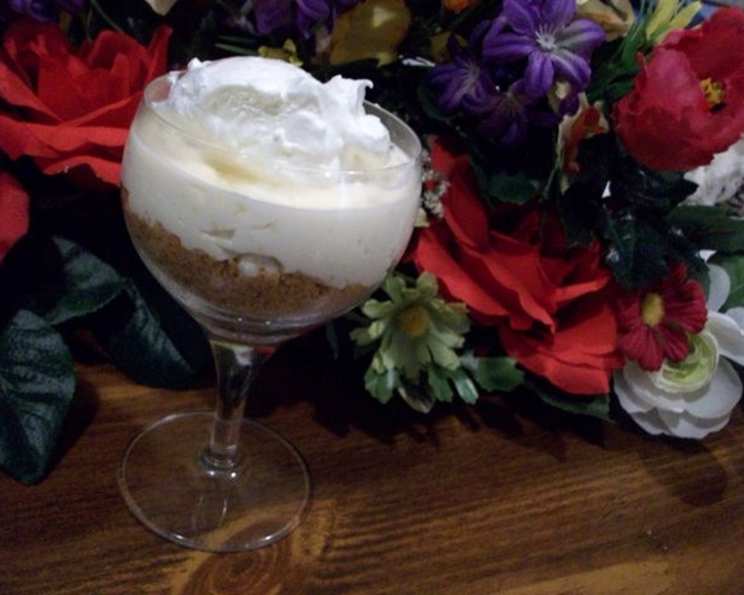
These individual lime cheesecakes are delightful served straight from the refrigerator. For a beautiful presentation, top each one with a generous dollop of whipped cream, a sprinkle of lime zest, or a few fresh lime slices. A scattering of fresh mint leaves also adds a lovely touch of color and freshness.
Leftovers can be stored in the refrigerator, covered, for up to 2-3 days. The flavors tend to meld and deepen slightly overnight, making them even more delicious the next day. They are best enjoyed chilled. Freezing is not recommended for this recipe, as the texture can be compromised upon thawing.
Nutritional Information
(Please note: These are estimated values and can vary based on specific ingredients used.)
| Nutrient | Amount per Serving | % Daily Value |
|---|---|---|
| Calories | 822.7 kcal | 18% |
| Total Fat | 60.7 g | 93% |
| Saturated Fat | 34 g | 169% |
| Cholesterol | 263.8 mg | 87% |
| Sodium | 653.1 mg | 27% |
| Total Carbohydrate | 61.8 g | 20% |
| Dietary Fiber | 0.7 g | 2% |
| Sugars | 50 g | 200% |
| Protein | 11.6 g | 23% |
Variations & Substitutions
While this recipe is a beautiful celebration of lime, feel free to experiment!
- Citrus Swap: Instead of lime, try using lemon zest and juice for a classic lemon cheesecake. Orange zest and juice can also work, offering a sweeter, more mellow citrus profile.
- Crust Adventures: Beyond graham crackers and gingersnaps, consider using crushed shortbread cookies, vanilla wafers, or even a nut-based crumb (like finely ground almonds or pecans) for a different texture and flavor.
- Fruity Topping: While whipped cream is a classic, consider a bright berry compote or a simple drizzle of raspberry coulis for a burst of fruitiness.
FAQs
Q: Why is my microwave cheesecake not setting properly?
A: This can happen if the microwave is not powerful enough or if the cooking time was insufficient. Ensure you are cooking on high power and check for doneness by looking for a dry, set top surface. Additional cooking in 30-second intervals is usually the solution.
Q: Can I make this without a microwave?
A: This recipe is specifically designed for the microwave. While you could theoretically bake individual portions in a very small oven at a low temperature, the timing and results would be significantly different and would not be a “2-minute” recipe.
Q: What makes the filling smooth without cooking it for a long time?
A: The combination of softened cream cheese, sugar, and the egg, when blended thoroughly, creates a base that cooks quickly and evenly in the microwave. The brief cooking time is enough to set the egg and create a creamy texture.
Q: Is it important to use softened cream cheese?
A: Absolutely! Softened cream cheese is crucial for achieving a smooth, lump-free filling. If your cream cheese is cold, you’ll end up with a gritty texture.
Q: Can I make more than two at a time?
A: You can definitely make more, but you’ll likely need to cook them in batches. Overcrowding the microwave can lead to uneven cooking.
Final Thoughts
This 2-Minute Microwave Lime Cheesecake is a small marvel, a testament to the fact that you don’t need hours in the kitchen to create something truly delightful. It’s perfect for those moments when you crave a little bit of indulgence without the commitment. Whether it’s a solitary treat after a long day, a sweet surprise for a friend, or just a way to brighten an ordinary afternoon, this speedy slice of sunshine is sure to bring a smile to your face. Give it a try, and prepare to be amazed by the simple magic of your microwave. I’d love to hear about your creations and any delightful variations you discover!