
The Perfect Indulgence: 4-Inch Chocolate Peanut Butter Cheesecake
There’s a particular kind of magic that happens when the creamy tang of cheesecake meets the irresistible duo of chocolate and peanut butter. For me, this flavor combination isn’t just a dessert; it’s a nostalgic gateway to childhood afternoons and celebratory family gatherings. I remember the first time I successfully scaled down a classic cheesecake recipe to fit a petite 4-inch pan. It felt like unlocking a secret culinary code, a way to enjoy that rich, decadent experience without the overwhelming commitment of a full-sized pie. This particular 4-inch Chocolate Peanut Butter Cheesecake, with its crisp pretzel crust and luscious filling, quickly became my go-to for personal treats or when I wanted to share a little bit of joy without overdoing it.
Recipe Overview
- Prep Time: 20 minutes
- Cook Time: 50-60 minutes (plus 20 minutes oven off)
- Total Time: 12 hours 10 minutes (includes chilling overnight)
- Servings: 4
- Yield: 1 (4-inch) cheesecake
- Dietary Type: Vegetarian (can be adapted for vegan with egg substitute)
Ingredients
This recipe yields one delightful 4-inch cheesecake, perfect for individual indulgence or sharing with a select few. The magic lies in the balance of textures and flavors, from the salty crunch of the pretzel crust to the smooth, rich filling and the sweet, glossy topping.
For the Pretzel Crust:
- 1/2 cup crushed pretzel
- 2 tablespoons butter, melted
For the Filling:
- 6 ounces cream cheese, softened
- 2 1/2 tablespoons brown sugar
- 3/4 teaspoon cornstarch
- 1/4 cup chocolate chips, melted
- 3 tablespoons peanut butter
- 4 tablespoons egg substitute (or 2 large eggs if not keeping it vegetarian)
- 1/4 teaspoon vanilla extract
- 3 teaspoons peanuts (optional, for added crunch and flavor)
For the Topping:
- 4 tablespoons white chocolate chips
- 1 1/4 teaspoons peanut butter
- 1 teaspoon chocolate, melted
Equipment Needed
To create this miniature masterpiece, you’ll want to have the following on hand:
- One 4-inch springform pan (or a 4 1/2 inch pan if that’s what you have)
- A medium bowl for the crust
- A large bowl for the filling
- An electric mixer (handheld or stand mixer)
- A small saucepan for melting chocolate
- A knife for releasing the crust edge
- A cooling rack
- An oven
Instructions
Creating this 4-inch Chocolate Peanut Butter Cheesecake is a rewarding process, with each step building upon the last to create a truly exquisite dessert.
- Prepare the Crust: In a medium bowl, combine the crushed pretzel and melted butter. Stir until the pretzel crumbs are evenly moistened. Press this mixture firmly and evenly into the bottom of your 4-inch springform pan.
- Begin the Filling: In a large bowl, combine the softened cream cheese, brown sugar, and cornstarch. Using your electric mixer, beat these ingredients until they are smooth and well combined, ensuring there are no lumps.
- Incorporate Flavors: Now, beat in the melted chocolate chips and peanut butter. Continue to beat until the mixture is uniform.
- Add Wet Ingredients: Gradually beat in the egg substitute (or eggs), and then the vanilla extract. Ensure you beat well after each addition to fully incorporate each ingredient into the smooth filling.
- Optional Peanuts: If you’re opting for the textural contrast, stir in the peanuts at this stage.
- Initial Bake: Place the prepared springform pan into your oven, which has been preheated to 350°F (175°C). Bake for 10 minutes.
- Lower Temperature Bake: After the initial 10 minutes, reduce the oven temperature to 225°F (107°C). Continue to bake for an additional 40-50 minutes. You’ll know the cheesecake is nearing doneness when the center no longer looks wet or shiny. It should have a slight wobble, but not be liquid.
- Prevent Cracking: Once the baking time is complete, carefully remove the cake from the oven. Gently run a knife around the inside edge of the springform pan. This helps to release the cheesecake from the sides, preventing it from cracking as it cools.
- Slow Cooling: Turn the oven off. Return the cheesecake to the still-warm oven for an additional 20 minutes. This slow cooling process is crucial for achieving a perfectly smooth and crack-free surface.
- Overnight Chill: After the oven-off period, remove the cheesecake from the oven and place it on a cooling rack. Allow it to cool completely. Once cooled, chill the cheesecake, uncovered, overnight. This extended chilling time is essential for the cheesecake to set properly and develop its characteristic dense, creamy texture.
- Prepare the Topping: The next day, prepare the topping. In a small saucepan, melt the white chocolate chips and peanut butter together over low heat, stirring constantly until smooth.
- Cool the Topping: Once melted and smooth, remove the topping mixture from the heat and allow it to cool to lukewarm. This is important to prevent it from melting the cheesecake surface.
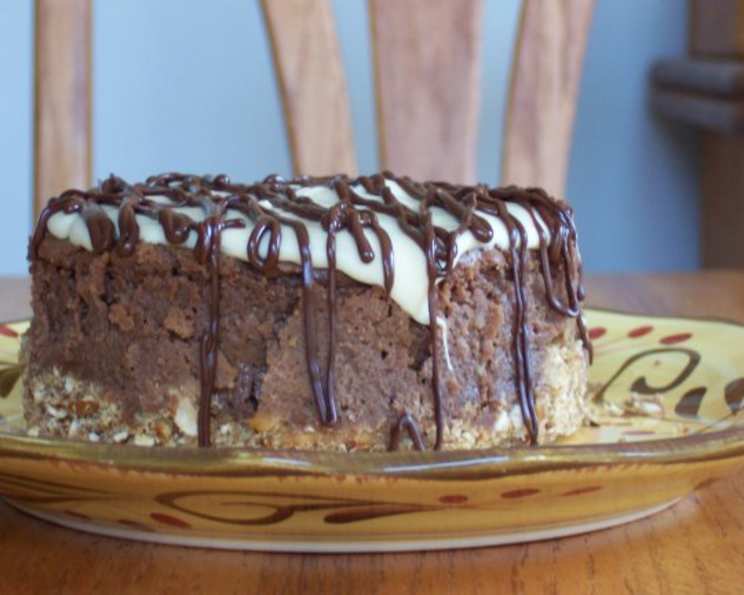
- Apply the Topping: Pour the cooled white chocolate and peanut butter mixture evenly over the chilled cheesecake.
- Garnish: Drizzle strips of melted chocolate over the peanut butter mixture. To create a decorative swirl, using a knife, draw the dull side of the tip across the chocolate in a zig-zag pattern.
- Final Chill: Chill the cheesecake until the topping firms up before serving.
Expert Tips & Tricks
- Pretzel Crushing: For the ideal crust consistency, pulse pretzels in a food processor until they resemble coarse crumbs, but avoid turning them into a fine powder. This will give you a more satisfying texture.
- Cream Cheese Temperature: Ensure your cream cheese is truly at room temperature. Cold cream cheese is the primary culprit for a lumpy cheesecake filling. Leave it out on the counter for at least an hour, or gently warm it in the microwave for a few seconds at a time, being careful not to melt it.
- Melting Chocolate: When melting chocolate chips for the filling and topping, do so gently. Use a double boiler or melt in short bursts in the microwave, stirring between each interval to prevent scorching.
- Overnight Chill is Non-Negotiable: While it’s tempting to rush, the overnight chill is what transforms a good cheesecake into a great one. It allows the flavors to meld and the texture to firm up to its optimal consistency.
Serving & Storage Suggestions
This 4-inch Chocolate Peanut Butter Cheesecake is a perfect personal treat. Serve it chilled, directly from the refrigerator. A delicate dusting of cocoa powder or a few fresh raspberries can add a beautiful visual contrast. Leftovers can be stored, covered tightly with plastic wrap or in an airtight container, in the refrigerator for up to 3 days. Due to its richness, it’s not typically recommended to freeze this cheesecake, as the texture can be compromised upon thawing.
Nutritional Information
(Please note: Nutritional information is an estimate and can vary based on specific ingredients and brands used.)
| Nutrient | Amount per Serving | % Daily Value |
|---|---|---|
| Calories | 547.1 kcal | |
| Calories from Fat | 321 g | |
| Total Fat | 35.7 g | 54% |
| Saturated Fat | 18.8 g | 93% |
| Cholesterol | 63.7 mg | 21% |
| Sodium | 657 mg | 27% |
| Total Carbohydrate | 48.5 g | 16% |
| Dietary Fiber | 2.4 g | 9% |
| Sugars | 22.6 g | 90% |
| Protein | 12.7 g | 25% |
Variations & Substitutions
While this recipe is designed for a classic chocolate peanut butter experience, feel free to explore these variations:
- Nut-Free Crust: If you have nut allergies, substitute the pretzel crust with a graham cracker crust made from crushed graham crackers and melted butter.
- Dark Chocolate Lover: For a more intense chocolate flavor, use dark chocolate chips in the filling.
- Peanut Butter Cup Dreams: For an extra decadent twist, press miniature peanut butter cups into the crust before adding the filling.
- White Chocolate Lover: Increase the white chocolate chips in the topping for an even sweeter, creamier finish.
FAQs
Q: My cheesecake cracked on top. What went wrong?
A: Cracking is often caused by over-baking or rapid temperature changes. Ensure you’re not over-baking, and the slow cooling process (including the time in the turned-off oven) is crucial to prevent this.
Q: Can I use a different size springform pan?
A: This recipe is specifically designed for a 4-inch pan. Using a larger pan will result in a very thin cheesecake, and you’ll need to adjust baking times significantly. For a 9-inch pan, multiply this recipe by 4.
Q: What is the purpose of the cornstarch in the filling?
A: Cornstarch acts as a stabilizer, helping to create a firmer, smoother cheesecake texture without making it gummy.
Q: Can I make this recipe vegan?
A: Yes, you can make this recipe vegan by using a vegan cream cheese, vegan butter, and ensuring your chocolate chips are dairy-free. The egg substitute is already included, making it adaptable.
Q: How do I know when the cheesecake is truly “set”?
A: A properly set cheesecake will have a slight wobble in the very center when gently shaken, but the edges should be firm. It will continue to set up as it chills overnight.
Final Thoughts
This 4-Inch Chocolate Peanut Butter Cheesecake is more than just a dessert; it’s a little slice of happiness, a testament to the fact that sometimes, small things pack the biggest flavor punch. It’s perfect for those moments when you crave something special, a personal indulgence that feels both luxurious and comforting. I encourage you to give this recipe a try, savor each creamy, chocolatey, peanut buttery bite, and perhaps share a mini cheesecake (or two!) with someone special. I’d love to hear about your creations!