
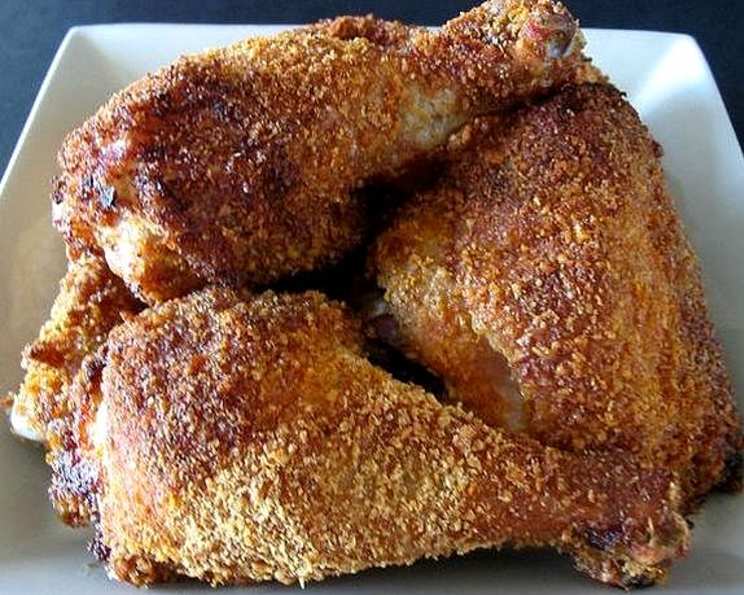
Kittencal’s Crispy Coating Mix for Moist Oven Baked Chicken
There are some recipes that become treasured heirlooms, passed down through generations or discovered serendipitously and immediately elevated to essential status in your culinary repertoire. For me, this Crispy Coating Mix for Moist Oven Baked Chicken falls into that latter category. I remember the first time I encountered a version of this dish – it was a potluck, and among the usual suspects, there was a platter of chicken pieces that defied all expectations. Each bite offered a shatteringly crisp exterior, yielding to incredibly juicy, tender meat. It was a revelation, a testament to the magic that can happen when simple ingredients are combined with a touch of genius. I became obsessed, determined to uncover the secret, and through my own kitchen experiments, I refined it to the absolute perfection I present to you today.
Recipe Overview
- Prep Time: 15 minutes
- Cook Time: 45 minutes
- Total Time: 60 minutes
- Servings: 8
- Yield: 2 whole chickens, cut into pieces
- Dietary Type: Not specified
Ingredients
This recipe relies on a few key components to achieve its signature crispness and moisture. It’s crucial to use the specified brands and types for the best results.
- 1 package (3/4 cup) Shake ‘n Bake Southern Fried coating mix: This is the backbone of our crispy coating. Trust me, I’ve experimented extensively, and the Southern Fried flavor from Shake ‘n Bake delivers an unparalleled taste and texture.
- 1 1/2 cups Corn Flake Crumbs: Please, for the love of all that is crispy, use the ready-made boxed kind. These crumbs have the perfect texture and seasoning already integrated. Avoid crushing your own cornflakes at home; the result won’t be the same.
- 2 teaspoons Seasoning Salt: Again, stick with seasoning salt. It brings a depth of flavor that plain salt just can’t replicate.
- 2 teaspoons Garlic Powder: This adds a robust aromatic foundation. Feel free to use a little less if you prefer a milder garlic presence, but the full amount is wonderfully savory.
- 1 tablespoon Onion Powder: A sweet and pungent counterpoint to the garlic, this powder is essential for a well-rounded flavor profile.
- 1 1/2 teaspoons Fresh Ground Black Pepper: Freshly ground pepper offers a vibrant bite that elevates all the other seasonings.
- 2 whole chickens, cut into pieces (about 3 1/2 pounds each): You’ll want about 7 pounds of chicken in total. The bone-in, skin-on pieces are key to retaining that incredible moisture.
Equipment Needed
- A large baking sheet (approximately 15 inches)
- Aluminum foil
- Non-stick cooking spray
- A small bowl or large resealable plastic bag (the one included with the coating mix is ideal)
- Towel or oven mitts for draining
Instructions
The beauty of this recipe lies in its simplicity, allowing even novice cooks to achieve remarkable results. Follow these steps carefully, and you’ll be rewarded with chicken that’s a showstopper.
-
Prepare the Chicken: Begin by washing the chicken pieces under cold water. This step is crucial not just for hygiene but also to ensure the chicken surfaces are slightly moist. This moisture is what allows the coating to adhere beautifully, forming that signature crispy crust. After washing, gently set the chicken pieces aside, allowing any excess surface water to drain naturally.
-
Combine the Coating Mix: Locate the plastic mixing bag that typically comes with your Shake ‘n Bake coating mix. If you don’t have one, a large resealable plastic bag will work just as well. Into this bag, combine all the dry ingredients: the Shake ‘n Bake Southern Fried coating mix, the corn flake crumbs, seasoning salt, garlic powder, onion powder, and fresh ground black pepper. Shake the bag thoroughly to ensure all the ingredients are evenly distributed and well-mixed. You want a uniform blend of flavors and textures.
-
Preheat the Oven and Prepare the Baking Sheet: Now, it’s time to get your oven ready. Set your oven to 425°F (218°C). For optimal crisping, we’ll be using the lowest-bottom position for the oven rack. This allows the heat to circulate effectively around the chicken pieces from below. Next, line a large 15-inch baking sheet with aluminum foil. This makes for incredibly easy cleanup. Once lined, spray the foil generously with non-stick cooking spray. This prevents the chicken from sticking and further aids in achieving a crisp bottom.
-
Coat the Chicken Pieces: Take one piece of chicken at a time and place it into the prepared plastic bag with the coating mixture. Shake the bag gently but thoroughly, ensuring each piece of chicken is coated evenly on all sides. You want a thick, consistent layer of the crispy mixture. Once coated, carefully place the chicken piece onto the prepared baking sheet, arranging it so that the pieces are not touching each other to allow for even cooking and crisping.
-
Repeat and Bake: Repeat the coating process with the remaining chicken pieces. Once all the chicken is coated and arranged on the baking sheet, it’s time for the oven. Bake for 45 minutes.
- Important Note on Baking Time: The exact baking time can vary slightly depending on your oven and the size of your chicken pieces. If you find that the backs are still attached to the legs on some pieces, you might need to bake for an additional 5 minutes to ensure they are cooked through.
-
Managing Juices for Maximum Crispness: Throughout the baking process, you might notice that some rendered chicken juices and fat accumulate at the bottom of the baking sheet. This is perfectly normal, especially if you are using chicken that was previously frozen and thawed, as it might still retain some moisture. To ensure maximum crispiness, about halfway through the baking time, you can carefully remove the baking sheet from the oven. You can do this by holding it over your sink (using a towel or oven mitts for safety) and gently tilting it to drain off any excess liquid. Do not remove the chicken from the pan and pour it into the sink! Simply drain the liquid. Then, place the baking sheet back into the oven to finish baking. The less liquid in the bottom of the pan, the crispier your chicken will be.
-
Resting for Moisture: Once the chicken is baked to perfection, resist the urge to serve it immediately. Let the chicken rest on the baking sheet for a few minutes after removing it from the oven. This resting period allows the juices to redistribute throughout the meat, resulting in an even more moist and tender final product. The chicken will continue to cook slightly from its residual heat.
Expert Tips & Tricks
- Don’t Overcrowd the Pan: For truly crispy chicken, ensure there’s ample space between each piece on the baking sheet. This allows hot air to circulate freely, promoting even browning and a superior crunch.
- Temperature is Key: Make sure your oven is accurately preheated to 425°F (218°C). An oven thermometer can be a valuable tool to ensure your oven is calibrated correctly.
- The Bag Method is Your Friend: The plastic bag method for coating isn’t just for convenience; it minimizes mess and ensures a truly even distribution of the crispy coating, which is paramount for that perfect crunch.
- Experiment with Heat: If you enjoy a bit of a kick, consider adding a pinch of cayenne pepper or a dash of hot sauce to the dry coating mix for a spicier rendition.
Serving & Storage Suggestions
This crispy chicken is a versatile star, perfect for family dinners, casual gatherings, or even as a delicious addition to salads or sandwiches. Serve it piping hot, straight from the oven, perhaps with a side of your favorite recipe #145064 (as suggested by the original creator) for an irresistible drizzle. It pairs wonderfully with classic comfort food sides like mashed potatoes, coleslaw, or a fresh green salad.
Leftovers can be stored in an airtight container in the refrigerator for up to 3 to 4 days. While the crispiness might diminish slightly upon refrigeration, the chicken will remain incredibly moist. To reheat, the oven is your best bet for restoring some of that coveted crispness. Place the chicken on a baking sheet and warm it in a preheated oven at around 350°F (175°C) for about 10-15 minutes, or until heated through. Avoid using the microwave if crispiness is a priority, as it tends to make the coating soft.
Nutritional Information
Please note: Nutritional information is an estimate and can vary based on specific ingredients used and portion sizes.
| Nutrient | Amount per Serving (approx.) | % Daily Value (approx.) |
|---|---|---|
| Calories | 752.4 kcal | N/A |
| Calories from Fat | 477 g | N/A |
| Total Fat | 53 g | 63 % |
| Saturated Fat | 15.2 g | 75 % |
| Cholesterol | 243.8 mg | 81 % |
| Sodium | 267.2 mg | 11 % |
| Total Carbohydrate | 7.3 g | 2 % |
| Dietary Fiber | 0.6 g | 2 % |
| Sugars | 0.7 g | 2 % |
| Protein | 58.1 g | 116 % |
Variations & Substitutions
While this recipe is designed for optimal results with the specified ingredients, here are a few ideas for variation if needed:
- Gluten-Free Option: For a gluten-free version, ensure your Shake ‘n Bake is certified gluten-free, and substitute the corn flake crumbs with gluten-free crushed cereal or gluten-free breadcrumbs.
- Spicy Kick: As mentioned in the tips, adding a pinch of cayenne pepper or chili powder to the dry mix can transform this into a spicy coated chicken.
- Herbaceous Notes: For a different flavor profile, consider adding dried herbs like thyme, rosemary, or oregano to the dry coating mixture.
FAQs
Q: Why is it important to use only Shake and Bake Southern Fried flavor and boxed cornflake crumbs?
A: These specific ingredients have been tested and refined by the recipe creator to provide the ideal texture, flavor, and ability to crisp up perfectly in the oven. Other brands or flavors may yield different results.
Q: Can I use boneless, skinless chicken pieces?
A: While you can, this recipe is specifically designed for bone-in, skin-on chicken. The bones and skin contribute significantly to the moisture and overall flavor of the final dish.
Q: How can I ensure the chicken is fully cooked?
A: The chicken is cooked through when the internal temperature reaches 165°F (74°C) in the thickest part of the meat, avoiding the bone. The juices should also run clear when pierced.
Q: Why bake the chicken at 425°F?
A: The high temperature is essential for achieving that signature crispy coating quickly, while the internal temperature of the chicken cooks through without drying out.
Q: What if I don’t have a 15-inch baking sheet?
A: You can use a smaller baking sheet, but you may need to bake the chicken in batches to avoid overcrowding. Alternatively, use two smaller sheets.
Final Thoughts
There’s an undeniable satisfaction that comes from creating a truly spectacular meal with seemingly simple ingredients. This Kittencal’s Crispy Coating Mix for Moist Oven Baked Chicken is a testament to that. It’s a recipe that delivers consistently, proving that comfort food doesn’t have to be complicated. I encourage you to gather these few key ingredients, preheat your oven, and experience the magic for yourself. The aroma alone will fill your home with warmth, and the taste will leave you wondering why you ever settled for anything less. Share it with loved ones, savor each perfectly crisp bite, and know that you’ve unlocked a secret to truly exceptional oven-baked chicken.