
Kotopita: A Golden Embrace of Phyllo and Fragrant Chicken
The aroma of baking phyllo, mingling with the warm spices of cinnamon and nutmeg, always transports me back to my yiayia’s (grandmother’s) kitchen. Even before I could properly wield a knife, I’d watch, mesmerized, as she’d delicately layer those impossibly thin sheets of dough, each one brushed with golden butter, creating a canvas for her delicious chicken filling. Kotopita, for me, isn’t just a pie; it’s a memory, a hug, a taste of home that warms me from the inside out. This dish, a staple in Greek households, is a testament to how simple, honest ingredients, when treated with respect and love, can create something truly extraordinary. It’s a comforting centerpiece that’s perfect for family gatherings or a satisfying solo meal.
Recipe Overview
- Prep Time: 1 hour 10 minutes
- Cook Time: 40 minutes
- Total Time: 1 hour 50 minutes
- Servings: 8-10
- Yield: 1 pie
- Dietary Type: Poultry, Dairy (optional cheese substitution)
Ingredients
For the Heart of the Pie:
- 3 lbs boneless chicken breasts, poached, shredded, and set aside
- 1/2 cup olive oil
- 3 large onions, diced
- 3 leeks, white parts only, chopped
- 1/2 teaspoon cinnamon
- 1/2 teaspoon nutmeg
- 1/4 cup long grain rice, uncooked
- 2 teaspoons dried mint
- 1/2 cup golden raisins
- 1/2 cup grated kefalotyri or 1/2 cup parmesan cheese
- 5 eggs, lightly beaten
- Salt & freshly ground black pepper, to taste
For the Golden Crust:
- Salted butter, melted
- Olive oil (mixed with melted butter)
- Phyllo pastry sheets
Equipment Needed
- Large sauté pan
- Large mixing bowl
- 9″x13″ baking pan
- Pastry brush
- Measuring cups and spoons
- Sharp knife and cutting board
Instructions
- Prepare the Aromatic Base: Begin by heating the olive oil in a large sauté pan over medium-high heat. Add the diced onions and chopped leeks. Sauté these aromatics, stirring occasionally, until the onions become translucent and the leeks are tender. This process should take approximately 10 minutes, allowing their natural sweetness to develop without browning.
- Infuse with Spices and Grains: To the sautéed onions and leeks, add the cinnamon, nutmeg, uncooked long grain rice, dried mint, and golden raisins. Stir everything together to ensure the spices are well distributed and coat the ingredients.
- Cool the Mixture: Remove the sauté pan from the heat. Allow the aromatic mixture to cool slightly. This step is crucial to prevent the eggs from scrambling when they are added later.
- Assemble the Filling: In a large mixing bowl, combine the shredded chicken, lightly beaten eggs, and grated kefalotyri or parmesan cheese. Mix these ingredients until they are thoroughly combined.
- Incorporate the Aromatics: Add the cooled onion and leek mixture to the chicken and egg mixture. Mix everything together very well, ensuring an even distribution of all the flavors and textures.
- Season to Perfection: Taste the filling and season generously with salt and freshly ground black pepper. Remember that the phyllo can be a bit bland, so ensure the filling is well-seasoned.
- Preheat the Oven: Preheat your oven to 350°F (175°C). This moderate temperature is ideal for baking the phyllo to a beautiful golden crisp without burning.
- Prepare the Baking Pan: Lightly grease a 9″x13″ baking pan. This will prevent the bottom layer of phyllo from sticking.
- Layer the Phyllo Base: Carefully unroll your phyllo pastry sheets. Place a layer of the phyllo sheets on the bottom of the prepared pan. It’s perfectly fine if they overlap or extend slightly over the sides; you can trim them later if desired.
- Brush with Fat: Using a pastry brush, generously brush the phyllo sheets with the melted butter and olive oil mixture. This fat is essential for creating the signature flaky, golden layers of the kotopita.
- Add the Chicken Mixture: Spread the prepared chicken mixture evenly over the layered and buttered phyllo in the baking pan. Ensure the filling is distributed in a uniform layer to promote even baking.
- Top with Phyllo: Carefully place another layer of phyllo pastry sheets on top of the chicken mixture. Continue to layer the phyllo, brushing each layer with the butter and olive oil mixture until you have used all the phyllo or achieved a desired thickness. You can fold in the edges of the top layers to create a neat border.
- Bake to Golden Perfection: Place the baking pan in the preheated oven. Bake for 40 minutes, or until the top layer of phyllo is a beautiful, deep golden brown and the filling is set. Keep an eye on the pie during the last 10-15 minutes of baking; if the top is browning too quickly, you can loosely tent it with foil.
- Rest Before Serving: Once baked, remove the kotopita from the oven. Allow it to rest for at least 10-15 minutes before slicing and serving. This resting period allows the filling to set completely, making it easier to cut and serve clean slices.
Expert Tips & Tricks
- Phyllo Handling: Phyllo dough dries out very quickly. Keep the unused sheets covered with a damp (not wet) kitchen towel while you work. Work efficiently and have your butter mixture ready.
- Poaching Chicken: For the most tender and flavorful chicken, poach the chicken breasts gently in lightly salted water with a bay leaf and a few peppercorns until just cooked through. Avoid overcooking, which can make the shredded chicken dry.
- Rice Absorption: The small amount of uncooked rice in the filling acts as a binder, absorbing some of the moisture from the chicken and vegetables and helping to create a cohesive filling.
- Cheese Choice: Kefalotyri is a traditional Greek hard cheese with a sharp, salty flavor that complements the chicken beautifully. If you can’t find it, good quality Parmesan or even Pecorino Romano can be excellent substitutes.
- Even Baking: To ensure your kotopita bakes evenly, make sure the oven temperature is accurate and avoid overcrowding the oven with other dishes. If your oven has hot spots, you might need to rotate the pan halfway through baking.
Serving & Storage Suggestions
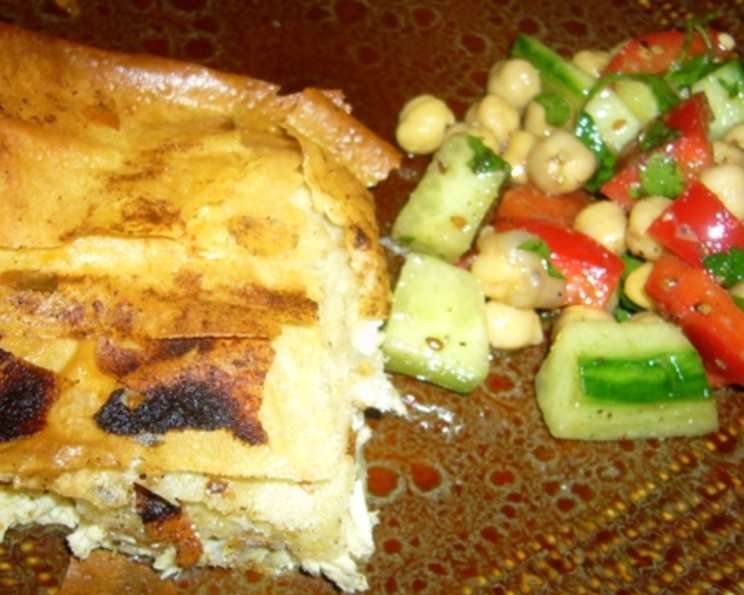
Kotopita is wonderfully versatile. It can be served warm as a main course, alongside a crisp Greek salad dressed with lemon and olive oil. It also makes a fantastic appetizer, cut into smaller squares or triangles. For a heartier meal, pair it with a dollop of plain Greek yogurt or tzatziki.
Leftovers can be stored in an airtight container in the refrigerator for up to 3-4 days. Reheat individual portions in a moderate oven (around 300°F/150°C) until warmed through, which helps to re-crisp the phyllo. For longer storage, the baked and cooled pie can be frozen, wrapped tightly, for up to 2 months. Thaw overnight in the refrigerator before reheating.
Nutritional Information
| Nutrient | Amount per Serving | % Daily Value |
|---|---|---|
| Calories | 552.1 kcal | |
| Calories from Fat | 293 kcal | |
| Total Fat | 32.6 g | 50% |
| Saturated Fat | 7.5 g | 37% |
| Cholesterol | 241.2 mg | 80% |
| Sodium | 161.5 mg | 6% |
| Total Carbohydrate | 22.7 g | 7% |
| Dietary Fiber | 2 g | 7% |
| Sugars | 9.4 g | 37% |
| Protein | 41.2 g | 82% |
Note: Nutritional information is an estimate and can vary based on specific ingredients and portion sizes.
Variations & Substitutions
While this recipe is wonderfully classic, there’s always room for creative interpretation! For a lighter version, you could reduce the amount of butter used for brushing the phyllo or opt for a cooking spray. If you prefer a spicier kick, consider adding a pinch of red pepper flakes to the onion and leek mixture. Some families also enjoy adding a handful of chopped fresh parsley or dill to the filling for an extra burst of freshness. For those seeking a vegetarian option, a finely chopped mixture of mushrooms, spinach, and feta cheese could be a delightful substitute for the chicken.
FAQs
Q: Can I make kotopita ahead of time?
A: Yes, you can prepare the filling a day in advance and store it, covered, in the refrigerator. You can also assemble the entire pie and refrigerate it, unbaked, for a few hours before baking. If baking from chilled, you might need to add a few extra minutes to the baking time.
Q: My phyllo dough is tearing, what should I do?
A: This is a common issue! Work with phyllo dough in a slightly cooler environment if possible. Ensure your hands are dry and work gently. Overlapping layers can help camouflage minor tears. Don’t strive for perfection; the rustic charm is part of its appeal!
Q: Can I use pre-cooked chicken like rotisserie chicken?
A: Absolutely! Rotisserie chicken can be a great time-saver. Ensure it’s shredded and seasoned appropriately before adding it to the filling. You might need to adjust the salt in the filling slightly depending on the seasoning of the rotisserie chicken.
Q: What if I don’t have kefalotyri cheese?
A: As mentioned in the ingredients, good quality Parmesan cheese is an excellent substitute. A sharp, aged cheddar or even a blend of Italian hard cheeses could also work, though they will impart a slightly different flavor profile.
Q: How can I make the top of my kotopita crispier?
A: Ensure you brush each layer of phyllo generously with the butter and olive oil mixture. During the last 10-15 minutes of baking, you can increase the oven temperature slightly to 375°F (190°C) or use the broiler for a minute or two, watching very carefully to prevent burning.
Final Thoughts
Kotopita is a dish that truly embodies the warmth and generosity of Greek cuisine. It’s a labor of love, from the patient layering of phyllo to the fragrant simmering of the filling. Each bite is a symphony of textures – the crisp, golden pastry giving way to the savory, spiced chicken filling. Whether you’re a seasoned cook or just starting your culinary journey, I wholeheartedly encourage you to try your hand at making this magnificent pie. It’s a dish that’s sure to impress your guests and become a cherished part of your own culinary repertoire. Serve it with pride, and savor every delicious moment.