
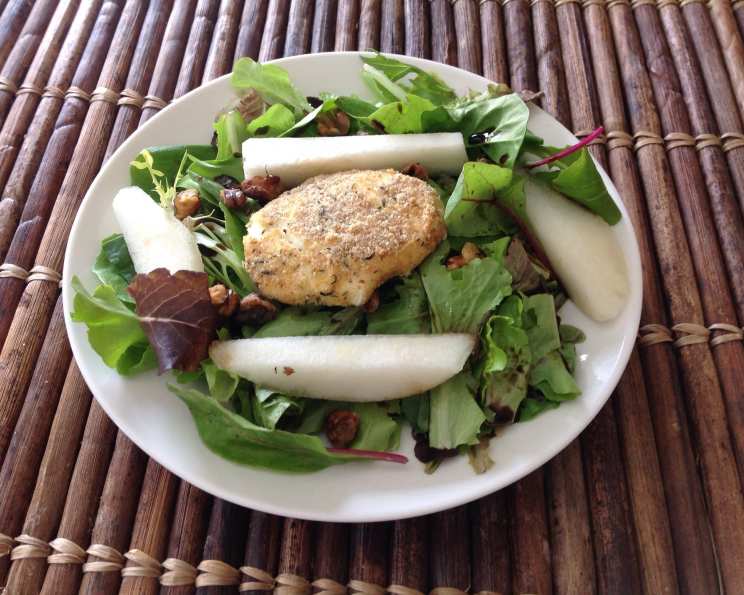
Warm Goat Cheese Salad with Pear: A Symphony of Flavors and Textures
There are some dishes that, at first glance, seem deceptively simple. A salad, perhaps, or a quick weeknight meal. But when you delve deeper, when you taste and experience it, you realize it’s a carefully orchestrated dance of complementary ingredients, a testament to the magic that can happen with just a few thoughtful additions. This Warm Goat Cheese Salad with Pear is precisely that kind of dish. I first encountered a variation of this in a cookbook that aimed to lighten up beloved restaurant classics, and it immediately captured my imagination. The idea of warm, creamy goat cheese melting into crisp greens, punctuated by the sweet juiciness of pear and the satisfying crunch of toasted walnuts, was simply irresistible. It’s the kind of salad that elevates a simple meal into something truly special, a delightful balance of earthy, sweet, tangy, and savory notes that leaves you feeling both satisfied and surprisingly light.
Recipe Overview
- Prep Time: 15 minutes
- Cook Time: 10 minutes (plus 5 minutes for nuts)
- Total Time: 30 minutes
- Servings: 4
- Yield: 4 individual salads
- Dietary Type: Vegetarian
Ingredients
This recipe is designed to be straightforward, allowing the quality of each ingredient to shine through. The key is to use fresh, vibrant produce and good quality goat cheese.
- 4 ounces goat cheese (log): Look for a fresh, unripened goat cheese log. Its creamy texture is essential for this preparation. If your log is a bit soft and crumbles easily, don’t worry; we’ll reshape it.
- 1 cup breadcrumbs: Panko breadcrumbs work beautifully here, providing an extra crispiness, but regular dried breadcrumbs will also suffice.
- 1 teaspoon dried thyme: The earthy aroma of thyme is a perfect complement to goat cheese. If you don’t have thyme, you can substitute with an equal amount of dried Italian seasonings.
- Salt: To taste.
- Pepper: Freshly ground black pepper is always best for its pungent kick.
- 1 egg, lightly beaten: This will act as the binder for the breadcrumbs.
- 1/4 cup walnuts: Toasted to perfection, these add a delightful nutty crunch and depth of flavor.
- 16 cups mixed salad greens (or arugula): A generous amount of mixed greens forms the base. Arugula offers a peppery bite that pairs wonderfully with the other components, but a good quality spring mix or even baby spinach would also work.
- 1/4 cup balsamic vinaigrette (or to taste): A good quality balsamic vinaigrette ties all the flavors together. Feel free to adjust the amount to your preference.
- 1 pear, peeled, cored, and sliced: Choose a firm but ripe pear, such as Anjou or Bosc. The sweetness and slight crispness of the pear offer a refreshing counterpoint to the warm cheese.
Equipment Needed
While this recipe doesn’t require specialized equipment, having these on hand will make the process smoother:
- Small bowl: For beating the egg.
- Shallow dish or plate: For the breadcrumb mixture.
- Baking sheet: For toasting the goat cheese and walnuts.
- Spatula: For carefully transferring the goat cheese.
- Large mixing bowl: For tossing the salad.
- Serving plates: To assemble and present your beautiful salads.
Instructions
Let’s transform these simple ingredients into a culinary delight. The key is in the precise timing and gentle handling of the goat cheese.
-
Prepare the Goat Cheese: Begin by slicing your goat cheese log into four equal 1/2-inch thick disks. If your goat cheese is particularly soft and starts to crumble, don’t fret. Gently use your hands to press and reshape it back into neat disks. This is a common occurrence, especially with softer goat cheeses.
-
Coat the Goat Cheese: On a plate, combine the breadcrumbs with the dried thyme and a pinch each of salt and pepper. Stir well to ensure the seasonings are evenly distributed throughout the breadcrumbs. Next, dip each goat cheese disk into the lightly beaten egg, ensuring it’s fully coated. Then, carefully transfer the egg-coated cheese to the breadcrumb mixture, turning to coat each side evenly. Press gently to help the crumbs adhere.
-
Chill the Goat Cheese: Arrange the coated goat cheese disks on a clean plate. Place this plate in the freezer for 15 minutes. This crucial step will help the goat cheese firm up, preventing it from completely melting into a puddle during baking and ensuring the breading stays intact.
-
Preheat the Oven and Toast Walnuts: While the goat cheese is chilling, preheat your oven to 450 degrees Fahrenheit. Once preheated, place the chilled goat cheese disks on a baking sheet that has been lightly coated with cooking spray. Bake for approximately 10 minutes, or until the cheese is softened and yielding, and the breadcrumbs are beautifully golden brown and toasted. Keep a close eye on them as they can go from perfect to overcooked quite quickly. While the oven is still hot after removing the goat cheese, it’s time to toast your walnuts. Spread the walnuts on the same baking sheet (no need to wash it) and toast them in the oven for 5 minutes. Watch them closely; they can burn easily. Once toasted, remove them from the oven and set aside to cool slightly.
-
Assemble the Salad: In a large mixing bowl, combine the mixed salad greens with the sliced pear. Drizzle with the balsamic vinaigrette and gently toss to coat the greens and pear. Aim for just enough vinaigrette to lightly dress the salad, allowing the natural flavors to come through.
-
Serve: Divide the dressed salad greens and pear mixture evenly among four plates. Carefully place one warm, toasty goat cheese disk atop each salad. Finally, scatter the toasted walnuts over the salads. Serve immediately to enjoy the delightful contrast of warm, melted cheese against the cool, crisp greens and sweet pear.
Expert Tips & Tricks
- Goat Cheese Consistency: If your goat cheese is very soft, chilling it for an additional 5-10 minutes in the freezer before coating can make it easier to handle.
- Breadcrumb Alternatives: For a gluten-free option, use gluten-free breadcrumbs or even finely crushed nuts like almonds or pecans.
- Pear Selection: Avoid overly ripe pears, as they can become mushy. Firmer varieties hold their shape better in the salad.
- Vinaigrette Customization: Feel free to make your own balsamic vinaigrette using good quality olive oil, balsamic vinegar, a touch of Dijon mustard, and honey or maple syrup for sweetness. Adjust the tanginess to your liking.
- Presentation: For an elegant touch, consider adding a few fresh thyme sprigs or a drizzle of balsamic glaze over the finished salad.
Serving & Storage Suggestions
This Warm Goat Cheese Salad with Pear is best enjoyed immediately after preparation, while the goat cheese is warm and melty and the greens are crisp.
- Serving: Serve as a light lunch, an elegant appetizer, or a sophisticated side dish. The visual appeal of the golden-crusted goat cheese nestled among the vibrant greens and sweet pear makes it a showstopper.
- Storage: Due to the warm component, this salad is not ideal for storing leftovers. If you must, you can store the dressed salad greens and pear separately from the goat cheese and walnuts in airtight containers in the refrigerator for up to one day. The goat cheese, once baked, will not have the same texture when reheated.
Nutritional Information
(Please note: Nutritional values are estimates and can vary based on specific ingredient choices and portion sizes.)
| Nutrient | Amount per Serving | % Daily Value |
|---|---|---|
| Calories | 300.2 kcal | |
| Total Fat | 15.9 g | 24% |
| Saturated Fat | 7 g | 35% |
| Cholesterol | 75.3 mg | 25% |
| Sodium | 361.7 mg | 15% |
| Total Carbohydrate | 27.7 g | 9% |
| Dietary Fiber | 3 g | 12% |
| Sugars | 6.8 g | 27% |
| Protein | 12.6 g | 25% |
Variations & Substitutions
- Fruit Swap: Instead of pears, consider sliced apples (like Honeycrisp or Fuji) for a similar sweet crunch, or even fresh figs when in season.
- Nut Alternatives: Pecans, slivered almonds, or even toasted pumpkin seeds can be used in place of walnuts for a different nutty profile.
- Cheese Variations: While goat cheese is traditional, a warm brie or camembert disk would offer a richer, creamier experience.
- Herb Infusion: Incorporate finely chopped fresh rosemary or sage into the breadcrumb coating for an aromatic twist.
- Added Protein: For a heartier meal, consider adding grilled chicken strips or pan-seared salmon to the salad.
FAQs
Q: Can I prepare the goat cheese ahead of time?
A: Yes, you can coat the goat cheese disks and freeze them for up to a week. When ready to serve, bake them directly from frozen, adding a few extra minutes to the baking time.
Q: What if my goat cheese crumbles when I try to slice it?
A: This is perfectly normal! Simply use your hands to gently press the crumbled cheese back together into disk shapes. The breadcrumbs will help hold its form during baking.
Q: Is this salad suitable for a lighter meal?
A: Absolutely. The recipe as written is a lighter take on a classic. You can further lighten it by reducing the amount of vinaigrette used or opting for a lighter, homemade dressing.
Q: How can I make the breading crispier?
A: For extra crispiness, consider using panko breadcrumbs. You can also briefly toast the breadcrumbs in a dry pan before coating the goat cheese, ensuring they are completely dry.
Q: What is the best way to serve this salad?
A: Serve it immediately after baking the goat cheese. The contrast between the warm, melted cheese and the cool, crisp salad is what makes this dish so delightful.
A Culinary Embrace
This Warm Goat Cheese Salad with Pear is more than just a recipe; it’s an experience. It’s a testament to how simple, fresh ingredients, treated with a little care and attention, can come together to create something truly memorable. The interplay of textures – the yielding warmth of the goat cheese, the satisfying crunch of the walnuts, the crispness of the greens – is perfectly balanced by the sweet, juicy pear and the tangy embrace of the vinaigrette. It’s the kind of dish that makes you pause, savor each bite, and appreciate the artistry of food. I encourage you to try this recipe, to experiment with the variations, and to share your culinary journey. Perhaps it will become a go-to for a quick yet elegant lunch, or a surprising star at your next gathering. Enjoy the symphony of flavors!