
Kittencal’s Make-Ahead Stuffing Balls: A Culinary Game Changer
As a chef, I’ve seen my fair share of holiday tables groaning under the weight of traditional fare. Turkey, potatoes, gravy – they’re all classics for a reason. But sometimes, you crave a little innovation, a delightful departure from the expected. That’s where Kittencal’s Make-Ahead Stuffing Balls truly shine. I remember the first time I encountered this recipe; it was a revelation. The sheer genius of transforming a beloved side dish into an individual, perfectly portioned delight, with the added bonus of being able to prep it days in advance, felt like unlocking a holiday secret. It’s that perfect blend of comforting familiarity and clever convenience that makes these stuffing balls an instant favorite, especially when you need to impress without the last-minute kitchen chaos.
Recipe Overview
- Prep Time: 30 minutes
- Cook Time: 20-25 minutes
- Total Time: 45-55 minutes (plus cooling time)
- Servings: 14-16
- Yield: Approximately 14-16 balls
- Dietary Type: Adaptable (vegetarian if using vegetable broth)
Ingredients
For the heart of these delightful stuffing balls, you’ll need a thoughtful selection of pantry staples and fresh produce. The beauty of this recipe lies in its simplicity and the way these humble ingredients come together to create something truly special.
- 4-6 tablespoons butter
- 2 stalks celery, finely diced
- 2 large onions, finely chopped
- 2 tablespoons fresh minced garlic
- 1/8 teaspoon cayenne pepper (optional, to taste)
- 1 (10-ounce) can sliced mushrooms, well drained and chopped
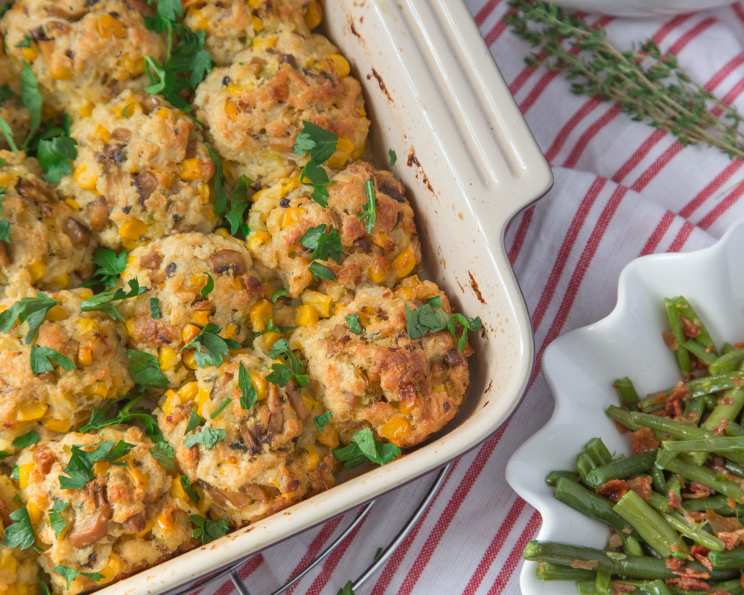
- 1 (14-ounce) can cream-style corn
- 1 (12-ounce) can corn niblets, drained
- 1/2 cup chicken broth (low sodium is a good option)
- 2-4 teaspoons poultry seasoning (or to taste)
- 1/2 – 1 teaspoon seasoning salt (or to taste) or 1/2 – 1 teaspoon white salt (or to taste)
- 1 teaspoon fresh ground black pepper (or to taste)
- 2-4 teaspoons dried parsley (or use chopped fresh)
- 1/4 cup grated Parmesan cheese (optional, for an extra layer of savory depth)
- 3 large eggs, slightly beaten
- 7 cups coarse fresh breadcrumbs, packed (or use 8 cups packed very small bread cubes)
- 1/3 cup melted butter (for drizzling, no substitutions recommended for this step)
Equipment Needed
To bring these stuffing balls to life, a few essential kitchen tools will be your allies:
- A large fry pan or skillet
- A large mixing bowl
- A whisk or spoon for mixing
- A 13 x 9-inch baking pan
- Aluminum foil
- Measuring cups and spoons
- A knife and cutting board for dicing vegetables
Instructions
The process for creating these stuffing balls is remarkably straightforward, designed for maximum flavor with minimum fuss. The make-ahead aspect is truly a game-changer, allowing you to reclaim precious time when you need it most.
- Begin by buttering a 13 x 9-inch baking pan. This initial step ensures that your stuffing balls won’t stick and will release beautifully after baking.
- In a large fry pan or skillet, heat the 4-6 tablespoons of butter over medium-high heat.
- Once the butter is melted and shimmering, add the finely diced celery and finely chopped onions. Cook, stirring occasionally, until they are soft and translucent, but crucially, not browned. This should take approximately 6 minutes. The gentle sautéing brings out their natural sweetness without imparting a bitter flavor.
- Add the fresh minced garlic to the pan and cook for another 2 minutes, stirring constantly. Be mindful not to burn the garlic, as this can lead to an unpleasant taste.
- Next, incorporate the chopped and drained mushrooms, cream-style corn, corn niblets, chicken broth, poultry seasoning, parsley, optional Parmesan cheese, seasoning salt (or white salt), and black pepper. Bring the mixture to a medium boil, then reduce the heat to low and simmer for 10-15 minutes. This simmering period allows the flavors to meld beautifully and the liquids to reduce slightly, concentrating the taste.
- Remove the pan from the heat and transfer the mixture to a large bowl. Allow it to cool for 20-30 minutes. This cooling period is vital, as you want the mixture to be just warm enough so that when you add the eggs, they don’t scramble.
- Once cooled to a manageable temperature, add the slightly beaten eggs to the mixture and mix well to combine.
- Add the bread crumbs or bread cubes to the bowl. Mix thoroughly to combine everything. This is where using your hands often yields the best results, ensuring every crumb is coated in the savory mixture.
- Taste the mixture and adjust the poultry seasoning, salt, and pepper to your preference. This is your chance to fine-tune the flavor profile.
- At this stage, the mixture can be covered and refrigerated until you are ready to shape the balls. This is a key step in the make-ahead process.
- When you’re ready to form the balls, moisten your hands with a little water. This prevents the mixture from sticking to your fingers. Shape the mixture into golf ball-sized balls. For consistency, an ice cream scoop can be very helpful in portioning the mixture. If the mixture seems too wet to hold its shape, you can add a few more breadcrumbs as needed, just enough to help the balls hold together.
- Transfer the shaped balls to the prepared buttered 13 x 9-inch casserole dish. At this point, they can be covered and refrigerated again until you are ready to bake.
- When you are ready to bake, drizzle the 1/3 cup of melted butter evenly over the stuffing balls.
- Cover the baking dish loosely with foil. This helps to steam the balls initially, ensuring they cook through evenly without the exteriors becoming too crisp too soon.
- Bake in a preheated oven at 350°F (175°C) for about 20-25 minutes. It’s important not to overbake these, as they can become dry. They should be heated through and lightly golden.
Expert Tips & Tricks
- Bread is Key: For the best texture, use day-old or slightly dried-out bread. Fresh bread can make the balls too soft. If your bread is very fresh, you can lightly toast the cubes in a low oven before using them.
- Uniformity: Using an ice cream scoop to portion the mixture before rolling into balls will ensure they all cook evenly.
- Moisture Control: If the mixture feels too wet to handle, add a tablespoon of breadcrumbs at a time until it’s manageable. Conversely, if it feels too dry, a tablespoon of broth can help.
- Make-Ahead Masterclass: The true magic of this recipe lies in its make-ahead capabilities. You can prepare the mixture, refrigerate it overnight, and then shape and bake it the next day. Alternatively, you can shape the balls, refrigerate them, and bake them within a day or two. For longer storage, the baked and cooled balls freeze exceptionally well.
Serving & Storage Suggestions
These stuffing balls are a versatile side dish that complements a wide array of main courses. Serve them warm, directly from the oven, nestled alongside your roast turkey, chicken, or ham. They also make a fantastic vegetarian entrée when paired with a robust gravy.
For storage, any leftover stuffing balls can be kept in an airtight container in the refrigerator for up to 3 days. To reheat, you can gently warm them in a low oven (around 300°F / 150°C) until heated through. If you’ve frozen the baked balls, thaw them overnight in the refrigerator and then reheat as described above. They also reheat beautifully from frozen, though you may need to add a few extra minutes to the baking time.
Nutritional Information
| Nutrient | Amount per Serving | % Daily Value |
|---|---|---|
| Calories | 355.1 kcal | |
| Calories from Fat | 108 g | |
| Total Fat | 12.1 g | 18% |
| Saturated Fat | 6 g | 29% |
| Cholesterol | 60.2 mg | 20% |
| Sodium | 665.6 mg | 27% |
| Total Carbohydrate | 52.2 g | 17% |
| Dietary Fiber | 4 g | 16% |
| Sugars | 6.5 g | 26% |
| Protein | 11 g | 21% |
Note: Nutritional values are estimates and may vary based on specific ingredients and preparation methods.
Variations & Substitutions
While this recipe is a classic for a reason, feel free to explore its potential for customization:
- Herbal Infusion: Add a tablespoon or two of finely chopped fresh sage, thyme, or rosemary along with the parsley for a more complex herbal profile.
- Savory Add-ins: For an extra layer of richness, stir in 1/2 cup of finely crumbled cooked sausage meat or crispy cooked bacon bits into the breadcrumb mixture. Chopped cranberries, fresh or dried, can also add a lovely tart counterpoint.
- Vegetarian Option: To make these entirely vegetarian, simply use vegetable broth instead of chicken broth.
- Gluten-Free: For a gluten-free version, use gluten-free breadcrumbs or cubes. Ensure your broth is also gluten-free.
FAQs
Q: Can I make the stuffing mixture a day in advance?
A: Yes, absolutely! You can prepare the entire mixture (up to step 9) and refrigerate it overnight. Bring it to room temperature slightly before shaping the balls.
Q: How do I prevent the stuffing balls from sticking together?
A: Moistening your hands with water before shaping is the most effective way to prevent sticking. A light coating of butter on your hands can also help.
Q: What is the best way to reheat leftovers?
A: For the best results, reheat leftover stuffing balls in a preheated oven at 300°F (150°C) until warmed through. This helps them retain their texture.
Q: Can I freeze these after baking?
A: Yes, the baked and cooled stuffing balls freeze wonderfully. Pack them in an airtight container or freezer bag for up to 2-3 months.
Q: Why are the mushrooms and corn used in cream-style and niblets?
A: The cream-style corn provides a creamy, binding element, while the corn niblets add texture and pops of sweetness throughout the balls.
Final Thoughts
Kittencal’s Make-Ahead Stuffing Balls are more than just a side dish; they are a testament to the power of thoughtful preparation and delicious simplicity. They offer a delightful twist on a holiday classic, freeing up your oven and your time for more cherished moments. Whether you’re hosting a grand feast or seeking a comforting weeknight meal, these little flavor bombs are sure to be a hit. I encourage you to give them a try, perhaps even experiment with a few of the suggested variations, and discover your own favorite way to enjoy them. I’d love to hear about your culinary adventures with these wonderful stuffing balls!