
The Humble Flour Tortilla: A Journey from Simple Ingredients to Culinary Bliss
There are certain smells that instantly transport me back in time, to sun-drenched kitchens and the comforting embrace of home. For me, the aroma of flour tortillas toasting on a hot comal is one of those potent olfactory anchors. I remember my grandmother, her hands dusted with flour, deftly transforming a simple dough into soft, pliant discs that were the foundation of countless memorable meals. These weren’t the stiff, brittle things you sometimes find in plastic packaging; these were alive with flavor, perfectly tender, and infused with the warmth of her love.
Recipe Overview
- Prep Time: 15 minutes
- Cook Time: 30 minutes
- Total Time: 45 minutes
- Servings: 12
- Yield: 12 tortillas
- Dietary Type: Vegetarian
Ingredients
The beauty of a truly great flour tortilla lies in its simplicity. You likely have everything you need in your pantry right now.
- 2 cups all-purpose flour, plus more for dusting
- 1 teaspoon salt
- 3 tablespoons lard or 3 tablespoons vegetable shortening
- ⅔ cup warm water
Equipment Needed
- Large mixing bowl
- Small saucepan
- Measuring cups and spoons
- Rolling pin
- Large, heavy skillet or griddle (a cast-iron skillet is ideal)
- Spatula
- Dinner plates (for serving and keeping tortillas warm)
- Damp kitchen towel
Instructions
Crafting perfect flour tortillas is a rewarding process, and with a little patience and attention to detail, you’ll be turning out warm, fresh tortillas in no time.
- Begin by combining the all-purpose flour and salt in a large mixing bowl. Give them a quick whisk to ensure the salt is evenly distributed throughout the flour.
- In a small saucepan, gently heat the lard (or shortening) and water over low heat. The goal here is just to melt the lard; avoid bringing the mixture to a boil.
- Once the lard has just melted, remove the saucepan from the heat. Let the mixture cool for a few minutes. This prevents the hot liquid from cooking the flour prematurely.
- Gradually stir the warm lard and water mixture into the flour mixture in the bowl.
- Using your hands, or if you have a stand mixer, turn it on low speed, form the ingredients into a dough. Continue mixing until the ingredients are well combined and the sides of the bowl are scraped clean. The resulting dough should be neither overly wet nor dry and crumbly.
- Chef’s Note: If your dough seems too wet, add a little more flour, a tablespoon at a time, until it reaches the desired consistency. Conversely, if it feels too dry and crumbly, add a little more water, again, a tablespoon at a time, until it comes together. For most, this step is usually not necessary if the measurements are accurate.
- Knead the dough briefly. If doing this by hand, turn the dough out onto a lightly floured surface and knead for a minute or two until it’s smooth. If using a stand mixer, continue mixing on low until the dough starts to wrap around the bread hook.
- Place the dough on your lightly floured surface and divide it into 12 equal pieces.
- Roll each piece of dough into a small ball between the palms of your hands. Place these balls on a flat surface, such as a baking sheet.
- Cover the dough balls with a slightly damp kitchen towel. Allow them to rest for at least 10 minutes, or up to 1 ½ hours. This resting period is crucial for making the dough pliable and easier to roll.
- When you’re ready to cook, preheat a large, heavy skillet or griddle over medium-high heat. A well-seasoned cast-iron skillet works wonders for achieving the perfect tortilla.
- Using a rolling pin, roll one of the dough balls into a thin round, about 6-7 inches in diameter. Aim for an even thickness.
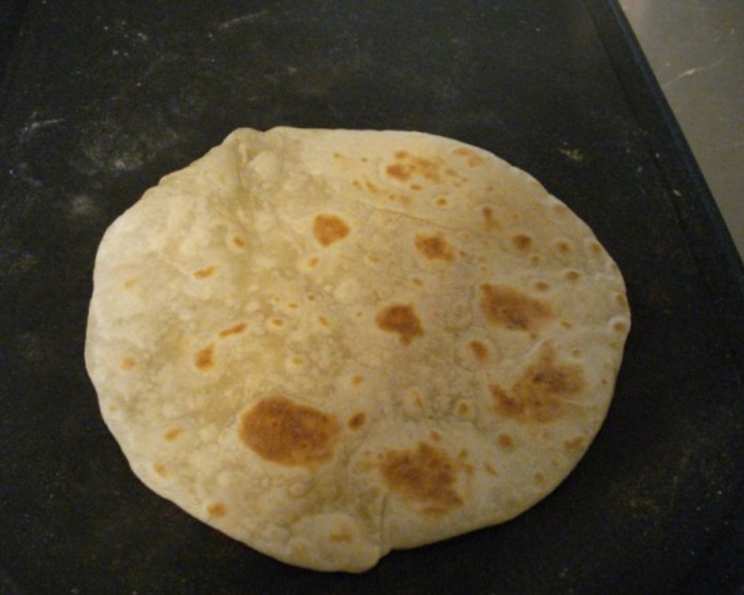
- Place the rolled dough round directly onto the hot cooking surface. Within approximately 30 seconds, you should observe the dough starting to bubble, and small brown spots should begin to form on the bottom.
- Flip the tortilla and cook for another 30 seconds on the other side.
- As you cook, you’ll notice the tortilla will puff up. At this point, you can gently mash them down with a spatula if you wish, though it’s not strictly necessary for the tortilla to be cooked through.
- The tortilla is done once it has turned mostly white with those lovely little brown spots visible on its surface.
- Remove the finished tortilla from the heat and place it on a dinner plate. To keep the tortillas warm and pliable as you continue cooking, use another dinner plate inverted to act as a lid, trapping the steam.
- As you cook the remaining tortillas, you may need to adjust the heat on your skillet as necessary to maintain consistent cooking temperatures.
Expert Tips & Tricks
- The Importance of Rest: Don’t skip the dough resting period! It allows the gluten to relax, making the dough significantly easier to roll thinly without resistance.
- Hot Skillet is Key: A properly preheated skillet is crucial for creating those characteristic bubbles and light char marks that give tortillas their signature flavor and texture. If your skillet isn’t hot enough, your tortillas will be tough.
- Don’t Overcrowd the Pan: Cook only one tortilla at a time. This ensures even heat distribution and allows you to monitor each tortilla’s progress closely.
- Keep Them Covered: The inverted plate trick is a game-changer for keeping tortillas soft and warm. The trapped steam prevents them from drying out, ensuring they remain tender even after you’ve finished cooking.
- Lard vs. Shortening: While lard offers a traditional flavor and texture, vegetable shortening is a perfectly acceptable substitute. Both contribute to the flakiness and tenderness of the tortilla.
Serving & Storage Suggestions
Serve these warm flour tortillas immediately for the best experience. They are incredibly versatile and make an excellent accompaniment to a wide array of dishes, from tacos and enchiladas to simply being smeared with butter and honey.
For storage, keep any leftover tortillas wrapped tightly in plastic wrap or stored in an airtight container at room temperature for up to 1-2 days. They will remain softest when kept this way. If you have more than you can consume within that time, you can refrigerate them for up to a week, though they may become slightly firmer. To freeze, stack them with parchment paper in between each tortilla, then wrap tightly in plastic wrap and foil or place in a freezer-safe bag. They will keep for 2-3 months in the freezer.
To reheat refrigerated or frozen tortillas, you can briefly warm them on a dry skillet over medium heat, in a microwave wrapped in a damp paper towel for about 15-20 seconds, or in a low oven (around 250°F / 120°C) for a few minutes.
Nutritional Information
| Nutrient | Amount per Serving | % Daily Value |
|---|---|---|
| Calories | 105 kcal | |
| Calories from Fat | ||
| Total Fat | 3.4 g | 5% |
| Saturated Fat | 1.3 g | 6% |
| Cholesterol | 3 mg | 1% |
| Sodium | 194.5 mg | 8% |
| Total Carbohydrate | 15.9 g | 5% |
| Dietary Fiber | 0.6 g | 2% |
| Sugars | 0.1 g | 0% |
| Protein | 2.1 g | 4% |
Note: Nutritional values are estimates and can vary based on specific ingredients and preparation methods.
Variations & Substitutions
While the classic flour tortilla is hard to beat, feel free to experiment!
- Whole Wheat Tortillas: For a slightly nuttier flavor and added fiber, substitute half of the all-purpose flour with whole wheat flour. You may need to adjust the water slightly.
- Herb Infused: Finely chop fresh herbs like cilantro or chives and knead them into the dough for a flavorful twist.
- Spicy Kick: Add a pinch of cayenne pepper or finely diced jalapeño to the dough for a touch of heat.
FAQs
Q: Why are my flour tortillas tough?
A: Tough tortillas are often the result of over-kneading the dough or cooking them for too long at too high a heat. Ensure you knead just until the dough comes together and cook each side for a short duration on a medium-high heat.
Q: How do I get my tortillas to puff up?
A: A properly heated skillet and a thin, even dough are key. The steam trapped within the tortilla expands rapidly when exposed to the hot cooking surface, causing it to puff.
Q: Can I make flour tortillas without lard?
A: Absolutely! Vegetable shortening is an excellent substitute, offering a similar tender texture. You can also use other neutral oils, though the texture might be slightly different.
Q: How long do homemade flour tortillas last?
A: Stored properly at room temperature in an airtight container, they are best enjoyed within 1-2 days. Refrigeration extends their life, and freezing is the best option for longer storage.
Q: What’s the difference between a flour tortilla and a corn tortilla?
A: The primary difference lies in the base ingredient: flour tortillas are made with wheat flour, while corn tortillas are made with masa harina (corn flour). This results in distinct textures, flavors, and cooking methods.
Final Thoughts
There’s a profound satisfaction in creating something so fundamental and delicious from scratch. These flour tortillas are more than just a recipe; they’re an invitation to connect with a culinary tradition, to fill your home with an irresistible aroma, and to elevate your everyday meals. Whether you’re rolling them for a simple quesadilla or folding them around your favorite fillings, savor the moment. I encourage you to give this recipe a try, and I’d love to hear about your successes and creations. Perhaps pair them with a vibrant salsa or a hearty stew for a truly authentic experience. Happy cooking!