
Kalamata Olive Bread: A Taste of the Mediterranean Sun
There’s a certain magic that happens when the aroma of freshly baked bread fills a kitchen, and for me, the scent of Kalamata Olive Bread evokes an instant transport to sun-drenched Greek islands. I remember one particularly memorable trip where we stumbled upon a tiny village bakery, its stone walls radiating warmth even on a cool morning. The baker, a woman with kind eyes and flour-dusted hands, pulled out a loaf that was unlike any I’d ever seen – dark, studded with glistening olives, and boasting a crust that promised an explosion of flavor. That loaf, enjoyed with a drizzle of local olive oil and a slab of creamy feta, became a benchmark, a culinary memory I’ve chased ever since. This recipe, adapted from the beloved Panera Bread Cookbook, gets remarkably close to that perfect balance of yeasty tang, salty olive bursts, and a satisfyingly chewy crumb.
Recipe Overview
- Prep Time: 1 hour 30 minutes (including starter fermentation)
- Cook Time: 30-40 minutes
- Total Time: 2 hours 10 minutes (plus cooling)
- Servings: 36 (total from 2 loaves)
- Yield: 2 loaves
- Dietary Type: Contains Wheat
Ingredients
For the Bread Starter:
- 1 cup warm water (95-105°F)
- 2 teaspoons instant yeast
- 1 cup all-purpose flour
For the Bread:
- 2/3 cup warm water (95-105°F)
- 3 tablespoons honey
- 4 teaspoons instant yeast
- 2 ounces vegetable shortening (approximately 1/4 cup plus 1 teaspoon)
- 4 3/4 cups all-purpose flour
- 1 tablespoon salt
- 1 3/4 cups Kalamata olives, pitted
Equipment Needed
- Medium mixing bowl (for starter)
- Stand mixer with dough hook attachment (or a sturdy large bowl for hand kneading)
- Measuring cups and spoons
- Clean kitchen towel or plastic wrap
- Bench scraper or knife (for dividing dough)
- Baking sheets or loaf pans (optional, if not free-forming)
- Sharp knife or lame (for scoring)
- Spray bottle filled with water
- Wire cooling rack
Instructions
-
Creating the Starter: Begin by preparing the bread starter, which will lend a depth of flavor and a better texture to your final loaf. In a medium mixing bowl, combine 1 cup of warm water and 2 teaspoons of instant yeast. Stir gently to ensure the yeast fully dissolves. Next, add 1 cup of all-purpose flour to the bowl. Stir this mixture until all the ingredients are thoroughly incorporated and you have a cohesive, somewhat sticky batter. Cover the bowl with a clean kitchen towel and let it rest and ferment at room temperature for 30 minutes. You should see some signs of activity, like small bubbles forming.
-
Preparing the Dough: While the starter is fermenting, you can move on to the main dough. In the bowl of your stand mixer (or a large mixing bowl if you’re kneading by hand), combine 2/3 cup of warm water, 3 tablespoons of honey, and 4 teaspoons of instant yeast. Stir to dissolve the yeast completely. Add the 2 ounces of vegetable shortening, 4 3/4 cups of all-purpose flour, 1 tablespoon of salt, the prepared bread starter, and the 1 3/4 cups of pitted Kalamata olives.
-
Mixing and Kneading: If using a stand mixer, attach the dough hook. Mix on low speed until the ingredients begin to come together into a shaggy dough. Continue mixing, gradually increasing the speed to medium, until the dough is fully developed. This means it should be smooth, elastic, and pull away cleanly from the sides of the bowl. For hand kneading, turn the dough out onto a lightly floured surface and knead for about 8-10 minutes, or until it reaches the desired smooth and elastic consistency.
-
Dividing the Dough: Once the dough is well-developed, remove it from the mixing bowl. Divide the dough into two equal pieces, each weighing approximately 22 ounces. If you happen to have a little extra dough, you can freeze it for future baking endeavors. Roll each piece of dough into a smooth, tight ball.
-
First Rest (Bulk Fermentation): Place the dough balls on your counter or, if you have them, in proofing baskets. Cover them loosely with a warm, damp cloth. Allow the dough to rest at room temperature for 30 minutes. This brief rest helps the gluten relax, making it easier to shape.
-
Preheating the Oven: While the dough is resting, preheat your oven to 400°F (200°C). Ensure your oven racks are positioned appropriately for baking loaves.
-
Second Rest (Proofing): After the initial 30-minute rest, gently form the dough into your desired loaf shapes. You can either free-form them on a baking sheet lined with parchment paper or place them into greased loaf pans. Once shaped, cover the loaves again with a warm, damp cloth. Let them proof at room temperature for another 30 minutes. During this time, the loaves will puff up slightly.
-
Scoring and Baking: Just before baking, it’s time to score the loaves. Using a very sharp knife or a baker’s lame, make a few shallow cuts across the top of each loaf. This allows the bread to expand evenly in the oven. Lightly spray the surface of the loaves with water. This step helps create a beautiful, crisp crust. Carefully place the loaves into the preheated oven.
-
Baking Time and Doneness: Bake the bread for 30 to 40 minutes. The loaves are done when the crusts are a deep golden brown and a quick tap on the bottom sounds hollow. For an even more precise measure, use an instant-read thermometer; the internal temperature of the bread should register between 190-200°F (88-93°C).
-
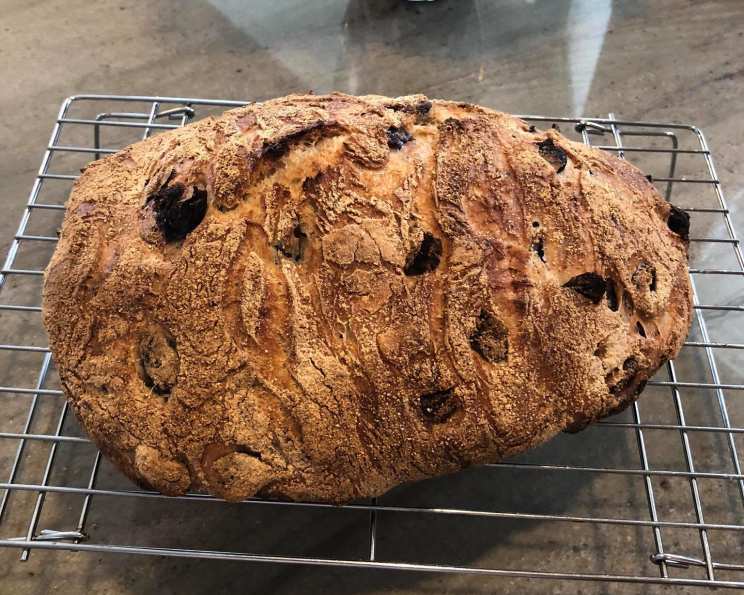
Cooling: Once baked to perfection, immediately remove the bread from the oven. If you baked your loaves in loaf pans, carefully turn them out onto a wire cooling rack. If you free-formed them, they will already be on the baking sheet or parchment, so just transfer them to the cooling rack. Allow the bread to cool for at least 30 minutes before slicing and serving. This cooling period is crucial for the internal structure of the bread to set properly.
Expert Tips & Tricks
- Olive Quality Matters: For the best flavor, use good quality Kalamata olives. Pitting them yourself is ideal, as pre-pitted olives can sometimes be softer and less flavorful. If your olives are particularly salty, you might consider rinsing them briefly before adding them to the dough.
- Dough Hydration: The amount of flour can vary slightly depending on humidity and the specific brand of flour. If your dough feels too sticky after the initial mix, you can add a tablespoon of flour at a time until it’s manageable but still slightly tacky. Conversely, if it feels too stiff, add a teaspoon of water.
- Proofing Environment: A warm, damp cloth is key for proofing. It creates a humid environment that encourages the yeast to work its magic without drying out the dough. You can achieve this by lightly misting the cloth with water.
- Scoring for Success: Don’t be afraid to score your bread! A few confident cuts allow the steam to escape, preventing blowouts and creating a more attractive loaf. A sharp blade is essential for clean cuts.
- Oven Variances: Ovens can differ. Keep an eye on your bread during the last 10 minutes of baking. If it’s browning too quickly, you can loosely tent it with foil.
Serving & Storage Suggestions
This Kalamata Olive Bread is at its absolute peak when served warm, straight from the oven or after its initial cooling period. Slice it generously and enjoy it on its own, or pair it with a quality extra virgin olive oil for dipping. It’s also fantastic alongside a fresh Greek salad, a bowl of hearty lentil soup, or with a selection of Mediterranean cheeses like feta, halloumi, or even a creamy goat cheese.
For storage, once the bread has completely cooled, it can be kept at room temperature, wrapped tightly in plastic wrap or placed in an airtight container, for 2-3 days. The crust will soften over time. If you have more bread than you can consume within this period, it freezes beautifully. Wrap individual loaves or portions tightly in plastic wrap, then place them in a freezer-safe bag. It will keep well in the freezer for up to 3 months. To reheat, thaw at room temperature or warm it gently in a low oven (around 300°F or 150°C) for a few minutes until refreshed.
Nutritional Information
| Nutrient | Amount per Serving | % Daily Value |
|---|---|---|
| Calories | 101.4 kcal | |
| Total Fat | 2.5 g | 3% |
| Saturated Fat | 0.6 g | 2% |
| Cholesterol | 0 mg | 0% |
| Sodium | 251.8 mg | 10% |
| Total Carbohydrate | 17.3 g | 5% |
| Dietary Fiber | 0.9 g | 3% |
| Sugars | 1.5 g | 5% |
| Protein | 2.4 g | 4% |
Note: Nutritional information is an estimate and can vary based on specific ingredients used.
Variations & Substitutions
While this recipe is fantastic as is, there are always ways to put your own spin on it.
- Herbal Infusion: Add a tablespoon or two of finely chopped fresh rosemary or oregano to the dough along with the olives for an extra layer of Mediterranean flavor.
- Cheese Lover’s Dream: For an even richer, more decadent loaf, consider incorporating about 1/2 cup of crumbled feta cheese into the dough along with the olives.
- Whole Wheat Twist: For a slightly heartier bread, you can substitute up to 1 cup of the all-purpose flour with whole wheat flour. Keep in mind that whole wheat flour can absorb more liquid, so you might need to adjust the water content slightly.
- Spicy Kick: If you enjoy a bit of heat, a pinch of red pepper flakes mixed into the dough can add a subtle warmth.
FAQs
Q: Why is my bread starter not bubbling?
A: Ensure your water is the correct temperature (95-105°F) and that your yeast is fresh. If it’s still not active, you might need to discard and start again with new yeast.
Q: My dough is too sticky to handle, what should I do?
A: Lightly flour your hands and work surface. You can also add a tablespoon of all-purpose flour at a time to the dough until it becomes manageable but still slightly tacky.
Q: Can I make this bread without a stand mixer?
A: Absolutely! This dough can be easily kneaded by hand on a lightly floured surface for about 8-10 minutes until smooth and elastic.
Q: Why is my bread crust not crispy?
A: A common reason is insufficient oven heat or steam during baking. Ensure your oven is fully preheated, and the spray of water before baking helps create steam for a crispier crust.
Q: How can I store the bread if I won’t eat it all within a few days?
A: Freeze the cooled bread. Wrap it tightly in plastic wrap, then in a freezer-safe bag, for up to 3 months.
Final Thoughts
There’s an undeniable satisfaction in pulling a loaf of homemade Kalamata Olive Bread from your oven. It’s more than just bread; it’s a vessel for rich, savory flavors that speak of sun-warmed olives and the simple pleasures of good food. This recipe offers a delightful journey into that taste, perfect for sharing with loved ones or savoring with a quiet moment. So, gather your ingredients, embrace the process, and let the irresistible aroma fill your home. I often pair a slice with a glass of crisp white wine or a light rosé, further enhancing the Mediterranean experience. I’d love to hear about your own baking adventures with this flavorful loaf!