
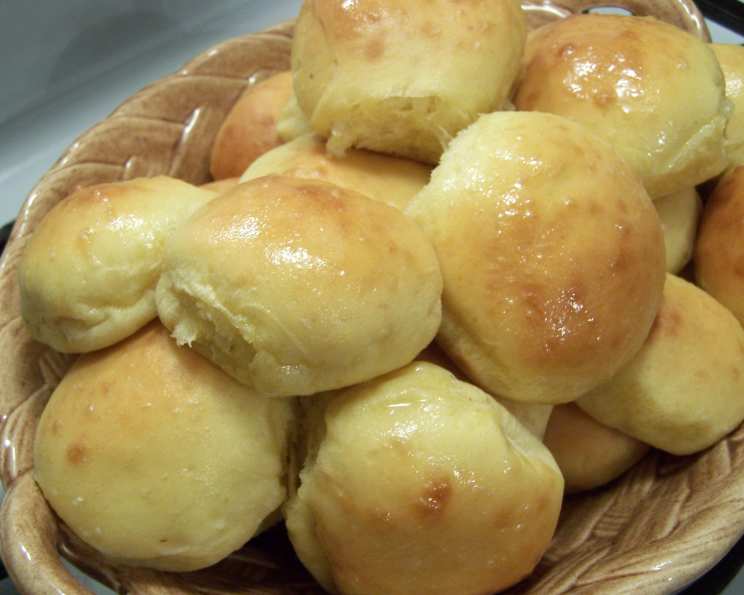
Embrace the Golden Hue: Mastering Winter Squash Dinner Rolls
There’s a certain magic that happens in the kitchen when the air turns crisp and the days grow shorter. It’s a season that calls for warmth, comfort, and the comforting embrace of ingredients that truly shine as the year winds down. For me, nothing encapsulates this feeling quite like the deep, earthy sweetness of winter squash transformed into a delicate, yielding dinner roll. I remember the first time I baked these, the kitchen filling with a subtle, toasty aroma that was both familiar and utterly new. The rich, golden hue of the squash infused the dough, promising a softness and a depth of flavor that store-bought loaves could never replicate. They became an instant holiday staple, a testament to how simple, wholesome ingredients can elevate a humble bread into something truly special.
Recipe Overview
Here are the essential details to get you started on your journey to perfect winter squash dinner rolls:
- Prep Time: Approximately 30 minutes, plus rising time
- Cook Time: 10 to 12 minutes per batch
- Total Time: About 2 hours 10 minutes, including rising
- Servings: 12
- Yields: 2 1/2 dozen rolls
- Dietary Type: Can be adapted to be vegetarian
Ingredients
Gathering your ingredients is the first step to culinary success. For these delightful rolls, you’ll need a few pantry staples alongside the star of the show:
- 4 1⁄2 to 4 3⁄4 cups all-purpose flour (you may not use all of it)
- 1 (1/4 ounce) packet dry yeast
- 1 1⁄2 cups milk
- 2 tablespoons butter or 2 tablespoons shortening
- 2 tablespoons sugar
- 1 teaspoon salt
- 1 large egg
- 1⁄2 cup cooked winter squash (such as Hubbard, butternut, acorn, or delicato) puree
- 3 tablespoons melted butter, for brushing
A Note on Squash: The beauty of these rolls lies in their versatility. Feel free to use any cooked winter squash you have on hand. Ensure it’s pureed to a smooth consistency. If you’re short on time, unsweetened baby food squash puree is an excellent and convenient option.
Equipment Needed
A few essential tools will make the process smoother:
- Large mixing bowl
- Medium saucepan
- Whisk
- Electric mixer (handheld or stand mixer) with dough hook attachment (optional, but helpful)
- Measuring cups and spoons
- Lightly floured surface for kneading
- Oiled bowl
- Baking sheets
- Biscuit cutter or sharp knife
- Pastry brush
Instructions
Follow these steps diligently, and you’ll be rewarded with a batch of the most tender and flavorful dinner rolls imaginable.
- In a large bowl, combine 2 cups of the all-purpose flour and the dry yeast. Give it a quick stir to distribute the yeast.
- In a medium saucepan, gently heat the milk, butter (or shortening), sugar, and salt until the mixture is warm to the touch. Stir constantly until the butter or shortening is completely melted. Be careful not to overheat; you don’t want to scald the milk.
- Pour this warm liquid mixture into the bowl with the flour and yeast.
- Add the egg and the cooked winter squash puree to the bowl.
- Using your mixer (or a sturdy spoon and a lot of elbow grease), beat the mixture at a low speed for 30 seconds, just until everything starts to come together.
- Increase the mixer’s speed to high and beat for 3 minutes. This step is crucial for developing the gluten structure, which will result in beautifully soft and elastic rolls.
- Gradually stir in enough of the remaining all-purpose flour to create a soft dough. The dough should be slightly sticky but should pull away from the sides of the bowl. You might not need all of the flour, or you might need a tiny bit more; aim for that soft, pliable consistency.
- Turn out the dough onto a lightly floured board or clean countertop.
- Knead the dough until it becomes smooth and elastic. This typically takes about 8 to 10 minutes by hand. If you’re using a stand mixer with a dough hook, this will take about 5 to 7 minutes. The dough should spring back when lightly poked.
- Lightly oil a clean bowl. Place the kneaded dough into the oiled bowl, turning it once to coat the surface with oil.
- Cover the bowl loosely with plastic wrap or a clean kitchen towel. Let the dough rise in a warm place until it has doubled in size. This usually takes about 1 hour and 15 minutes.
- Make-Ahead Option: For your convenience, you can refrigerate the dough overnight after the initial rise. Simply punch it down once it has doubled, cover the bowl tightly, and place it in the refrigerator. Let it sit at room temperature for about 30 minutes before proceeding to the next step.
- Once the dough has doubled, punch it down gently to deflate it.
- Let the dough rest for 10 minutes. This brief rest period makes the dough easier to handle.
- Roll out the dough to your desired thickness, about 1/2 to 3/4 inch thick. You can then shape it into individual rolls by hand, or use a biscuit cutter to cut out rounds. Alternatively, you can shape the dough into a log and slice it into individual rolls.
- Place the shaped rolls onto baking sheets, leaving a little space between them.
- Cover the rolls loosely again and let them rise for a second time until they are puffy and nearly doubled, about 30 to 45 minutes.
- While the rolls are on their second rise, preheat your oven to 400 degrees F (200 degrees C).
- Bake the rolls in the preheated oven for 10 to 12 minutes, or until they are golden brown on top and the bottoms are nicely browned as well.
- Remove the rolls from the oven. Immediately brush the tops generously with the melted butter. This adds a wonderful sheen and extra layer of flavor.
- Transfer the rolls to a wire cooling rack to cool slightly before serving.
Expert Tips & Tricks
- The Art of the Rise: A warm, draft-free place is essential for a good dough rise. The top of a slightly warm (but turned off) oven or near a sunny window can be ideal. If your kitchen is particularly cold, you can place the covered bowl in a larger pan filled with warm water.
- Don’t Over-Flour: It’s tempting to add a lot of flour when dough feels sticky, but this can result in dry, tough rolls. Resist the urge! A soft dough is key to tender results.
- Uniformity is Key: When cutting out rolls with a biscuit cutter, press straight down without twisting. Twisting can seal the edges of the dough, preventing them from rising evenly.
- The Overnight Advantage: The overnight refrigerator rise not only saves time on baking day but also develops a deeper flavor in the dough due to the slow fermentation.
Serving & Storage Suggestions
These winter squash dinner rolls are best served warm, fresh from the oven, with a generous slather of butter. They are wonderful companions to any hearty winter meal, from roasted meats and stews to hearty vegetarian dishes.
For storage, once the rolls have completely cooled, they can be kept in an airtight container or a resealable plastic bag at room temperature for up to 2 days. To refresh them, simply warm them gently in a low oven (around 300 degrees F or 150 degrees C) for a few minutes until heated through. For longer storage, they freeze beautifully. Wrap cooled rolls tightly in plastic wrap, then place them in a freezer-safe bag or container for up to 3 months. Thaw at room temperature or reheat directly from frozen in a 350 degrees F (175 degrees C) oven for about 15-20 minutes.
Nutritional Information
(Please note: This is an estimated nutritional breakdown and can vary based on specific ingredients and portion sizes.)
| Nutrient | Amount per Serving | % Daily Value |
|---|---|---|
| Calories | 253.3 | |
| Calories from Fat | ||
| Total Fat | 7.2 g | 11% |
| Saturated Fat | 3 g | 15% |
| Cholesterol | 29.5 mg | 9% |
| Sodium | 236.4 mg | 9% |
| Total Carbohydrate | 40 g | 13% |
| Dietary Fiber | 1.5 g | 5% |
| Sugars | 2.4 g | 9% |
| Protein | 6.7 g | 13% |
Variations & Substitutions
While these rolls are delightful as is, feel free to experiment:
- Herbs and Spices: For a savory twist, add a teaspoon of dried herbs like rosemary or thyme, or a pinch of nutmeg or cinnamon for a subtle sweetness, to the dry ingredients.
- Seed Topping: After the second rise, you can brush the rolls with a little egg wash (1 egg beaten with 1 tablespoon water) and sprinkle with sesame seeds, poppy seeds, or pumpkin seeds for added texture and flavor.
- Richer Dough: For an even richer dough, you can substitute half-and-half for some of the milk.
FAQs
Q: Can I use canned pumpkin puree instead of cooked winter squash?
A: Yes, absolutely! Just be sure to use 100% pure pumpkin puree, not pumpkin pie filling, and ensure it’s unsweetened.
Q: My dough didn’t rise. What could be the problem?
A: The most common culprits are inactive yeast (check the expiration date and ensure it was stored properly), milk that was too hot (which kills the yeast), or a drafty, cold environment.
Q: How do I know when the rolls are fully baked?
A: They should be golden brown on top and the bottoms should also be browned. You can gently tap the bottom of a roll; it should sound hollow.
Q: Can I make these rolls vegan?
A: Yes! Simply substitute the milk with your favorite non-dairy milk (almond, soy, or oat work well) and use vegetable shortening or vegan butter instead of dairy butter.
Q: What’s the best way to reheat leftover rolls?
A: For the best texture, reheat them in a 300-degree F (150-degree C) oven for 5-10 minutes until warmed through.
A Warm Welcome to Your Table
These winter squash dinner rolls are more than just a side dish; they’re a warm invitation to gather, to share, and to savor the simple pleasures of a home-cooked meal. They carry the comforting essence of the season, a testament to the wholesome goodness of nature’s bounty. Bake them for your next family gathering, holiday feast, or simply for a cozy weeknight supper. I encourage you to let the inviting aroma fill your home and to share the joy of these golden, tender delights. May they bring as much warmth and happiness to your table as they have to mine.