
Italian Sprinkle Cookies: A Taste of Nostalgia and Celebration
There’s a certain magic that happens when the scent of almond and lemon extract fills the kitchen, a fragrant promise of something sweet and special. For me, Italian Sprinkle Cookies evoke a vivid memory of my grandmother’s sun-drenched kitchen, the air thick with the aroma of baking and the gentle clinking of her cherished mixing bowls. Every year, as the holidays approached, these cookies were a cornerstone of her festive preparations. Watching her nimble fingers deftly roll the dough into perfect little spheres, her face alight with concentration, was a lesson in patience and love. The final flourish of rainbow sprinkles, scattered with joyful abandon, always felt like the confetti of a miniature celebration, a sweet prelude to the merriment to come.
Recipe Overview
- Prep Time: 20 minutes
- Cook Time: 12 minutes
- Total Time: 32 minutes (plus 24 hours drying time)
- Servings: 72 cookies
- Yield: 72 cookies
- Dietary Type: Nut-based (due to almond extract)
Ingredients
Here’s what you’ll need to create these delightful Italian Sprinkle Cookies:
For the Cookies:
- 6 large eggs
- 5 cups all-purpose flour
- 2 cups confectioners’ sugar
- 2 tablespoons baking powder (plus an additional 1 1/2 teaspoons baking powder)
- 1 cup shortening, melted
- 1 tablespoon almond extract
- 1 1⁄2 teaspoons lemon extract
For the Glaze:
- 1⁄2 cup milk, warm
- 1 teaspoon almond extract
- 1 teaspoon vanilla extract
- 1 (1 lb) box confectioners’ sugar
For Decoration:
- Colored sprinkles (jimmies)
Equipment Needed
- Heavy-duty electric mixer (stand mixer or hand mixer)
- Large mixing bowls (at least two)
- Measuring cups and spoons
- Rubber spatula or wooden spoon
- Baking sheets (ungreased)
- Wire cooling racks
- Small bowl for glaze
- Slotted spoon or fingers (for dipping cookies)
Instructions
Crafting these Italian Sprinkle Cookies is a rewarding process, a rhythmic dance of mixing, shaping, and decorating. Follow these steps carefully to achieve that signature texture and delightful flavor.
- Prepare the Eggs: In a heavy-duty electric mixer, fitted with the whisk attachment, beat the 6 large eggs on high speed until they become light and foamy. This process should take approximately 5 minutes. Once ready, set the beaten eggs aside.
- Combine Dry Ingredients and Fats: In a separate, large mixing bowl, stir together the 5 cups of all-purpose flour, the 2 cups of confectioners’ sugar, and the 2 tablespoons of baking powder. Next, gradually add the 1 cup of melted shortening and both the 1 tablespoon of almond extract and the 1 1⁄2 teaspoons of lemon extract. Using a rubber spatula or a wooden spoon, stir until a bead-like texture is formed. This means the mixture will resemble coarse breadcrumbs.
- Incorporate the Eggs: Gradually add the reserved beaten eggs to the dry ingredients. The dough will become quite stiff as you mix. Continue to mix until the ingredients are just combined and a cohesive dough forms. Be careful not to overmix at this stage.
- Shape the Cookies: Roll the dough into 1-inch balls. Aim for consistency in size for even baking.
- Arrange for Baking: Place the dough balls onto ungreased baking sheets. Leave a little space between each cookie, as they will spread slightly during baking.
- Bake to Perfection: Preheat your oven to 350°F (175°C). Bake the cookies for 12 minutes.
- Assess Doneness: The key to these cookies is their texture. The tops of the cookies will not brown, so don’t expect visual cues there. Instead, check the bottoms; they should brown slightly. This indicates they are cooked through.
- Prepare the Glaze: While the cookies are baking or immediately after they come out, prepare the glaze. In a large bowl, combine the 1⁄2 cup of warm milk with the 1 teaspoon of almond extract and the 1 teaspoon of vanilla extract.
- Sweeten the Glaze: Add the 1 lb box of confectioners’ sugar to the milk mixture. Whisk vigorously until all the lumps are dissolved and the glaze is smooth and pourable. You want a consistency that will coat the cookies without being too thin.
- Dip and Glaze: As soon as the cookies are removed from the oven, and while they are still warm, quickly immerse two or three at a time into the prepared glaze. Use a slotted spoon to lift them, allowing excess glaze to drip back into the bowl, or carefully use your fingers if you prefer.
- Drain and Decorate: Place the glazed cookies onto wire racks to drain. Work quickly, as the glaze will begin to set.
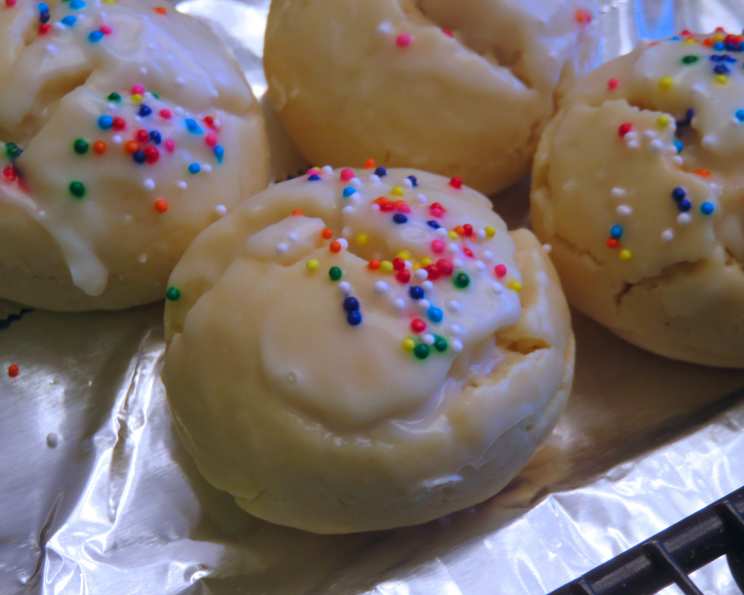
- Add the Sprinkles: Quickly top the still-wet glaze with colored sprinkles. The sprinkles will adhere best when the glaze is fresh.
- Allow to Dry: Let the cookies dry for a full 24 hours before storing them in airtight containers. This drying period is crucial for achieving the perfect chewy texture.
Expert Tips & Tricks
As a chef, I’ve learned that even simple recipes can benefit from a few thoughtful touches. For these Italian Sprinkle Cookies, here are some insights to elevate your baking:
- Egg Quality Matters: Using fresh, high-quality eggs will contribute significantly to the foamy texture when beating.
- Melted Shortening Consistency: Ensure your shortening is fully melted but not hot. If it’s too hot, it can scramble the eggs.
- Dough Stiffness: Don’t be alarmed by the stiff dough. This is intentional and contributes to the cookie’s unique structure. If it feels exceptionally unmanageable, a minute or two more of resting can help.
- Glaze Consistency is Key: If your glaze is too thick, add a tiny bit more warm milk, a teaspoon at a time. If it’s too thin, whisk in a little more confectioners’ sugar. It should be thick enough to coat, but fluid enough to dip easily.
- Speed is of the Essence: The glazing and sprinkling process needs to be done swiftly. Have your sprinkles ready to go before you start dipping. The warmth of the cookie is what helps the glaze set and the sprinkles adhere.
- Don’t Overbake: It’s better to slightly underbake than overbake these cookies, as they continue to cook slightly on the hot baking sheet and as they cool. The slight bottom browning is your main indicator.
- Room Temperature for Baking: Always use ingredients at room temperature for baking. This helps them emulsify better, resulting in a more consistent dough.
Serving & Storage Suggestions
These Italian Sprinkle Cookies are a joy to serve! They make a vibrant addition to any dessert platter, cookie tin, or holiday spread. Arrange them artfully on a festive plate, perhaps alongside a cup of rich espresso or a glass of Vin Santo. Their cheerful appearance makes them a hit with children and adults alike.
For storage, ensure the cookies are completely dry before placing them in airtight containers. They can be stored at room temperature for up to 5 days. Avoid stacking them too high to prevent the glaze from cracking. If you need to store them for longer, you can freeze them in a single layer on a baking sheet until firm, then transfer to a freezer-safe container for up to 3 months. Thaw them at room temperature before enjoying.
Nutritional Information
Here’s an approximate nutritional breakdown for these delicious cookies:
| Nutrient | Amount per Serving | % Daily Value |
|---|---|---|
| Calories | 103 kcal | 5% |
| Total Fat | 3.4 g | 5% |
| Saturated Fat | 0.9 g | 4% |
| Cholesterol | 17.9 mg | 6% |
| Sodium | 37.2 mg | 2% |
| Total Carbohydrate | 16.5 g | 6% |
| Dietary Fiber | 0.2 g | 1% |
| Sugars | 9.5 g | 19% |
| Protein | 1.5 g | 3% |
(Note: Nutritional values are estimates and can vary based on specific ingredients and portion sizes.)
Variations & Substitutions
While this recipe is a classic for a reason, feel free to explore some creative variations:
- Citrus Twist: For a brighter flavor, increase the lemon extract to 2 teaspoons and consider adding a touch of orange extract to the dough for a more complex citrus profile.
- Almond Extract Substitute: If almond extract isn’t your preference or is unavailable, you can increase the vanilla extract to 2 1⁄2 teaspoons in the cookie dough and 2 teaspoons in the glaze. However, the almond extract is quite characteristic of this cookie.
- Glaze Colors: Beyond the traditional rainbow sprinkles, consider using colored glazes by dividing the glaze and tinting each portion with food coloring. This can add another layer of festivity.
- Fruity Infusion: A small amount of finely grated lemon or orange zest can be added to the dough for an extra burst of natural citrus flavor.
FAQs (Frequently Asked Questions)
Q: Why are my cookies not browning on top?
A: This is entirely normal for Italian Sprinkle Cookies. The recipe is designed so the tops remain pale, while the bottoms achieve a slight golden hue to indicate they are cooked.
Q: My dough seems very stiff. Is that correct?
A: Yes, a stiff dough is characteristic of this cookie recipe. It helps them hold their shape and achieve their signature texture.
Q: How long do the cookies need to dry?
A: The cookies require a full 24 hours to dry completely. This allows the glaze to set properly and the cookie to achieve its ideal chewy consistency.
Q: Can I use butter instead of shortening?
A: While butter offers a richer flavor, it will change the texture of the cookie. Shortening provides the classic chewiness and structure of traditional Italian Sprinkle Cookies.
Q: What kind of sprinkles are best?
A: The recipe specifically calls for colored sprinkles (jimmies). These are the long, thin, rod-shaped sprinkles that adhere well to the glaze and provide the festive look and slight crunch.
Final Thoughts
These Italian Sprinkle Cookies are more than just a recipe; they are a testament to the enduring power of simple ingredients and thoughtful preparation to create moments of joy and connection. The combination of tender, slightly chewy cookie and sweet, bright glaze, all kissed with the delicate notes of almond and lemon, is utterly irresistible. I encourage you to bake these with loved ones, to create your own cherished memories in the kitchen. Share them generously, and savor the sweet, colorful delight they bring to any occasion. They pair wonderfully with a warm beverage or simply a good conversation. Happy baking!