
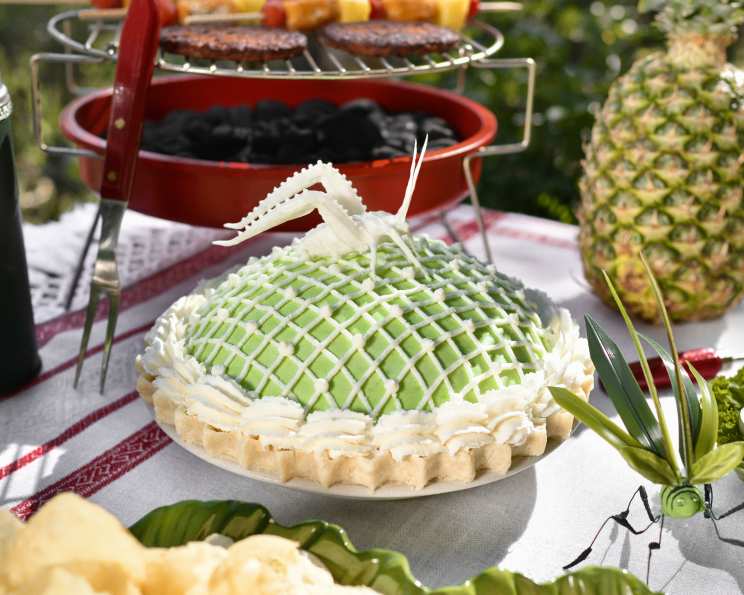
White Chocolate Grasshopper Pie: A Frothy Delight from My Kitchen to Yours
There are some desserts that, once tasted, imprint themselves on your memory with the vividness of a technicolor dream. For me, the White Chocolate Grasshopper Pie is one of those. I first encountered it during a particularly sweltering summer spent at a friend’s lakeside cabin, where the humidity hung heavy and the thought of anything rich and heavy seemed utterly unappealing. This pie, however, was a revelation. Its pale green hue hinted at the subtle mint within, while the airy lightness of the filling was like biting into a cloud. It was simultaneously refreshing and decadent, a true testament to the magic that can happen when simple ingredients are treated with a little care and imagination. It quickly became my go-to for impressing guests, and its ability to be made ahead, offering a stunning finale to any gathering, cemented its place in my repertoire.
Recipe Overview
- Prep Time: 15 minutes
- Cook Time: 10 minutes
- Total Time: 3 hours 40 minutes (includes freezing time)
- Servings: 10
- Yield: 1 pie
- Dietary Type: Dessert
Ingredients
For the Crust
- 3/4 cup all-purpose flour
- 1/4 teaspoon baking soda
- 1/4 teaspoon baking powder
- 1/4 cup white shortening
- 1/3 cup white sugar
- 2 egg whites
- 1 tablespoon white gel food coloring
- 1 cup white chocolate chips
- 4 tablespoons melted shortening
For the Filling
- 2 teaspoons gelatin powder
- 1/8 cup water
- 36 large Jumbo Jet Puffed Marshmallows
- 1 cup half-and-half
- 1/2 cup green creme de menthe
- 1 1/4 cups heavy whipping cream
Stabilized Whip Cream
- 1/4 cup cold water
- 1 teaspoon unflavored gelatin
- 1 cup heavy whipping cream
- 1 tablespoon white sugar
Grasshopper Decoration
- 3/4 cup white chocolate
- 2 tablespoons heated corn syrup
- 1/4 cup white chocolate, for fusing and decorating
Equipment Needed
- Stand mixer with whisk and paddle attachments
- 16×12 inch cookie sheet
- Parchment paper
- Food processor (or a sturdy zip-top bag and rolling pin)
- 8-inch pie dish
- Medium mixing bowls
- Large pot
- Glass bowl
- Saucepan
- Piping bag with a decorative tip
- Cooling rack
Instructions
Crafting the Crisp White Chocolate Crust
- Begin by preheating your oven to 350 degrees F. Line a 16×12 inch cookie sheet with parchment paper.
- In a medium mixing bowl, whisk together the all-purpose flour, baking soda, and baking powder. Set this dry mixture aside.
- In the bowl of your stand mixer, cream the white shortening until light and fluffy. Add the white sugar, egg whites, and white gel food coloring. Mix on medium speed until the mixture is well combined and appears light and fluffy.
- Gradually add the dry ingredients to the wet ingredients in the stand mixer, mixing on low speed until a cohesive dough forms.
- Press this dough evenly onto the prepared cookie sheet, rolling it out to a uniform thickness of about 1/8 of an inch.
- Bake for 10 minutes, or until the crust is just starting to brown. It’s crucial to keep this crust as light as possible, so once it’s out of the oven and has cooled slightly, carefully trim and discard any browned edges.
- Once fully cooled, crumble the baked crust into large pieces. Process these pieces in a food processor until you have fine crumbs. If you don’t have a food processor, a sturdy zip-top bag and a rolling pin will work wonderfully.
- In a separate mixing bowl, place the 1 cup of white chocolate chips. Add the melted shortening to this bowl. Mix until a pliable dough forms.
- Press this white chocolate mixture into an 8-inch pie dish, taking care to create a neat, crimped edge with your fingertips. Set this prepared pie crust aside.
Whipping Up the Dreamy Mint Filling
- In a glass bowl, combine the 1/8 cup of water with the 2 teaspoons of gelatin powder. Allow it to bloom for about 5 minutes.
- In a large pot, gently melt down the 36 Jumbo Jet Puffed Marshmallows over low to medium heat, stirring constantly. Once the marshmallows have melted into a creamy consistency, stir in the half-and-half, green creme de menthe, whipping cream, and the bloomed gelatin mixture.
- Continue to heat the mixture gently until it is just about ready to simmer. Remove the pot from the heat and allow it to cool for about 15 minutes.
- Transfer the cooled mixture to the bowl of your stand mixer fitted with the whisk attachment. Mix for 5 minutes until the mixture thickens slightly.
- Pour half of this filling mixture into your prepared pie dish.
- Line a domed mixing bowl with plastic wrap. Pour the remaining filling mixture into this lined bowl.
- Place both the pie and the bowl containing the filling into the freezer overnight.
Creating the Showstopper Dome and Stabilized Cream
- The next morning, carefully remove the filling from the domed bowl. Handle it by the plastic wrap, as it will be jiggly and a bit delicate. Flip this filling onto the frozen pie in the pie dish to create a beautiful domed effect. This step can be tricky, so be patient!
- Return the pie to the freezer until you are ready to decorate.
- Now, for the stabilized whip cream. In a small saucepan, add the 1/4 cup of cold water and the 1 teaspoon of unflavored gelatin. Allow it to bloom for 5 minutes.
- Begin heating this mixture over medium heat, stirring constantly until it just begins to steam. Remove it from the heat and let it cool back to room temperature.
- In the clean bowl of your stand mixer, fitted with a whisk attachment, beat the 1 cup of heavy whipping cream and 1 tablespoon of white sugar on high speed until soft peaks begin to form.
- Continue beating, and in a steady stream, slowly pour in the cooled gelatin mixture. Beat until stiff peaks form, ensuring the cream is beautifully stable.
- Transfer the stabilized whip cream to a piping bag fitted with your desired tip.
Assembling the Grasshopper and Final Touches
- In a saucepan, melt the 3/4 cup of white chocolate over low heat on the stovetop until it is completely melted and in a liquid state.
- Add the 2 tablespoons of heated corn syrup to the melted white chocolate and mix non-stop until a pliable dough forms. This is your modeling chocolate.
- Use this modeling chocolate to shape the legs and feelers for your grasshopper. You can adhere these pieces together using the remaining 1/4 cup of white chocolate, melted down.
- Any leftover melted white chocolate can be placed into a small parchment piping bag for finer details and smoothing of your chocolate insect.
- Place the finished chocolate grasshopper on top of your decorated pie.
- Decorate your pie immediately with the stabilized whip cream from the piping bag.
- Place the decorated pie back into the freezer until ready to serve. For optimal slicing and serving, it’s best to serve this pie immediately or freeze until ready for company.
Expert Tips & Tricks
- Crust Perfection: For an incredibly light crust, don’t overwork the dough. The key is to bake it until it’s just kissed by the oven’s heat, avoiding any significant browning. Trimming off any color after baking is a crucial step for that pale, ethereal look.
- Food Processor Substitute: If you lack a food processor, a zip-top bag and a rolling pin are your best friends for crushing the baked crust. Just be sure to use a sturdy bag and a good whack!
- Filling Consistency: The filling is meant to be quite soft when it goes into the freezer. Don’t be alarmed if it seems too liquid. The overnight freeze will work its magic.
- Dome Success: The “jiggly and tricky” step of inverting the filling is where patience is a virtue. Ensure both the pie shell and the filling are thoroughly frozen before attempting this inversion. If it doesn’t invert perfectly, don’t worry; you can gently nudge it into place and cover any imperfections with the whipped cream.
- Stabilized Cream Magic: The gelatin in the whipped cream is essential for ensuring it holds its shape beautifully on the pie, especially when serving. Make sure the gelatin mixture has cooled completely before adding it to the whipped cream to prevent it from melting.
Serving & Storage Suggestions
This White Chocolate Grasshopper Pie is best served directly from the freezer. It slices cleanly when thoroughly frozen, allowing the distinct layers to be appreciated. For a particularly elegant presentation, consider a dusting of finely crushed peppermint candies or a drizzle of dark chocolate sauce.
Leftovers should be stored in the freezer. Wrap the pie tightly in plastic wrap and then in aluminum foil to prevent freezer burn. It can be kept frozen for up to a week. If frozen, allow it to thaw for about 10-15 minutes at room temperature before slicing and serving for the best texture.
Nutritional Information
| Nutrient | Amount per Serving | % Daily Value |
|---|---|---|
| Calories | 701.3 kcal | |
| Calories from Fat | 395 g | |
| Total Fat | 44 g | 67% |
| Saturated Fat | 23.3 g | 116% |
| Cholesterol | 89.5 mg | 29% |
| Sodium | 135.2 mg | 5% |
| Total Carbohydrate | 66.8 g | 22% |
| Dietary Fiber | 0.3 g | 1% |
| Sugars | 49.2 g | 196% |
| Protein | 6.5 g | 13% |
(Note: Nutritional information is an estimate and may vary based on specific ingredients and preparation methods.)
Variations & Substitutions
- Crust Variations: For a gluten-free option, you could experiment with a gluten-free graham cracker crust or a nut-based crust, adjusting the binding agents as needed.
- Mint Intensity: If you prefer a stronger mint flavor, you can increase the amount of green creme de menthe, but be mindful that this may also affect the set of the filling.
- Chocolate Choices: While white chocolate is key here, feel free to experiment with the type of white chocolate used for the decoration. High-quality chocolate will yield the best modeling chocolate results.
- No Dome? No Problem: If the idea of the inverted dome seems too daunting, simply press the white chocolate crust into the pie dish as directed, and pour all of the filling into it. You’ll still have a delicious pie, just without the extra domed layer.
FAQs (Frequently Asked Questions)
Q: Can I make this pie without a stand mixer?
A: Yes, absolutely! You can cream the shortening and sugar by hand or with an electric hand mixer. The filling can be whisked vigorously by hand, and the whipped cream can be whipped with a hand mixer or by hand with a balloon whisk, though this will require considerable effort.
Q: My white chocolate dough for the crust isn’t holding together. What should I do?
A: Ensure your shortening is fully melted. If it’s still too dry, you might need to add a tiny bit more melted shortening, a teaspoon at a time, until it forms a pliable dough.
Q: The filling seems too runny even after chilling. Is it supposed to be this soft?
A: The filling is designed to be quite soft before freezing. It will firm up considerably overnight in the freezer. If it’s still exceptionally liquid, ensure the gelatin was bloomed and heated properly.
Q: Can I use peppermint extract instead of creme de menthe?
A: You can, but you’ll need to adjust the liquid balance. Start with about 1/2 teaspoon of peppermint extract and taste the mixture. You’ll also need to ensure the liquid from the half-and-half and cream is still sufficient for the filling’s consistency, as the extract adds no liquid.
Q: How far in advance can I make the chocolate grasshopper decoration?
A: The modeling chocolate grasshopper can be made a day or two in advance and stored in an airtight container at room temperature.
A Sweet Finale
The White Chocolate Grasshopper Pie is more than just a dessert; it’s an experience. It’s a delightful play on textures and a subtle dance of flavors, making it perfect for special occasions or simply for treating yourself. I encourage you to embark on this culinary adventure. Whether you perfect the inverted dome or opt for a simpler presentation, the result will be a refreshing, visually striking, and utterly delicious pie that’s sure to become a favorite. Pair a slice with a chilled glass of sparkling cider or a light, floral tea for a truly sublime moment. Enjoy every airy, minty, white chocolate-kissed bite!