
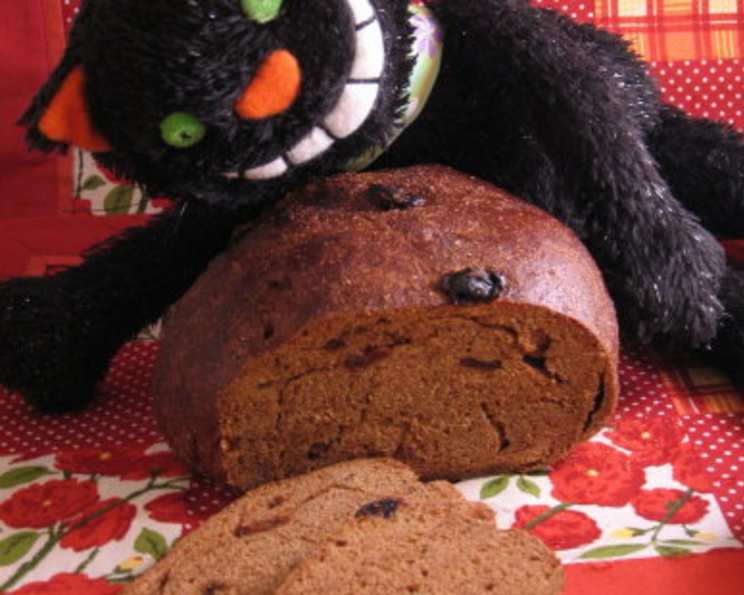
Raisin Pumpernickel Bread: A Symphony of Sweet and Savory Depths
There’s a particular magic that happens in my kitchen when the scent of baking pumpernickel fills the air. It’s a deep, resonant aroma, tinged with the comforting sweetness of molasses and the subtle, earthy notes of rye. I remember, vividly, the first time I truly mastered this Raisin Pumpernickel bread. It wasn’t just about following steps; it was about coaxing out the rich character of each ingredient, feeling the dough transform under my hands, and finally, presenting loaves that were not just food, but an experience. This bread, often referred to as “Black Russian,” has a profound ability to evoke a sense of nostalgia and simple, profound satisfaction.
Recipe Overview
- Prep Time: Approximately 30 minutes (plus dough rising time of 3-4 hours, and a second rise of about 1-2 hours)
- Cook Time: 35 to 45 minutes
- Total Time: Approximately 5 to 6 hours 15 minutes (including rising and baking)
- Servings: 3 loaves
- Yield: 3 delicious loaves
- Dietary Type: Contains Gluten, Dairy-Free (if vegetable oil is used)
Ingredients
This is a recipe that rewards a patient hand and quality ingredients. The interplay of flours and the richness of molasses are key to its signature character.
- 1 ½ cups lukewarm water (105°F to 115°F)
- ½ cup molasses
- 1 package (2 ¼ teaspoons) active dry yeast
- 1 tablespoon instant coffee granules
- 1 tablespoon salt
- 2 cups medium rye flour
- 1 ½ tablespoons unsweetened cocoa powder
- 2 cups whole wheat flour
- 2 cups bread flour, plus more for dusting and kneading
- 2 tablespoons vegetable oil
- 1 cup raisins
- 3-4 tablespoons cornmeal (for dusting the baking sheet)
- 1 tablespoon cold water
- 1 egg white
Equipment Needed
You’ll want a few essentials for this bread-making journey:
- Large mixing bowl
- Whisk or fork
- Measuring cups and spoons
- Clean kitchen towel
- Lightly floured work surface
- Baking sheet
- Small bowl (for egg wash)
- Wire cooling racks
Instructions
The process for making Raisin Pumpernickel Bread is a labor of love, with several stages of rising that contribute to its incredible texture and depth of flavor.
- In a large mixing bowl, stir together the lukewarm water and molasses.
- Sprinkle in the active dry yeast and stir to dissolve.
- Let stand for 10 minutes, or until the mixture appears slightly foamy, indicating the yeast is active.
- Stir in the instant coffee granules, salt, and medium rye flour.
- Sprinkle in the unsweetened cocoa powder and stir well to combine, ensuring there are no dry pockets.
- Add the whole wheat flour and 1 cup of the bread flour. Stir until you achieve a sticky dough. You may not need all of the first cup of bread flour, or you might need a little more; the goal is a dough that is cohesive but still quite sticky.
- Turn the bread out onto a lightly floured work surface. Let it rest for about 10 minutes. This resting period allows the flours to hydrate properly.
- While the dough rests, wash and dry the mixing bowl you used previously.
- Sprinkle additional flour over the dough on your work surface and begin the kneading process.
- Continue kneading, gradually incorporating the remaining bread flour as needed, until you have a smooth, elastic ball of dough. Keep in mind that breads made with rye flour will always have a slightly sticky consistency, even when properly kneaded.
- Pour the vegetable oil into the clean mixing bowl. Turn the ball of dough to coat it well with the oil.
- Cover the bowl with a clean kitchen towel and set aside in a warm place to rise until the dough has tripled in bulk. This typically takes 3 to 4 hours, depending on the ambient temperature.
- Once the dough has tripled, lightly flour your work surface and turn the dough out onto it.
- Flatten the dough into a large rectangle. Sprinkle the raisins evenly over the surface of the rectangle.
- Roll up the dough tightly, like a jelly roll, encasing the raisins. Knead the dough gently for a few minutes to distribute the raisins evenly throughout.
- Let the dough rise again until it has doubled in size. This second rise will take approximately 1 to 2 hours.
- While the dough is undergoing its second rise, sprinkle a large baking sheet with 3 to 4 tablespoons of cornmeal. This will create a wonderful crust and prevent the loaves from sticking.
- Turn the dough out onto the prepared baking sheet. Cut the dough into 3 equal pieces.
- Shape each piece into a small, round loaf.
- Set the loaves on the baking sheet, ensuring there is ample space between them to allow for expansion during their final rise. Cover the loaves with a clean kitchen towel and let them rise until they have doubled in size once more.
- Preheat your oven to 400°F (200°C).
- In a small bowl, beat the egg white together with 1 tablespoon of cold water. This mixture will create a lovely sheen and a slightly crisp crust on the bread.
- When the loaves have risen sufficiently, brush the tops of each loaf generously with the egg white mixture.
- Bake the loaves on the middle rack of the preheated oven for 35 to 45 minutes. The bread is done when it is a deep, dark brown color and sounds hollow when the bottoms are tapped.
- Cool the loaves completely on wire racks before cutting or wrapping. This is a crucial step for texture development and to prevent a gummy interior.
Expert Tips & Tricks
- Hydration is Key: Rye flour absorbs a lot of liquid, and the molasses contributes to the dough’s stickiness. Don’t be tempted to add too much extra flour during kneading; a slightly sticky dough is often the sign of a good loaf with a moist crumb.
- Warm Rise: Find a warm spot for your dough to rise. An oven that has been turned on for a minute and then turned off (with the door ajar) or a spot near a warm appliance can be ideal.
- Checking for Doneness: The hollow sound when tapping the bottom is a reliable indicator. If you’re unsure, you can also use an instant-read thermometer; the internal temperature should be around 195-200°F (90-93°C).
- Cornmeal Crust: The cornmeal isn’t just for show; it adds a delightful textural contrast and helps the bread release easily from the baking sheet. Don’t skip this step!
Serving & Storage Suggestions
This Raisin Pumpernickel Bread is incredibly versatile. It’s magnificent toasted and spread with a generous smear of creamy butter. A slice or two paired with a sharp cheddar or a ripe piece of Brie is pure bliss. It also makes a surprisingly decadent base for French toast, the dark, sweet bread soaking up the egg custard beautifully.
To store, ensure the bread is completely cooled. Once cool, it can be stored at room temperature in an airtight bag or bread box for 2-3 days. For longer storage, wrap the cooled loaves tightly in plastic wrap, then in foil, and freeze for up to 3 months. Thaw at room temperature or gently reheat in a warm oven before serving.
Nutritional Information
Here’s an approximate nutritional breakdown per serving (assuming 3 servings per loaf, and 3 loaves total):
| Nutrient | Amount per Serving | % Daily Value |
|---|---|---|
| Calories | 1253.5 kcal | N/A |
| Total Fat | 13.6 g | 20% |
| Saturated Fat | 2 g | 10% |
| Cholesterol | 0 mg | 0% |
| Sodium | 2385.1 mg | 99% |
| Total Carbohydrate | 263.6 g | 87% |
| Dietary Fiber | 25.7 g | 102% |
| Sugars | 61.2 g | 244% |
| Protein | 30.9 g | 61% |
Note: Nutritional values are estimates and can vary based on specific ingredients and brands used.
Variations & Substitutions
While this recipe is wonderful as is, feel free to experiment! You could substitute some of the bread flour with an equal amount of unbleached all-purpose flour if bread flour isn’t readily available. For a slightly different flavor profile, consider using a dark corn syrup or blackstrap molasses instead of regular molasses. If you’re not a fan of raisins, you could substitute them with dried cranberries or chopped dates.
FAQs
Q: Why is my pumpernickel dough so sticky?
A: Rye flour naturally absorbs more liquid than wheat flour, and molasses adds moisture, making the dough inherently stickier. As long as you’ve kneaded it until it forms a cohesive ball and feels elastic, the stickiness is normal for this type of bread.
Q: Can I use instant yeast instead of active dry yeast?
A: Yes, you can substitute instant yeast for active dry yeast. If using instant yeast, you can typically skip the “proofing” step (letting it stand for 10 minutes) and add it directly with the dry ingredients. However, for this recipe, allowing it to bloom with the water and molasses is still beneficial for ensuring its activity.
Q: My bread is very dark on top but not fully baked inside. What went wrong?
A: This can happen if your oven runs hot or if you used a dark baking sheet. Ensure you are baking on the middle rack and consider loosely tenting the loaves with aluminum foil during the last 15-20 minutes of baking if the crust is browning too quickly. Always check for doneness by tapping the bottom.
Q: How can I get a more uniform shape for my loaves?
A: After dividing the dough, gently shape each piece into a round by tucking the edges under to create surface tension. Then, let them rest for about 10 minutes before the final shaping. This helps them hold their form.
Q: Is this bread suitable for sandwiches?
A: Absolutely! The sturdy texture and complex flavor of this Raisin Pumpernickel Bread make it an excellent choice for hearty sandwiches. It pairs wonderfully with deli meats, cheeses, and even spreads like cream cheese or hummus.
Final Thoughts
There’s a profound satisfaction in creating a loaf of Raisin Pumpernickel Bread from scratch. It’s a bread that speaks of tradition, warmth, and generosity. Each bite is a journey through layers of flavor – the subtle sweetness of molasses, the earthy depth of rye, the chewy bursts of raisin, and the rich cocoa undertones. I encourage you to embark on this baking adventure. Serve it warm with butter, use it as the foundation for an unforgettable sandwich, or transform it into the most delightful French toast you’ve ever had. May your kitchen be filled with the heavenly aroma of this magnificent bread!