
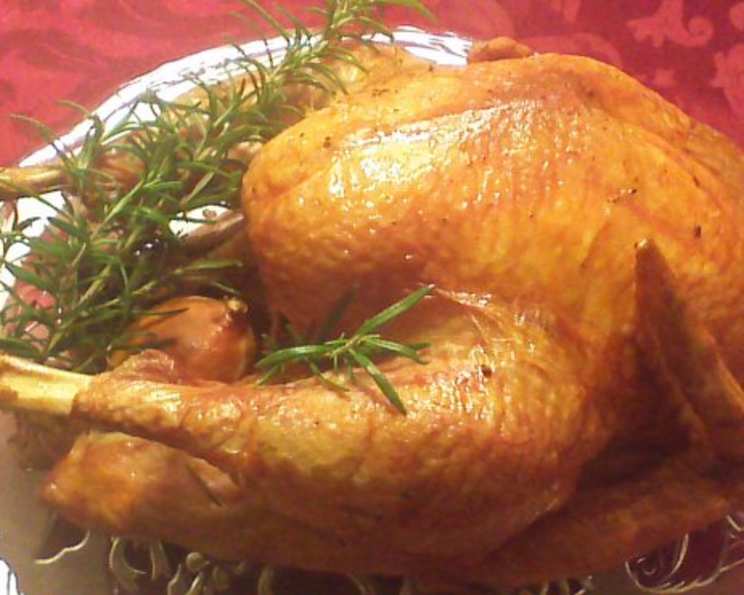
Rosemary Lemon Roast Turkey: Aromatic Simplicity for a Memorable Feast
There are certain aromas that, for me, instantly transport me back to cherished family gatherings. The deep, savory scent of a roasting turkey, kissed with herbs and brightened by citrus, is undeniably one of them. I vividly recall one Thanksgiving, years ago, when my grandmother, usually a whirlwind of activity, entrusted me with the centerpiece of our meal. The instructions were simple, passed down through generations: keep it moist, keep it flavorful, and let the oven do its magic. That day, armed with a fresh turkey, fragrant rosemary, and vibrant lemons, I learned that the most delicious dishes often come from the most straightforward techniques, a lesson this Rosemary Lemon Roast Turkey embodies beautifully. It’s a testament to the power of quality ingredients and a few thoughtful touches to elevate a classic.
Recipe Overview
- Prep Time: 20 minutes
- Cook Time: Approximately 3 hours
- Total Time: 3 hours 20 minutes
- Servings: 8
- Yield: 1 Roast Turkey
- Dietary Type: Gluten-Free, Dairy-Free (if using oil instead of butter)
Ingredients
- 1 small fresh turkey (10 – 12 pounds)
- 2 lemons
- 6 sprigs fresh rosemary
- 1/2 teaspoon salt
- 1/2 teaspoon fresh ground black pepper
- 2 tablespoons butter, melted (or olive oil for a dairy-free option)
Equipment Needed
- Roasting pan or a jelly roll pan with sides at least 1 inch high
- Paring knife
- Clean kitchen towels
- Meat thermometer
Instructions
The journey to a perfectly roasted turkey begins with careful preparation, ensuring every step contributes to a moist, flavorful, and beautifully browned bird. This method, eschewing complex techniques for simple elegance, promises a star-quality centerpiece for any occasion.
Step 1: Preparing the Turkey
Begin by carefully removing your fresh turkey from its packaging, ideally in the sink to catch any errant juices. The first crucial step is to locate and remove the bag of giblets from both ends of the turkey cavity. These are often tucked away, so a thorough check is essential.
Step 2: Rinsing and Drying
Once the giblets are out, rinse the turkey thoroughly with cold water, both inside and out. Gently lift the turkey and turn it upside down to allow excess water to drain for a moment. Then, use clean kitchen towels to pat the turkey completely dry. It’s vital to dry the skin well, as this promotes crispiness. Immediately place the used towel in the hamper to avoid any cross-contamination.
Step 3: Seasoning the Skin
Place your prepared turkey into your chosen roasting vessel – a roasting pan or a jelly roll pan with sides at least one inch high will work beautifully. Now, generously rub the salt and fresh ground black pepper onto the entire skin of the turkey. This simple seasoning is key to building a flavorful crust.
Step 4: Preparing the Aromatics
Take your lemons and, using a paring knife, poke a few holes into each one. Into several of these holes on each lemon, insert the fresh rosemary sprigs. This creates a fragrant infusion that will gently permeate the turkey as it roasts.
Step 5: Infusing the Cavity
Carefully insert one of the rosemary-studded lemons completely inside the main cavity of the turkey. The second rosemary lemon can then be rested near the opening of the turkey cavity, allowing its aromatic oils to mingle with the hot air circulating in the oven.
Step 6: Buttering for Golden Perfection
Now, it’s time to coat the outside of your turkey with the melted butter. Aim to coat the highest parts of the turkey thoroughly. While you want good coverage, avoid using so much butter that it pools excessively in the pan, as this can lead to smoking. As the turkey roasts, the butter will naturally spread down the sides, contributing to a beautifully golden-brown skin and sealing in fantastic flavor.
Chef’s Note: We’re buttering the turkey skin directly, a technique that’s both simpler and more effective than traditional basting for preventing dry meat. This method yields a slightly darker, wonderfully crispy skin with an undeniably delicious outcome.
Step 7: The Roasting Process
Preheat your oven to 325 degrees Fahrenheit (160 degrees Celsius). Carefully place your prepared turkey on the lowest rack possible in the oven. The turkey will need to slowly roast until a meat thermometer, inserted into the thickest part of the thigh (ensuring it doesn’t touch the bone), registers 165 degrees Fahrenheit (74 degrees Celsius). Many turkeys come with a pop-up timer; however, it is still highly recommended to verify the temperature with a meat thermometer to ensure food safety.
The exact roasting time will vary depending on your oven and the turkey’s specific characteristics. As a guideline, for a 10–12 pound turkey at 325 degrees Fahrenheit, approximately 3 hours of roasting time is generally required. It’s best to begin checking the turkey’s internal temperature after 2 1/2 hours, but resist the urge to open the oven door before then, as this can disrupt the cooking process.
Step 8: The Crucial Rest
Once your turkey has reached the safe internal temperature of 165°F (74°C), remove it from the oven. Allow the roasted turkey to rest on the countertop for a full 15 minutes before carving. This resting period is absolutely critical; it allows the juices to redistribute throughout the meat, ensuring a more succulent and tender result. You can loosely tent the turkey with aluminum foil to help retain heat, though this is not strictly necessary.
Enjoy your beautifully roasted turkey!
PS – Don’t wash that pan! In our next Crowded Earth Kitchen post, we’ll show you how to make delicious gravy with the flavorful drippings left in that turkey pan!
Expert Tips & Tricks
- Fresh vs. Frozen: While this recipe calls for a fresh turkey, if you must use frozen, ensure ample thawing time. A general rule of thumb is 24 hours per 4-5 pounds of turkey in the refrigerator. For a 10-12 pound bird, this means 2-3 full days of thawing. Never thaw at room temperature.
- Smaller is Better (Sometimes): If you’re feeding a crowd, consider roasting two smaller turkeys instead of one behemoth. Smaller birds cook more evenly and are less prone to drying out, providing a more consistently delicious outcome.
- Pan Choice: Don’t feel obligated to buy a special roasting pan. A sturdy jelly roll pan with sides, or even a 9×13 inch baking dish for smaller birds, will serve the purpose admirably. The key is to have sides to catch the precious drippings.
- Butter Alternative: For a dairy-free option, substitute the butter with good quality olive oil. The result will still be beautifully browned and flavorful.
Serving & Storage Suggestions
Serve your Rosemary Lemon Roast Turkey carved at the table, allowing guests to admire its golden perfection. It pairs wonderfully with classic Thanksgiving sides like mashed potatoes, stuffing, cranberry sauce, and green bean casserole.
Leftovers can be stored in an airtight container in the refrigerator for up to 3-4 days. Reheat gently in the oven at a moderate temperature (around 300°F/150°C) with a splash of broth or water to keep the meat moist. For longer storage, turkey can be frozen for up to 2-3 months.
Nutritional Information
| Nutrient | Amount per Serving | % Daily Value |
|---|---|---|
| Calories | 1056 | NA |
| Calories from Fat | 489 | NA |
| Total Fat | 54.4 g | 83% |
| Saturated Fat | 16.3 g | 81% |
| Cholesterol | 443.7 mg | 147% |
| Sodium | 587.8 mg | 24% |
| Total Carbohydrate | 1.4 g | 0% |
| Dietary Fiber | 0.4 g | 1% |
| Sugars | 0.4 g | 1% |
| Protein | 131.2 g | 262% |
Note: Nutritional information is an estimate and will vary based on the size of the turkey and specific ingredients used.
Variations & Substitutions
- Herb Variations: Feel free to experiment with other complementary herbs. Thyme, sage, or a mix of poultry herbs can be substituted for or added to the rosemary for a different aromatic profile.
- Garlic Infusion: Add a few cloves of garlic, smashed, to the lemon and rosemary mixture inside the cavity for an extra layer of savory depth.
- Citrus Swap: While lemon is classic, oranges can also be used for a slightly sweeter, brighter note.
FAQs (Frequently Asked Questions)
Q: Why is it important to remove the giblets?
A: The giblet bag often contains the turkey’s neck and other organs, which can impart an undesirable flavor if cooked inside the bird and can also be a food safety concern if not handled properly.
Q: Can I use a thermometer other than a meat thermometer?
A: While instant-read thermometers are helpful for checking doneness quickly, a reliable meat thermometer inserted into the thickest part of the thigh (not touching bone) is the most accurate way to ensure the turkey is cooked to a safe temperature.
Q: My turkey isn’t as brown as yours in the photo. What can I do?
A: Ensure your oven is accurately preheated and that you’re roasting on the lowest rack possible for optimal browning. If the skin is browning too quickly before the turkey is cooked through, you can loosely tent the breast with foil.
Q: Is it okay to baste the turkey instead of buttering it?
A: While basting can add moisture, buttering the skin directly before roasting is often preferred for achieving a crispier skin and a more even, flavorful crust. Basting can sometimes lead to a less crisp exterior.
Q: How do I know if my turkey is safe to eat?
A: The most critical indicator of safety is the internal temperature. Ensure the thickest part of the thigh registers 165°F (74°C) on a meat thermometer.
Final Thoughts
There’s a profound satisfaction in presenting a perfectly roasted turkey that fills your home with an irresistible aroma. This Rosemary Lemon Roast Turkey recipe, with its elegant simplicity, is a testament to that joy. It’s a dish that speaks of comfort, tradition, and the pleasure of sharing a meal with loved ones. Don’t hesitate to give this method a try; the straightforward steps lead to a spectacularly flavorful and beautifully presented bird. I encourage you to gather your ingredients, embrace the aroma, and savor the moments as this delightful turkey transforms in your oven. This is a dish that truly deserves a place at your table, and I can’t wait to hear about your successes!