
The Crispy, Creamy Nostalgia Bomb: Rice Krispies Ice Cream Sandwiches
There are certain flavors that instantly transport you back to childhood, a Proustian rush of pure, unadulterated joy. For me, the unmistakable snap, crackle, and pop of Rice Krispies cereal holds a special place, a sound synonymous with lazy summer mornings and the thrilling promise of a sweet treat. This recipe for Rice Krispies Ice Cream Sandwiches takes that nostalgic foundation and elevates it into something truly magical, a delightful duality of crispy, chewy cereal and cool, creamy ice cream. I remember making these with my grandmother in her sun-drenched kitchen, her hands dusted with flour and mine sticky with the sweet syrup mixture. The sheer simplicity, the no-bake wonder of it all, was part of the allure, and the end result – a decadent, handheld delight – was always met with gleeful exclamations. It’s a recipe that requires no fancy techniques, just a love for classic flavors and a desire to recapture that innocent sweetness.
Recipe Overview
- Prep Time: 15 minutes
- Cook Time: 0 minutes (No Baking Required!)
- Total Time: 2 hours 35 minutes (includes freezing)
- Servings: 24 squares
- Yield: 1 large sandwich cut into 24 portions
- Dietary Type: Vegetarian (can be adapted for other dietary needs with substitutions)
Ingredients
This recipe is a testament to the magic that can be created with a few simple, accessible ingredients. The beauty lies in its straightforwardness, allowing the quality of each component to shine.
- 1⁄2 cup Corn Syrup: The binder that holds our crispy layers together, providing a pleasant chewiness and a touch of sweetness.
- 1⁄2 cup Peanut Butter: Creamy or crunchy, this adds a rich, nutty depth that perfectly complements the cereal.
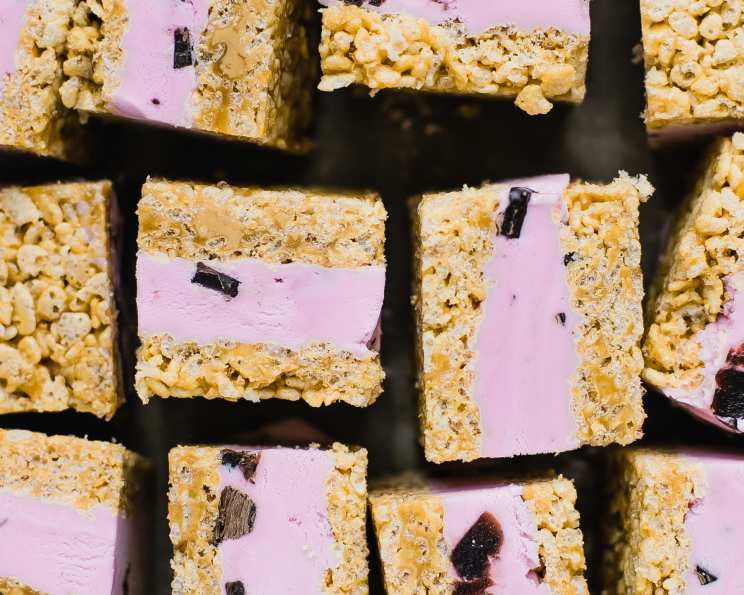
- 4 cups Rice Krispies: The star of the show! Their signature crispiness is essential for that delightful textural contrast.
- 2 cups Ice Cream (half of a 1-liter container) or 2 cups Frozen Yogurt, very slightly softened (half of a 1-liter container): Your chosen frozen element. Opt for a flavor that sings with peanut butter, or go classic vanilla for a timeless pairing. Ensuring it’s slightly softened is key for easy spreading.
Equipment Needed
While this recipe is blessedly free of complex culinary tools, a few items will make the process smoother:
- A medium-sized mixing bowl
- A sturdy spoon or spatula for mixing
- A buttered 9″x13″ pan: This prevents sticking and ensures easy removal of the cereal mixture.
- A plastic quilt ruler (optional, but helpful for even slicing)
- Aluminum foil or freezer wrap for individual storage
Instructions
The process is wonderfully uncomplicated, making it a perfect activity for a family cooking session or a quick treat for yourself.
- Begin by stirring together the corn syrup and peanut butter in your medium-sized mixing bowl. Ensure they are thoroughly combined into a smooth, homogeneous mixture.
- Add the Rice Krispies cereal to the bowl with the syrup and peanut butter mixture.
- Using your spoon or spatula, stir gently but thoroughly until all the Rice Krispies are well coated with the peanut butter and corn syrup mixture. You want to ensure every crispy puff gets its turn in this delicious embrace.
- Press the cereal mixture firmly and evenly into your buttered 9″x13″ pan. This step is crucial for creating a cohesive base for your ice cream. Using the back of your spoon or even your hands (lightly greased with butter or covered with plastic wrap if you prefer to keep them clean), apply even pressure to create a solid, compact layer. A plastic quilt ruler, if you have one handy in your baking supplies, can be a useful tool here for measuring and leveling the mixture to ensure a consistent thickness.
- Place the pan with the cereal mixture into the freezer and chill until firm. This will take approximately 15 minutes.
- Once the cereal mixture is firm, remove the pan from the freezer. Carefully cut the cereal mixture in half crosswise, creating two equal rectangular sections.
- Take one of the cereal mixture halves and spread it evenly with your softened ice cream or frozen yogurt. Ensure the ice cream or yogurt reaches all the edges of the cereal layer. The slight softening is important here to make it spreadable without tearing the cereal base.
- Gently place the second half of the Rice Krispie mixture on top of the ice cream-covered half, creating one very large sandwich. Press down lightly to ensure a good seal.
- Return the entire assembled sandwich to the freezer and freeze until firm. This will require a longer chill time, about 2 hours.
- Once completely firm, remove the large sandwich from the freezer. Using your ruler again for precision, cut the large sandwich into 2″ portions. This will yield 24 individual squares.
- Finally, wrap each portion individually in aluminum foil paper or freezer wrap. This is essential for preventing freezer burn and keeping your delicious creations fresh. Store in the freezer until you’re ready to indulge.
Expert Tips & Tricks
To elevate your Rice Krispies Ice Cream Sandwiches from delightful to divine, consider these insider tips:
- Peanut Butter Precision: If you prefer a smoother finish, use creamy peanut butter. For added texture and a more robust nutty flavor, opt for crunchy.
- Ice Cream Consistency: The key to easy spreading is slightly softened ice cream. Leave it on the counter for about 10-15 minutes before you plan to assemble. Too soft, and it will melt into the cereal; too firm, and it will be impossible to spread evenly.
- The Ruler’s Reign: While not strictly necessary, using a plastic quilt ruler or even a straight ruler to guide your cuts ensures uniform portions, making them look as professional as they taste. This also helps when pressing the initial cereal layer for even thickness.
- Freezer First: Don’t skimp on the freezing times. A properly firm cereal base and fully frozen sandwich are crucial for a clean cut and a delightful eating experience.
- Wrap It Up: Individual wrapping is your best friend against freezer burn. Ensure each square is completely sealed in foil or freezer wrap to maintain its texture and flavor.
Serving & Storage Suggestions
These Rice Krispies Ice Cream Sandwiches are best served straight from the freezer. To present them beautifully, you can place them on a chilled platter. For an extra touch, consider a drizzle of chocolate sauce or a sprinkle of chopped peanuts. They are designed for grab-and-go enjoyment, making them perfect for parties, picnics, or spontaneous dessert cravings.
Storage: These treats are designed to be stored in the freezer. Individually wrapped, they will maintain their quality for up to 2-3 months. Beyond that, while still safe to eat, the texture might begin to degrade. Since they are frozen solid, there’s no need to store them at room temperature. If they happen to soften slightly during serving, simply pop them back into the freezer for a few minutes to firm up again.
Nutritional Information
Here’s an estimated breakdown of the nutritional content per square, assuming a standard vanilla ice cream and smooth peanut butter. Please note that these are approximations and can vary based on the specific brands and types of ingredients used.
| Nutrient | Amount per Serving | % Daily Value |
|---|---|---|
| Calories | 90.6 kcal | N/A |
| Calories from Fat | N/A | N/A |
| Total Fat | 4 g | 6% |
| Saturated Fat | 1.3 g | 6% |
| Cholesterol | 4.8 mg | 1% |
| Sodium | 59.8 mg | 2% |
| Total Carbohydrate | 12.5 g | 4% |
| Dietary Fiber | 0.4 g | 1% |
| Sugars | 5 g | 19% |
| Protein | 2 g | 4% |
Note: The Daily Value percentages are based on a 2,000-calorie diet. Your daily values may be higher or lower depending on your calorie needs.
Variations & Substitutions
The beauty of this recipe lies in its inherent flexibility. Don’t hesitate to experiment and make it your own:
- Peanut Butter Alternatives: For those with peanut allergies or who simply prefer other nut butters, almond butter, cashew butter, or sunflower seed butter all work beautifully. Adjust the sweetness if needed, as some nut butters can be less sweet than peanut butter.
- Cereal Swaps: While Rice Krispies are classic, consider other crispy rice cereals or even puffed wheat for a different textural experience.
- Ice Cream Adventures: Go wild with your ice cream choices! Chocolate, strawberry, mint chocolate chip, or even cookie dough can create fantastic flavor combinations. If you’re feeling particularly decadent, a swirl of chocolate syrup or caramel could be mixed into the ice cream before spreading.
- For a Dairy-Free/Vegan Option: Utilize dairy-free peanut butter (most are), vegan crispy rice cereal, and a high-quality vegan ice cream or frozen coconut yogurt. Ensure your chosen ingredients are certified vegan if required.
- Add-Ins: Before pressing the cereal mixture into the pan, you could lightly fold in some mini chocolate chips, chopped peanuts, or even sprinkles for an extra pop of flavor and texture.
FAQs
Q: Can I make these without peanut butter?
A: Absolutely! You can substitute other nut butters like almond or cashew butter, or even use a sunflower seed butter for a nut-free option.
Q: My cereal mixture seems too dry/crumbly. What did I do wrong?
A: Ensure your corn syrup and peanut butter are well combined and slightly warm to make them more pliable for coating the cereal. Pressing firmly into the pan also helps to bind it together.
Q: How do I get clean cuts on the ice cream sandwich?
A: A sharp knife, dipped in warm water and wiped dry between each cut, is your best bet. Using a ruler to guide your cuts will also ensure uniformity.
Q: Can I use regular frozen yogurt instead of ice cream?
A: Yes, you can. Just ensure it’s very slightly softened for easy spreading, just like the ice cream.
Q: How long can I store these in the freezer?
A: When individually wrapped, they can be stored for 2-3 months, though they are best enjoyed within the first month for optimal texture.
A Taste of Sweet Simplicity
These Rice Krispies Ice Cream Sandwiches are more than just a dessert; they’re a portal to simpler times, a reminder that pure joy can often be found in the most unpretentious creations. They are a testament to the power of nostalgia, expertly blended with a cool, creamy indulgence. I encourage you to gather your simple ingredients, perhaps enlist the help of a budding chef in your life, and rediscover the magic of this no-bake wonder. The satisfaction of biting into that perfect balance of crunchy, chewy, and creamy is a reward in itself. Share them with loved ones, or savor them as a personal treat – either way, they are guaranteed to bring a smile.