
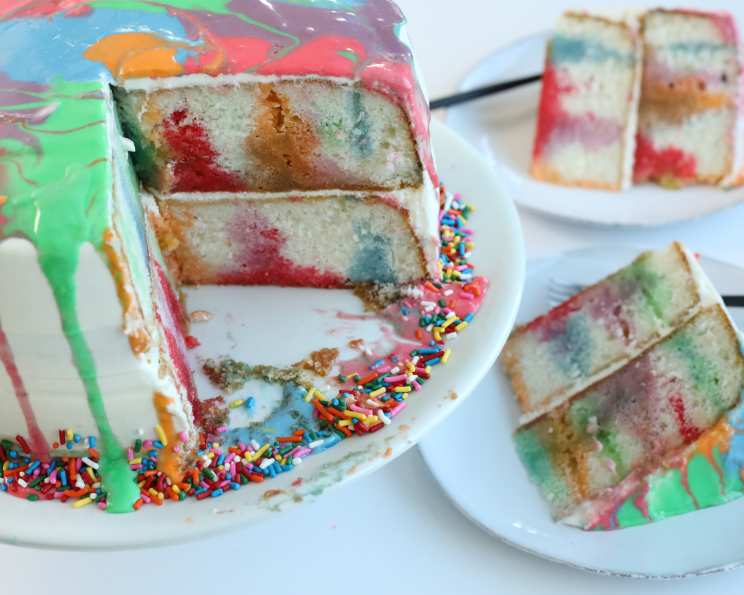
The Dazzling Rainbow Poke Cake: A Symphony of Color and Sweetness
I remember the first time I saw a rainbow poke cake. It wasn’t at a fancy bakery or a sophisticated dinner party, but at a chaotic, joyful birthday celebration for my niece. The cake, a vibrant explosion of color peeking through a snowy white frosting, was an instant hit, not just with the kids, but with every adult at the table. It was more than just a dessert; it was a visual spectacle, a edible work of art that promised pure delight. The idea of infusing a simple cake with all the hues of the spectrum, then dressing it in a cloud-like frosting, felt like pure culinary magic, a shortcut to pure happiness.
Recipe Overview
- Prep Time: 15 minutes
- Cook Time: 30 minutes
- Total Time: 3 hours 45 minutes
- Servings: 12
- Yield: 1 (9-inch) double-layer cake
- Dietary Type: Dessert
Ingredients
This recipe embraces simplicity, allowing the vibrant colors to take center stage. You’ll find that gathering these components is a breeze, and the magic truly happens as you assemble them.
- 2 (9-inch) white cake layers, cooled (store-bought or homemade, ensure they are completely cooled for best results)
- 2 ½ cups boiling water
- ½ (3-ounce) package red gelatin
- ½ (3-ounce) package orange gelatin
- ½ (3-ounce) package green gelatin
- ½ (3-ounce) package blue gelatin
- ½ (3-ounce) package purple gelatin
- 12 ounces whipped topping, thawed (such as Cool Whip)
- 1 large egg white
- 2 cups confectioners’ sugar
- ½ lemon, juice of (about 2 tablespoons)
- Red, green, blue, purple, and orange food coloring
Equipment Needed
For this colorful creation, you’ll want to have these basic kitchen tools at the ready:
- Two 9-inch round cake pans (if baking cake layers from scratch)
- Skewers or a fork for piercing the cake
- Several small bowls for dissolving gelatin
- Measuring cups and spoons
- A serving plate or cake stand
- A medium mixing bowl for the frosting
- An electric mixer (handheld or stand mixer)
- A spatula
- 5 small bowls for coloring the frosting
Instructions
The beauty of this Rainbow Poke Cake lies in its straightforward assembly. We’re leveraging shortcuts to create a dessert that’s both impressive and achievable for home bakers.
- Prepare the Cake Layers: Begin by placing your two cooled white cake layers, top side up, in their respective 9-inch round cake pans. This ensures they’ll hold their shape as we work with them.
- Pierce the Cakes: Using skewers or the tines of a fork, pierce the surface of each cake layer at approximately ½-inch intervals. This creates tiny tunnels for the gelatin to seep into, ensuring that beautiful color permeates the cake.
- Dissolve the Gelatin: In five separate small bowls, combine ½ cup of boiling water with one flavor of gelatin in each. Stir each mixture for about 2 minutes, or until the gelatin is completely dissolved. You want to ensure there are no grainy particles left.
- Infuse with Color: This is where the magic begins! Carefully start pouring each different color of gelatin into the various holes you pierced in both cake layers. Aim to pour only one color into each hole. Continue pouring until all the holes are filled with their designated colors. Be mindful not to overfill, but ensure each cavity gets a good dose of liquid color.
- Chill the Gelatin-Infused Cakes: Once the gelatin has been poured, cover the cake pans and refrigerate them for at least 3 hours, or until the gelatin is firm and set within the cake. This chilling period is crucial for the gelatin to solidify and create those distinct colored pockets.
- Prepare the Whipped Topping Layer: After the gelatin has set, it’s time to assemble the layers. Dip the bottom of one cake pan in warm water for about 10 seconds to loosen the cake. Carefully unmold this first cake layer onto your serving plate or cake stand. Spread about 1 cup of the thawed whipped topping evenly over the surface of this layer.
- Assemble the Cake: Gently unmold the second cake layer and carefully place it on top of the first cake layer, which is already adorned with whipped topping.
- Frost the Cake: Use the remaining whipped topping to frost the entire exterior of the cake, ensuring a smooth, snowy finish that conceals the colorful layers within.
- Chill Again: Refrigerate the frosted cake until the whipped topping is firm. This allows the frosting to set nicely, making it easier to handle and decorate.
- Prepare the Drizzle Frosting: In a medium mixing bowl, place the egg white. Using an electric mixer, beat it until soft peaks form.
- Incorporate Sugar and Lemon: Add the confectioners’ sugar and the lemon juice to the whipped egg white. Stir with a spatula until the ingredients are combined.
- Achieve the Right Consistency: The goal is a thick but still running paste. If the mixture is too thin, it will run right off the cake. If it’s too thick, it won’t mix or drip down the sides as intended. Adjust with a tiny bit more confectioners’ sugar if too thin, or a drop or two of water or lemon juice if too thick.
- Color the Drizzle Frosting: Split this frosting mixture into five separate small bowls. Add a different food coloring to each bowl – orange, red, purple, blue, and green – stirring until each color is vibrant and uniform.
- Decorate with Drizzle: This is the final artistic touch! Carefully drizzle small amounts of each colored frosting over the top of the chilled cake. Start from the center and work your way outwards. This technique makes it easier to gauge when there’s enough icing for it to just start overflowing around the edge of the cake, creating a beautiful, cascading effect.
- Final Chill: Chill the cake once more until you are ready to serve. This final chill ensures all the flavors meld and the drizzle sets.
Expert Tips & Tricks
As a chef, I’m always looking for ways to elevate a dish, even a simple one. Here are a few tricks that will take your Rainbow Poke Cake from good to spectacular:
- Gelatin Dissolving is Key: Don’t rush dissolving the gelatin. Ensure it’s fully dissolved in the boiling water; any undissolved granules will create tiny hard pockets, marring the smooth texture.
- The Pierce Technique: The depth and spacing of your piercings are important. Too shallow, and the color won’t penetrate. Too deep, and you might risk the cake falling apart. Aim for consistent, ½-inch deep piercings.
- Whipping the Egg White: For the drizzle, ensure your egg white is whipped to soft peaks before adding the sugar and lemon juice. This creates a stable base for the frosting.
- Consistency is Crucial for Drizzle: The drizzle consistency is the most critical part of the decorative step. It needs to be fluid enough to flow but thick enough to hold its shape momentarily. Taste as you adjust with confectioners’ sugar or liquid; a little goes a long way.
- Make-Ahead Magic: The gelatin-infused cake layers can be made a day in advance. Wrap them tightly in plastic wrap and refrigerate. Assemble and frost the cake closer to serving time. The drizzle is best applied just before serving for maximum visual impact.
Serving & Storage Suggestions
This cake is a showstopper on its own, but consider serving it with a dollop of extra whipped topping or a side of fresh berries for a burst of complementary freshness. The vibrant colors make it perfect for celebrations, parties, or simply brightening up an ordinary day.
Store any leftover Rainbow Poke Cake in the refrigerator, tightly covered. It will keep well for up to 3-4 days. The colors may slightly bleed over time, but the deliciousness will remain. Avoid leaving it at room temperature for extended periods, as the whipped topping can spoil. Reheating is not recommended; this cake is best served chilled.
Nutritional Information
While this cake is a delightful treat, it’s good to have an idea of its nutritional profile. Please note that these are estimates and can vary based on specific brands and ingredient choices.
| Nutrient | Amount per Serving | % Daily Value |
|---|---|---|
| Calories | 482.8 | |
| Calories from Fat | ||
| Total Fat | 15.8 g | 24% |
| Saturated Fat | 6.6 g | 32% |
| Cholesterol | 24.3 mg | 8% |
| Sodium | 340.8 mg | 14% |
| Total Carbohydrate | 72.5 g | 24% |
| Dietary Fiber | 0.6 g | 2% |
| Sugars | 54.4 g | 217% |
| Protein | 14.8 g | 29% |
Variations & Substitutions
While the classic white cake base is wonderful, feel free to get creative!
- Cake Flavor: You could try a vanilla bean or even a lemon cake for a subtle variation in flavor that complements the fruity gelatin.
- Gelatin Flavors: Feel free to swap out the gelatin flavors for your favorites! Strawberry, lime, or even tropical fruit flavors could create a unique rainbow.
- Whipped Topping: If you prefer, you can make your own stabilized whipped cream from heavy cream and a little powdered sugar and gelatin.
- Drizzle Alternatives: For a dairy-free drizzle, you could experiment with a vegan powdered sugar icing made with plant-based milk.
FAQs
Q: Can I use a different size cake pan for this recipe?
A: While the recipe is designed for 9-inch rounds, you could adapt it for a 9×13 inch pan. You would need to adjust the gelatin quantities and piercing technique to ensure even distribution.
Q: Why is my drizzle frosting too thin or too thick?
A: The consistency of the drizzle is crucial. It needs to be thin enough to drizzle but thick enough to hold its shape slightly. Adjust with a tiny bit more confectioners’ sugar if too thin, or a drop of water or lemon juice if too thick.
Q: How far in advance can I make this cake?
A: The gelatin-infused cake layers can be made a day ahead. It’s best to assemble, frost, and apply the drizzle closer to serving time for the best presentation.
Q: What’s the best way to ensure the colors in the cake are distinct?
A: Thoroughly dissolve each gelatin flavor in its own separate bowl and pour into distinct holes. Chilling the cake for the full 3 hours allows the gelatin to set properly before assembly.
Q: Can I use homemade cake layers instead of store-bought?
A: Absolutely! Homemade cake layers will work beautifully. Just ensure they are completely cooled before you begin piercing and adding the gelatin.
Final Thoughts
The Rainbow Poke Cake is a testament to the fact that sometimes, the most impressive desserts are also the most fun to make and share. It’s a recipe that invites laughter, collaboration, and a little bit of childlike wonder into the kitchen. So, gather your ingredients, embrace the vibrant colors, and prepare to delight your taste buds and your eyes. I encourage you to share your creations and let me know how this dazzling cake brightens your table. Happy baking!