
Romantic Rosemary or Lavender Bread
The aroma of freshly baked bread has a way of transporting me. It’s not just a scent; it’s a memory, a feeling. I recall one crisp autumn evening, preparing for a special dinner with my partner. The air in the kitchen was alive with anticipation, and I decided to bake something truly unique. I had this recipe, adapted from Gourmet, tucked away, and its promise of fragrant herbs felt perfect for the occasion. As the rosemary (or lavender) bloomed in the dough, it filled my home with an intoxicating perfume, a prelude to the warmth and intimacy of the meal that followed. This bread isn’t just food; it’s an experience, a fragrant embrace for any romantic gathering or a quiet, personal indulgence.
Recipe Overview
- Prep Time: 1 hour 45 minutes (includes 1.5 hours rising time)
- Cook Time: 1 hour
- Total Time: 2 hours 45 minutes (plus 1 hour additional rising time)
- Servings: 20 (estimated, based on 2 loaves of 10 slices each)
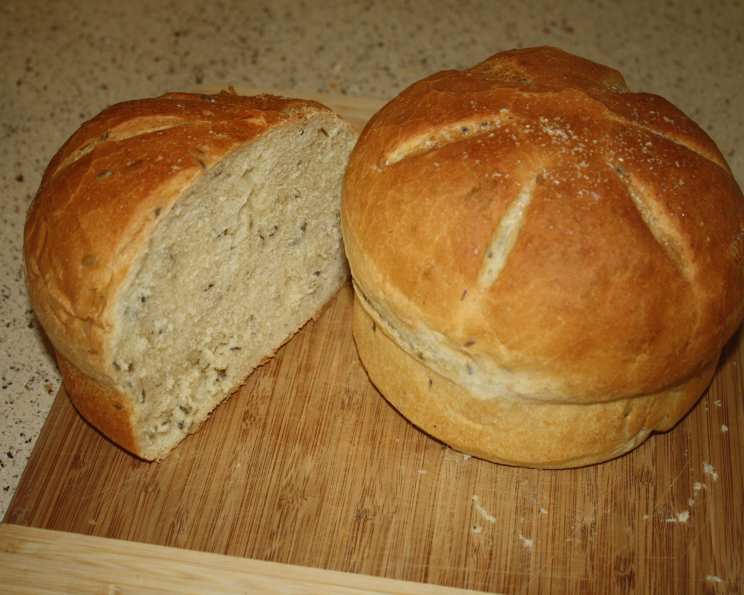
- Yield: 2 round loaves
- Dietary Type: Vegetarian (can be made Vegan with a non-dairy buttermilk substitute)
Ingredients
This recipe yields two magnificent, fragrant loaves, perfect for sharing or savoring over a few days. The choice between rosemary and lavender is a delightful one, each offering a distinct yet equally captivating aromatic profile.
- 3 ¼ teaspoons active dry yeast
- 1 cup lukewarm water (120°F / 49°C)
- 1 cup buttermilk
- ⅓ cup olive oil
- ¼ cup fresh rosemary or ¼ cup fresh lavender blossoms, finely chopped
- 1 tablespoon salt
- 1 teaspoon salt
- 6 ¾ cups all-purpose flour, approximately
- Yellow cornmeal, as needed
- Coarse salt, for sprinkling on loaves (optional)
- Spray bottle filled with cold water, for spritzing loaves
Ingredient Notes:
- When using dried herbs, it’s often recommended to use half the amount of fresh. Herbes de Provence can also be a lovely, complex alternative, again, using half the quantity of fresh.
- For a vegan option, you can substitute the buttermilk with a homemade or store-bought vegan buttermilk. To make your own, combine 1 cup of unsweetened plant-based milk (like soy or almond) with 1 tablespoon of lemon juice or white vinegar and let it sit for 5-10 minutes until it curdles.
Equipment Needed
To bring this aromatic bread to life, you’ll want to have these tools at the ready:
- Large mixing bowl
- Stand mixer with dough hook attachment (optional, but highly recommended)
- Measuring cups and spoons
- Flat work surface
- Plastic wrap
- Clean, slightly damp kitchen towel
- Large baking sheet
- Serrated knife
- Wire cooling racks
- Spray bottle
Instructions
Crafting this bread is a rewarding journey, beginning with the fundamental activation of yeast and culminating in the irresistible golden crust of your finished loaves.
- In a small bowl or measuring cup, combine the active dry yeast with the lukewarm water. Let this mixture sit undisturbed for about 10 minutes. It should become foamy and thick. If it doesn’t, your yeast may be inactive, or your water was too hot or too cold, and you’ll need to start over with fresh yeast.
- In the bowl of a stand mixer fitted with the dough hook, or in a large mixing bowl if you’re kneading by hand, combine the buttermilk, olive oil, your chosen herb (rosemary or lavender), the 1 tablespoon of salt, and the 1 teaspoon of salt.
- Add the activated yeast mixture to the buttermilk and oil blend and combine well.
- Begin adding the all-purpose flour gradually. If using a stand mixer, beat on low speed until the dough starts to pull away from the sides of the bowl in a cohesive mass. If mixing by hand, stir with a wooden spoon until the dough becomes too stiff to mix further. You may not need all of the flour, or you might need a touch more; the goal is a dough ball that leaves the sides of the bowl in one mass.
- Turn the dough out onto a lightly floured flat surface. With lightly floured hands, knead the dough until it is smooth and elastic. This typically takes about 5-10 minutes of consistent kneading. You’ll feel the dough transform under your hands, becoming supple and yielding.
- Lightly grease a large bowl with a bit of olive oil. Place the kneaded dough into the greased bowl, and flip it over so that both sides are lightly coated with oil. Cover the bowl tightly with plastic wrap, and then set it in a warm place to rise until it has doubled in bulk. This usually takes about 1.5 hours, but the exact time can vary depending on the ambient temperature.
- Once the dough has risen to double its size, gently punch it down to release the air. Turn the dough out onto a lightly floured surface. Cut the dough into two equal halves.
- Shape each half into a round loaf. You can do this by gently tucking the edges under to create surface tension and a smooth, taut top.
- Lightly grease a large baking sheet and dust it generously with yellow cornmeal. This not only prevents sticking but also imparts a lovely texture and subtle crunch to the bottom of the loaves. Place the shaped loaves onto the prepared baking sheet, ensuring they have ample space between them as they will rise again.
- Cover the loaves loosely with a clean, slightly damp kitchen towel. Let them rise for another hour in a warm place.
- While the loaves are having their second rise, preheat your oven to 425°F (220°C). Position an oven rack in the center of the oven.
- Just before baking, using a sharp serrated knife, slash the top of each loaf in an asterisk (*) pattern. This allows the bread to expand evenly in the oven. If you are using it, sprinkle each loaf with a little coarse salt for an extra flavor dimension and visual appeal.
- Carefully place the baking sheet with the loaves into the preheated oven. Bake for 15 minutes, and during this initial period, spritz the loaves with water from your spray bottle at least 2-3 times. This creates steam, which contributes to a beautifully crisp crust.
- After the initial 15 minutes, reduce the oven temperature to 400°F (200°C) and continue baking for an additional 45-55 minutes. Do not spritz with water during this second phase of baking. The loaves are done when they sound hollow when you rap on the bottom and appear a deep, golden brown.
- Once baked to perfection, remove the loaves from the oven and transfer them immediately to wire cooling racks to cool completely. Allowing them to cool fully is crucial for the texture of the crumb to set properly.
Expert Tips & Tricks
As a chef, I’ve learned that a few subtle touches can elevate homemade bread from good to truly exceptional.
- The Flour Measurement Dance: The amount of flour needed can fluctuate based on humidity and the type of flour. Always measure your flour by weight if possible for absolute precision. If using cups, spoon the flour into the cup and level it off with a straight edge; don’t scoop directly from the bag, as this can compact the flour and lead to a drier, denser loaf.
- Warmth for the Rise: Finding the perfect “warm place” is key for dough to rise properly. An oven that has been turned on for a minute and then turned off is often ideal. Alternatively, place the covered bowl near a sunny window or on top of your gently warming (but not hot) oven.
- The Spritz Secret: That steam created by spritzing the loaves in the initial baking phase is the magic behind a truly artisanal crust. It delays the setting of the crust, allowing the bread to expand fully and creating that desirable crackly exterior.
- Doneness Test: Beyond the hollow sound, another reliable test for doneness is an internal temperature of 190-200°F (88-93°C) when measured with an instant-read thermometer.
Serving & Storage Suggestions
This Rosemary or Lavender Bread is a versatile star. Serve it warm, sliced thickly, as an accompaniment to a romantic dinner, alongside a creamy soup, or with a platter of fine cheeses and charcuterie. It’s also wonderful on its own, perhaps with a drizzle of good quality olive oil.
For storage, once completely cooled, you can keep the bread at room temperature, tightly wrapped in plastic wrap or a bread bag, for up to 3 days. If you anticipate not finishing it within that time, slicing it and freezing the portions is an excellent option. To reheat, you can toast slices directly from frozen, or thaw a whole loaf at room temperature and then warm it in a 350°F (175°C) oven for 10-15 minutes until the crust is re-crisped.
Nutritional Information
Here is an estimated nutritional breakdown per serving (assuming 20 servings per loaf, so 10 servings per loaf):
| Nutrient | Amount per Serving | % Daily Value |
|---|---|---|
| Calories | 193 kcal | 9% |
| Total Fat | 4.2 g | 5% |
| Saturated Fat | 0.7 g | 4% |
| Cholesterol | 0.5 mg | 0% |
| Sodium | 480 mg | 21% |
| Total Carbohydrate | 33.1 g | 12% |
| Dietary Fiber | 1.4 g | 5% |
| Total Sugars | 0.7 g | 2% |
| Protein | 5 g | 10% |
Note: Nutritional values are estimates and can vary based on specific ingredients used.
Variations & Substitutions
The beauty of this recipe lies in its adaptability.
- Herb Variations: Feel free to experiment with other complementary herbs. Thyme, sage, or a blend of herbes de Provence can offer delightful alternatives.
- Flour Fun: For a heartier loaf, substitute up to one-third of the all-purpose flour with whole wheat flour. You might need to slightly adjust the liquid.
- Garlic Infusion: Add a clove or two of finely minced garlic to the dough along with the herbs for a savory twist.
- Seed Sprinkle: Incorporate a few tablespoons of sesame seeds, poppy seeds, or flax seeds into the dough for added texture and flavor.
FAQs
Q: Can I use dried rosemary or lavender instead of fresh?
A: Yes, you can, but it’s generally recommended to use half the amount of dried herbs compared to fresh, as dried herbs are more potent in flavor.
Q: Why didn’t my yeast get foamy?
A: This typically happens if your water was too hot (killing the yeast) or too cold (not activating it). Ensure your water is lukewarm (around 120°F/49°C). Also, check the expiration date of your yeast.
Q: My dough seems too sticky, what should I do?
A: Add flour, one tablespoon at a time, during the kneading process until the dough is smooth and elastic and no longer excessively sticky. Avoid adding too much flour, which can result in a dry loaf.
Q: How can I achieve a really crispy crust?
A: The spritzing technique with water in the initial baking stage is crucial for a crisp crust. Additionally, ensuring your oven is fully preheated and baking on a lower rack can help promote browning from the bottom up.
Q: Can I make this bread ahead of time?
A: Yes, the dough can be refrigerated for its first rise overnight, which can develop more complex flavors. Punch it down, shape, and proceed with the second rise and baking as usual.
Final Thoughts
Baking this Rosemary or Lavender Bread is an act of love, a way to imbue your home with warmth and fragrance. The gentle scent that fills your kitchen as it bakes is a promise of the delight to come. Whether you’re celebrating a special occasion or simply seeking a moment of quiet indulgence, this bread offers a taste of comfort and elegance. I encourage you to try it, to savor its unique aroma and flavor, and to share it with those you hold dear. Serve it with a glass of crisp white wine or a delicate herbal tea, and let the simple magic of freshly baked bread create beautiful memories.