
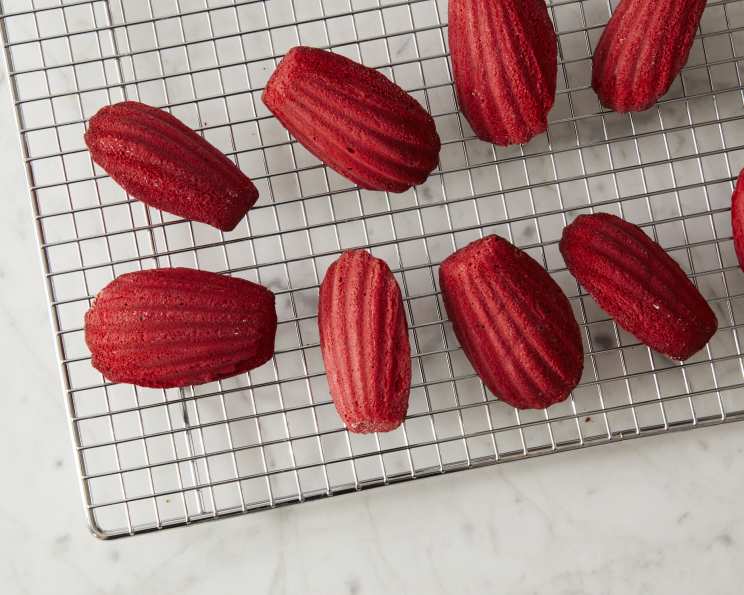
Red Velvet Madeleines: A Touch of Crimson Charm
There’s a certain magic that happens when you combine the delicate, shell-like beauty of a madeleine with the captivating allure of red velvet. For me, it always brings back memories of bustling holiday bake sales at my grandmother’s church, where trays of these ruby-hued treasures were a guaranteed sell-out. The scent of warm butter and sweet cocoa mingling with that subtle, almost imperceptible tang of something special – it was a symphony for the senses. Each tiny cake, perfectly browned around the edges and impossibly tender within, felt like a little gift, a fleeting moment of pure, unadulterated joy. This recipe, a delightful adaptation from the pages of Southern Living, captures that nostalgic essence beautifully, offering a sophisticated yet approachable way to bring a touch of that crimson charm to your own kitchen.
Recipe Overview
- Prep Time: 20 minutes
- Cook Time: 8-10 minutes per batch
- Total Time: Approximately 40 minutes (plus cooling)
- Servings: 12
- Yield: 24 madeleines
- Dietary Type: Classic
Ingredients
The alchemy of red velvet madeleines lies in the harmonious balance of classic cake ingredients with the signature elements that define this beloved flavor profile. Precision in measurement is key to achieving that perfect, airy crumb and moist interior.
- 3⁄4 cup granulated sugar
- 3 large eggs
- 2 egg yolks
- 1 teaspoon vanilla extract
- 3⁄4 cup butter, melted
- 2 tablespoons red food coloring
- 1 1⁄3 cups cake flour
- 2 tablespoons unsweetened cocoa powder
- 1⁄2 teaspoon baking powder
- 1⁄4 teaspoon salt
- Powdered sugar (optional, for dusting)
Equipment Needed
To create these exquisite madeleines, you’ll need a few essential tools that ensure their characteristic shape and texture.
- Madeleine pans (at least two, or bake in batches)
- Electric mixer (stand mixer or hand mixer)
- Mixing bowls (at least two)
- Whisk
- Sifter or fine-mesh sieve
- Rubber spatula
- Wire cooling racks
Instructions
Crafting these delightful red velvet madeleines is a methodical yet rewarding process. Follow these steps with care, and you’ll be rewarded with impeccably formed, beautifully flavored little cakes.
- Begin by preheating your oven to 400 degrees Fahrenheit. This initial high heat is crucial for achieving the characteristic hump on a madeleine.
- Next, lightly grease your madeleine pans. A good quality non-stick spray or softened butter works wonderfully. Ensure every nook and cranny is coated to prevent sticking.
- In a large mixing bowl, combine the granulated sugar, eggs, egg yolks, and vanilla extract.
- Using your electric mixer, beat this mixture on medium-high speed for 5 minutes. You are looking for a significant change in texture and color; the mixture should become thick, pale, and ribbon-like when the beaters are lifted. This process, known as ribbon stage, incorporates air essential for lightness.
- Gently add the melted butter and the red food coloring to the egg mixture. Beat again until just blended. Be careful not to overmix at this stage.
- In a separate medium bowl, sift together the cake flour, unsweetened cocoa powder, baking powder, and salt. Sifting ensures no lumps and aerates the dry ingredients, contributing to a lighter texture.
- Now, fold the dry ingredients into the egg mixture. Use a rubber spatula and a gentle motion. Incorporate the dry ingredients until just combined, being careful not to overwork the batter. Overmixing can develop the gluten in the flour, leading to tough madeleines.
- Carefully fill each cup of the madeleine pans about 3/4 full. For most standard madeleine pans, this will be about 1 tablespoon of batter per madeleine. Don’t overfill, as the batter will puff up slightly.
- Bake for 8 to 10 minutes. Keep a close eye on them. The madeleines are ready when they are puffed, spring back when lightly touched, and the edges are lightly golden brown.
- As soon as they come out of the oven, immediately remove the madeleines from the pans. This prevents them from steaming and becoming soggy. Use a small offset spatula or a paring knife to gently loosen them if needed.
- Cool the madeleines on wire racks. Allow them to cool completely, which will take about 20 minutes. This step is important for their final texture.
- Dust with powdered sugar just before serving, if desired. This adds a final touch of elegance and a hint of sweetness that complements the rich flavor of the red velvet.
Expert Tips & Tricks
Achieving that perfect madeleine hump, with its characteristic shell shape and tender interior, is an art form. Here are a few pointers from my years in the kitchen to help you master these little beauties:
- Temperature is Key: Ensure your butter is melted but not hot when you add it to the batter. If it’s too hot, it can cook the eggs. Conversely, if it’s too cool, it might seize. Aim for lukewarm.
- Don’t Overmix the Batter: This is perhaps the most crucial tip for tender madeleines. Once the dry ingredients are added, mix just until no streaks of flour remain. A few small lumps are preferable to overmixing.
- Chill the Batter (Optional but Recommended): For an even better madeleine hump, you can chill the batter in the refrigerator for at least 30 minutes, or even overnight. This allows the gluten to relax and the fats to firm up, which can lead to a more pronounced “bump.” If you chill the batter, you might need to let it sit at room temperature for a few minutes before piping it into the pans, but ensure it’s still cool.
- Know Your Oven: Oven temperatures can vary. If your oven tends to run hot or cold, adjust the baking time accordingly. The visual cues of a springy surface and golden edges are your best guides.
- Pan Preparation Matters: Don’t skimp on greasing your madeleine pans. Even with non-stick pans, a light greasing ensures easy release and those beautifully defined shells. Consider using melted butter or a baking spray with flour for best results.
Serving & Storage Suggestions
Red velvet madeleines are at their absolute peak when enjoyed shortly after they’ve cooled. Their delicate texture is best appreciated fresh.
Serving: These elegant little cakes are perfect on their own, as a delightful accompaniment to coffee or tea. They also make a stunning addition to a dessert platter or a special brunch spread. For an extra touch of decadence, consider a light dusting of powdered sugar just before serving. They are also lovely served with a small dollop of whipped cream or a light crème anglaise.
Storage: Store cooled madeleines in an airtight container at room temperature for up to 2 days. Avoid the refrigerator, as this can dry them out. If you need to store them for longer, you can freeze them. Wrap them well in plastic wrap, then in foil, and freeze for up to 1 month. Thaw at room temperature. They are best enjoyed within a day or two of thawing.
Nutritional Information
While a precise nutritional breakdown can vary based on specific ingredients and portion sizes, here’s an estimated overview for these delectable Red Velvet Madeleines.
| Nutrient | Amount per Serving | % Daily Value |
|---|---|---|
| Calories | 234.4 kcal | |
| Calories from Fat | ||
| Total Fat | 13.6 g | 20% |
| Saturated Fat | 8 g | 40% |
| Cholesterol | 104.7 mg | 34% |
| Sodium | 184.5 mg | 7% |
| Total Carbohydrate | 25.2 g | 8% |
| Dietary Fiber | 0.6 g | 2% |
| Sugars | 12.7 g | 50% |
| Protein | 3.5 g | 7% |
Note: Nutritional values are estimates and may vary.
Variations & Substitutions
While this recipe is a delightful classic, there are always ways to put your personal stamp on these ruby treats.
- Chocolate Drizzle: For an extra layer of indulgence, melt some dark or white chocolate and drizzle it over the cooled madeleines.
- Cream Cheese Glaze: A simple glaze made with cream cheese, powdered sugar, and a splash of milk or lemon juice can add a tangy contrast to the sweet cake.
- Extract Variations: Experiment with other extracts like almond or raspberry for a subtle flavor twist that complements the red velvet profile.
- Gluten-Free Option: For a gluten-free version, carefully substitute the cake flour with a high-quality gluten-free all-purpose baking blend that contains xanthan gum. You may need to adjust the baking time slightly.
FAQs
Q: Why are my madeleines not puffing up into the classic “hump”?
A: This often occurs if the oven isn’t hot enough, the batter is overmixed, or the ingredients aren’t properly aerated. Ensuring your oven is accurately preheated and the batter is mixed just until combined is key.
Q: Can I make madeleine batter ahead of time?
A: Yes, you can make the batter ahead of time. Chilling the batter in the refrigerator for at least 30 minutes, or even overnight, can actually improve the texture and the “hump.” Just ensure it’s still cool when you bake.
Q: My madeleines are sticking to the pan. What am I doing wrong?
A: Inadequate greasing is the most common culprit. Ensure you’ve thoroughly greased and floured, or used a good quality baking spray, in every cavity of your madeleine pan.
Q: How can I achieve the vibrant red color without using too much food coloring?
A: High-quality gel food coloring is more concentrated and provides a richer color with less product. Ensure you’re using a good amount of cocoa powder, as it can slightly mute the red hue.
Q: What is the difference between cake flour and all-purpose flour for madeleines?
A: Cake flour has a lower protein content than all-purpose flour, which results in a more tender and delicate crumb, ideal for light pastries like madeleines.
Final Thoughts
These Red Velvet Madeleines are more than just a treat; they are an invitation to a moment of refined pleasure. Their jewel-toned hue and delicate form evoke a sense of occasion, whether it’s a quiet afternoon indulgence or a celebratory gathering. They possess a charm that is both nostalgic and undeniably contemporary, making them a versatile addition to any baker’s repertoire. I encourage you to try this recipe, savoring the process as much as the delightful outcome. Share them with loved ones, perhaps alongside a rich, dark coffee or a delicate herbal tea, and watch as these little crimson gems bring smiles and delight. They are a testament to the simple beauty of baking, proving that sometimes, the most exquisite pleasures come in the smallest packages.