
Crabby Bread: A Playful Delight for Any Occasion
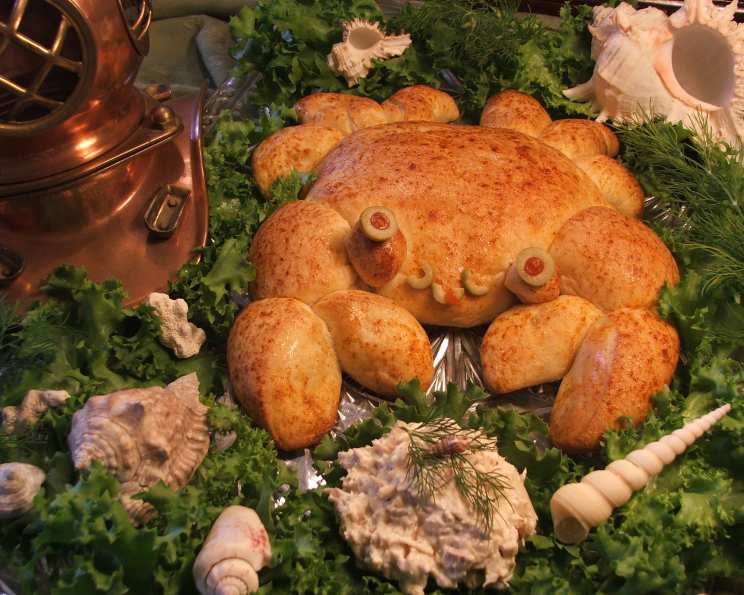
The first time I encountered “Crabby Bread,” it wasn’t just a dish; it was an instant smile. Imagine a party spread, bustling with conversation, and then there it is. A golden-brown dough sculpted into the most charming crab shape, nestled on a bed of crisp lettuce. It was so whimsical, so utterly unexpected, that it immediately stole the show. I remember the playful way my friends and I, despite my own crustacean allergy, enthusiastically tore off pieces to scoop up a rich crab dip, the aroma of baked bread and savory seafood mingling in the air. It transformed a simple appetizer into a memorable experience, proving that sometimes, the most delightful dishes are the ones that embrace a bit of fun.
Recipe Overview
- Prep Time: 35 minutes
- Cook Time: 20 minutes
- Total Time: 55 minutes (plus rising time)
- Servings: 4-8
- Yield: 1 crab-shaped bread
- Dietary Type: Vegetarian (can be made vegan by omitting egg wash)
Ingredients
This recipe relies on the magic of frozen bread dough to create its delightful shape. The simplicity of the ingredients allows the “crab” to be the star.
- 5 Rhodes frozen rolls, Texas size, thawed but still cold
- 1 toothpick, broken into 4 pieces
- 1 tablespoon butter, melted
- 1 egg, beaten (for egg wash, optional)
- Paprika (optional, for color)
- 1 pimento stuffed olive, halved (for eyes)
- Crab dip (or any seafood-style dip, spread, etc.)
- Crackers (optional, for serving)
- Fresh dill sprigs (optional, for garnish)
Equipment Needed
- Large baking sheet
- Small bowl (for egg wash)
- Pastry brush
- Serving platter
- Lettuce leaves (for presentation)
Instructions
Crafting your “Crabby Bread” is a wonderfully engaging process, almost like a culinary sculpting project. The key is to work with the dough while it’s still cold, making it easier to shape and manipulate.
-
Prepare the Crab’s Body: Take two of the Rhodes frozen rolls. Press them together to form a flat, football-like shape. This will be the main body of your crab. Place this shaped dough onto a large, sprayed baking sheet.
-
Form the Eyes: Using another roll, cut off enough dough to create two small balls for the eyes. Gently roll each piece into a round shape. To secure these eyes to the body, take a small piece of the broken toothpick and insert it into each eye ball. Then, carefully stick the toothpick end into the front of the body where you want the eyes to be.
-
Shape the Arms: From the remaining dough on the roll used for the eyes, cut the rest in half. These two halves will form the crab’s arms. Position each arm to the side of the eyes, ensuring they are placed before the end of the body shape.
-
Create the Claws: Take another roll and cut it in half. Now, take each of these halves and cut them almost in half, but off-center, to create the distinct shape of claws. Place the smaller part of each claw closest to the body at the end of each arm.
-
Fashion the Legs: Roll out the last roll into a long rope, approximately 12 inches in length. Divide this rope into 6 equal lengths. These will be the crab’s legs. Arrange these legs on each side of the crab’s body. You can curve two legs forward and one leg backward on each side. Gently tuck the legs slightly under the body for a more natural appearance.
-
First Rise: Once your crab shape is complete, brush the entire crab with the melted butter. Cover the crab loosely with plastic wrap. Allow it to rise for 30-45 minutes, or until it has doubled in size. Chef’s Note: I’ve found that a longer rise time of up to an hour can result in a slightly fatter, more pronounced crab shape, but 45 minutes often yields a more perfectly proportioned crustacean.
-
Prepare for Baking: Preheat your oven to 350°F (175°C).
-
Apply the Egg Wash and Seasoning: After the first rise, brush the risen crab shape with the beaten egg. If desired, sprinkle lightly with paprika for a beautiful golden hue.
-
Bake: Bake the crab at 350°F (175°C) for 20 minutes.
-
Add the Finishing Touches: While the crab is baking, prepare its eyes. Take the halved pimento stuffed olives. Place these onto the ends of the dough eyes, with the cut side facing outward. This adds a vibrant pop of color and a playful look.
-
Assemble and Serve: Once the crab bread is baked and has cooled slightly, carefully transfer it to a lettuce-lined platter. Place a generous mound of your favorite crab dip right between the claws.
-
Garnish: To complete the presentation, surround the “Crabby Bread” with decorative shells (like oyster shells or small decorative shells), your favorite crackers, and fresh dill sprigs, if desired.
Expert Tips & Tricks
- Dough Temperature is Key: Working with the thawed but still cold dough is crucial. If it becomes too warm and sticky, pop it back into the refrigerator for a few minutes to firm up. This makes shaping much cleaner.
- Toothpick Safety: Ensure the toothpick pieces are small and securely inserted. You can also use small pieces of uncooked spaghetti.
- Gentle Handling: Be gentle when shaping the dough. Overworking it can make it tough.
- Visual Appeal: Don’t be afraid to get creative with the shaping of the legs and arms. The more character you give your crab, the more charming it will be!
- Crab Dip Variations: While crab dip is the natural pairing, feel free to experiment with other seafood-style dips, a creamy spinach-artichoke dip, or even a savory hummus for a vegetarian option.
Serving & Storage Suggestions
“Crabby Bread” is at its absolute best served warm, fresh from the oven, when the bread is soft and slightly crisp on the outside. Arrange it as the centerpiece of an appetizer platter. It’s perfect for parties, picnics, and barbecues, providing an interactive and fun way for guests to enjoy their dip.
Leftovers can be stored at room temperature, tightly covered, for up to a day. For longer storage, refrigerate the bread (without the dip) in an airtight container for up to 2-3 days. To reheat, gently warm in a 300°F (150°C) oven for about 10-15 minutes until heated through.
Nutritional Information
This information is an estimate and will vary based on the specific ingredients and brand of frozen rolls used.
| Nutrient | Amount per Serving | % Daily Value |
|---|---|---|
| Calories | 150-200 kcal | 8-10% |
| Total Fat | 5-7 g | 7-9% |
| Saturated Fat | 2-3 g | 10-15% |
| Cholesterol | 10-15 mg | 3-5% |
| Sodium | 250-300 mg | 11-13% |
| Total Carbohydrate | 25-30 g | 9-11% |
| Dietary Fiber | 1-2 g | 4-8% |
| Sugars | 3-5 g | N/A |
| Protein | 5-7 g | 10-14% |
(Note: Nutritional information does not include the crab dip, crackers, or optional garnishes.)
Variations & Substitutions
- Seafood Allergy Friendly: If you or your guests have seafood allergies, this is a fantastic base for other dips! Consider a delicious spinach and artichoke dip, a creamy buffalo chicken dip, or even a rich mushroom pâté.
- Herb Infusion: Incorporate finely chopped fresh herbs like parsley or chives into the dough before shaping for an extra layer of flavor.
- Garlic Lovers: Add a clove or two of minced garlic to the melted butter before brushing for a garlicky kick.
- Spicy Kick: Mix a pinch of cayenne pepper or red pepper flakes into the egg wash for a subtle heat.
FAQs
Q: Can I make this “Crabby Bread” ahead of time?
A: You can shape the crab and let it do its first rise, then cover it tightly and refrigerate it overnight. Bake it directly from the refrigerator, adding a few extra minutes to the baking time.
Q: What kind of dip works best with “Crabby Bread”?
A: A creamy crab dip is the classic choice, but any rich, flavorful dip that can be scooped easily will work wonderfully.
Q: Is it difficult to shape the dough into a crab?
A: No, working with cold, thawed frozen dough is quite forgiving. Don’t worry about perfection; the charm lies in its homemade, playful appearance.
Q: Can I use different types of frozen rolls?
A: Yes, other brands of frozen white or whole wheat rolls should work. Adjust the number of rolls as needed to achieve the desired size.
Q: How do I ensure the legs and claws don’t detach during baking?
A: Ensure they are well-tucked and slightly pressed into the body. The toothpick securing the eyes will also help hold parts of the front together.
Final Thoughts
“Crabby Bread” is more than just a recipe; it’s an invitation to play in the kitchen and to bring a sense of joy and whimsy to your table. It’s the perfect conversation starter, guaranteed to elicit delighted reactions and create lasting memories. Whether you’re hosting a grand party or just looking for a fun, interactive lunch, this delightful crab-shaped bread is sure to be a crowd-pleaser. Don’t hesitate to embrace its playful spirit and have fun with the process. I encourage you to give it a try, and I’d love to hear about your own “crabby” creations!