
Finnish Pulla Bread: A Sweet Hug of Cardamom and Comfort
The scent of cardamom-laced bread baking in a warm oven is more than just a culinary experience for me; it’s a deeply ingrained memory of childhood winters in Finland. My grandmother, with her flour-dusted hands and ever-present smile, would knead dough with a rhythmic grace that always mesmerized me. The aroma that would fill her cozy kitchen, a symphony of sweet yeast, warming spices, and rich butter, is a sensory imprint I carry with me, a tangible connection to family and tradition. Pulla, in its braided beauty and comforting embrace, is that memory made edible, a testament to the simple pleasures that nourish the soul.
Recipe Overview
- Prep Time: Approximately 30 minutes (plus resting and rising time)
- Cook Time: 25 to 30 minutes
- Total Time: About 2.5 to 4 hours (including rising and baking)
- Servings: 3 loaves
- Yield: 3 large braided loaves
- Dietary Type: Contains Gluten, Eggs, Dairy
Ingredients
The foundation of a perfect pulla lies in quality ingredients, handled with care.
- 2 cups milk
- ½ cup warm water (110 degrees F/45 degrees C)
- 1 (¼ ounce) package active dry yeast
- 1 cup white sugar
- 1 teaspoon salt
- 1 teaspoon ground cardamom
- 4 large eggs, beaten
- 9 cups all-purpose flour
- ½ cup butter, melted
- 1 large egg, beaten (for egg wash)
- 2 tablespoons white sugar (for sprinkling)
Equipment Needed
A few essential tools will make the process smoother:
- Medium saucepan
- Small bowl or measuring cup
- Large mixing bowl
- Electric mixer with dough hook (optional, but helpful)
- Measuring cups and spoons
- Floured surface for kneading
- Inverted mixing bowl or plastic wrap for covering
- Clean dishtowel
- Baking sheets
- Pastry brush
Instructions
Crafting authentic Finnish Pulla is a labor of love, rewarding you with every aromatic step.
- Warm the milk: In a medium saucepan, gently warm the milk until it just begins to bubble. Immediately remove it from the heat. Allow it to cool until it is lukewarm. This is crucial for activating the yeast without killing it.
- Activate the yeast: In a small bowl or measuring cup, dissolve the yeast in the warm water. Let it sit for about 5–10 minutes until it becomes foamy, indicating it’s active.
- Combine wet ingredients: To the foamy yeast mixture, stir in the lukewarm milk, 1 cup of white sugar, the salt, ground cardamom, and the 4 beaten eggs.
- Create the batter: Gradually add enough all-purpose flour to create a thick batter. This will be approximately 2 cups of flour. Beat this mixture until it is smooth and elastic.
- Incorporate more flour: Add about 3 more cups of the all-purpose flour and beat well. The dough should begin to thicken and appear smooth and glossy.
- Add the butter: Pour in the ½ cup of melted butter (or margarine) and stir it in thoroughly.
- Beat again: Beat the dough once more until it looks consistently glossy.
- Stiffen the dough: Stir in the remaining flour (you may not need all 9 cups, or you might need a little more, depending on humidity). The goal is to achieve a stiff dough that is no longer sticky.
- First rest: Turn the dough out of the bowl onto a lightly floured surface. Cover it with an inverted mixing bowl or plastic wrap and let it rest for 15 minutes. This initial rest helps the gluten relax.
- Knead the dough: After the rest, knead the dough on the floured surface until it becomes smooth and satiny. This develops the gluten structure, which is essential for a good rise and texture.
- First rise: Place the kneaded dough into a lightly greased mixing bowl. Turn the dough to ensure the entire surface is lightly coated with grease. Cover the bowl with a clean dishtowel. Let it rise in a warm place until it has doubled in bulk. This typically takes about 1 hour.
- Punch down and second rise: Once doubled, punch down the dough to release the air. Cover it again and let it rise a second time until it is almost doubled.
- Shape the loaves: Turn the dough out onto a floured surface. Divide the dough into 3 equal parts. Then, divide each of those thirds into 3 more parts, giving you 9 smaller pieces in total.
- Create the braids: Roll each of the 9 pieces into a 12 to 16 inch strip. Braid 3 strips together to form a single loaf. Repeat this process twice more, so you have 3 large braided loaves.
- Prepare for baking: Carefully lift the braided loaves and place them onto greased baking sheets. Let them rise for another 20 minutes.
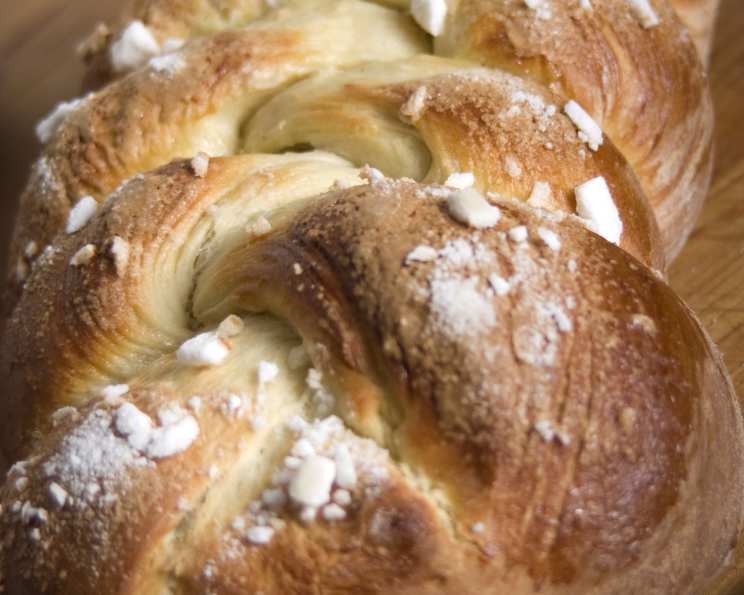
- Apply egg wash and sugar: In a small bowl, whisk the remaining 1 egg with a tablespoon of water or milk to create an egg wash. Brush this mixture evenly over each loaf. Then, sprinkle generously with the remaining 2 tablespoons of white sugar.
- Bake: Preheat your oven to 400 degrees F (205 degrees C). Bake the pulla loaves for 25 to 30 minutes. Check occasionally during baking, as the bottoms can burn easily. The loaves should be a deep golden brown and sound hollow when tapped on the bottom.
Expert Tips & Tricks
- Warmth is Key: Ensure your rising environment is consistently warm, but not hot. A slightly warm oven (turned off, with the light on) or near a cozy radiator can be ideal.
- Dough Consistency: The amount of flour needed can vary. Add it gradually, aiming for a dough that is soft and pliable but not sticky. Over-flouring will result in a dry loaf.
- Braid Tightness: Don’t braid too tightly, or the dough won’t have room to expand properly during its final rise and baking.
- Preventing Burned Bottoms: If you notice the bottoms browning too quickly, place a baking sheet on the rack below the pulla. This acts as a heat shield.
- Cardamom Power: For an even more pronounced cardamom flavor, lightly crush whole cardamom pods and grind them yourself just before adding.
Serving & Storage Suggestions
Serve your beautiful pulla loaves warm, perhaps with a generous smear of butter, or alongside a steaming cup of coffee or tea. It’s also a delightful accompaniment to fruit compotes or a rich hot chocolate.
Leftover pulla can be stored at room temperature, wrapped tightly in plastic wrap or in an airtight container, for 2–3 days. For longer storage, you can freeze individual slices or whole loaves. To reheat, a brief warming in a low oven (around 300°F/150°C) will revive its freshness.
Nutritional Information
This is an estimation and can vary based on specific ingredients used.
| Nutrient | Amount per Serving | % Daily Value |
|---|---|---|
| Calories | ~717 kcal | 36% |
| Total Fat | ~28.5 g | 37% |
| Saturated Fat | ~16.3 g | 82% |
| Cholesterol | ~270 mg | 90% |
| Sodium | ~399 mg | 17% |
| Total Carbohydrate | ~96.8 g | 35% |
| Dietary Fiber | ~3.6 g | 13% |
| Sugars | ~43.8 g | 88% |
| Protein | ~18.6 g | 37% |
(Note: Nutritional information is an estimate for one-third of the total recipe yield.)
Variations & Substitutions
While the classic pulla is divine, feel free to experiment:
- Raisin Pulla: Gently fold in about 1 cup of plumped raisins into the dough during the last stages of kneading or after the first rise.
- Almond Pulla: Add ½ cup of finely chopped almonds to the dough for added texture and nutty flavor.
- Orange Zest: A teaspoon of fresh orange zest can add a bright, citrusy note that pairs beautifully with cardamom.
- Non-Dairy Milk: For a dairy-free version, you can attempt to substitute the milk with unsweetened, fortified plant-based milk like oat or soy milk. The butter can be replaced with a dairy-free butter substitute. Note that texture may vary slightly.
FAQs
Q: Why is my pulla dough not rising?
A: This is often due to inactive yeast. Ensure your yeast is fresh and that the water used to activate it was at the correct temperature (110°F/45°C), not too hot or too cold.
Q: Can I make pulla ahead of time?
A: Yes, you can prepare the dough and let it do its first rise, then cover and refrigerate it overnight. Bring it to room temperature before shaping and proceeding with the recipe.
Q: What’s the best way to store pulla to keep it fresh?
A: Tightly wrap the cooled bread in plastic wrap or store it in an airtight container at room temperature. For longer storage, freezing is recommended.
Q: Why did my pulla bread turn out dry?
A: This is usually a result of adding too much flour. Measure your flour accurately and add it gradually until the dough is just stiff enough to handle.
Q: Can I use instant yeast instead of active dry yeast?
A: Yes, you can substitute instant yeast for active dry yeast. You can typically skip the proofing step with warm water and add it directly to the dry ingredients, but still follow the liquid measurements.
Final Thoughts
This Finnish Pulla is more than just a bread; it’s an invitation to slow down, to appreciate the craft of baking, and to share a piece of comfort and tradition. It’s the perfect centerpiece for a weekend brunch, a thoughtful gift for friends and family, or simply a delightful treat to enjoy with a warm beverage on a quiet afternoon. I encourage you to embrace the process, savor the incredible aroma that will fill your home, and share the joy this beautiful bread brings.