
The Alchemy of Flavor: Crafting Your Own Infused Vinegars
There’s a certain magic that happens when simple ingredients are allowed to mingle and transform over time. For me, this magic is most profoundly experienced with infused vinegars. I remember my grandmother, a woman whose kitchen was always a symphony of aromas, meticulously preparing her own herb vinegars. She’d carefully pluck sprigs from her garden, her hands stained with the faintest scent of basil and thyme, and arrange them in antique glass bottles. The sunlight streaming through her kitchen window would catch the clear vinegar, illuminating the submerged herbs like tiny, suspended sculptures. The patience she exhibited, waiting for weeks for that subtle shift in flavor, taught me a valuable lesson about the art of slow cooking and the profound rewards of a little dedication.
Recipe Overview
- Prep Time: 15 minutes
- Cook Time: 0 minutes (plus infusion time)
- Total Time: 1080 hours 15 minutes (approx. 4-6 weeks infusion)
- Servings: N/A (makes a batch of vinegar)
- Yield: 1 quart
- Dietary Type: Vegan, Gluten-Free, Dairy-Free
Ingredients
This recipe is wonderfully adaptable, encouraging you to use what’s freshest and most appealing.
- 1 quart white vinegar
- 4-5 shallots, peeled, or 4-5 white pearl onions
- 4 garlic cloves, peeled and lightly crushed
- Alternatively, you can use one of the following for a different flavor profile:
- 4-5 raspberries
- 2 tablespoons mustard seeds
- 2 tablespoons dill seeds
- 2 juniper berries
- 1 sprig rosemary
- 1 sprig tarragon
Equipment Needed
- Glass bottles with sound corks (enough to hold 1 quart of vinegar)
- Enamel-lined or stainless steel saucepan
- Long darning needle (optional, for threading onions or garlic)
- Fine string (optional, for threading onions or garlic)
Instructions
The process of creating flavored vinegar is less about active cooking and more about patient steeping. The key is to ensure cleanliness and to allow ample time for the flavors to meld beautifully.
- Prepare Your Bottles: Begin by collecting the number of glass bottles you’ll need, ensuring they have sound, tight-fitting corks. Wash the bottles thoroughly with soapy water. Rinse them first in very hot water and then in cold water. This thermal shock helps to thoroughly clean and sanitize the glass. Drain them well, and then dry them completely. For an extra measure of cleanliness and to ensure no residual moisture remains, heat the clean, dry bottles in a slow oven for a short period.
- Prepare the Corks: While the bottles are heating, scald the corks by immersing them in boiling water for a few minutes. This softens them, making them more pliable and easier to insert securely into the bottle necks, creating a good seal.
- Warm the Vinegar: Pour the white vinegar into an enamel-lined or stainless steel pan. Place the pan over low heat. Slowly heat the vinegar, being careful not to let it boil. Gentle warming helps to release the aromas of the aromatics and herbs without compromising the vinegar’s integrity.
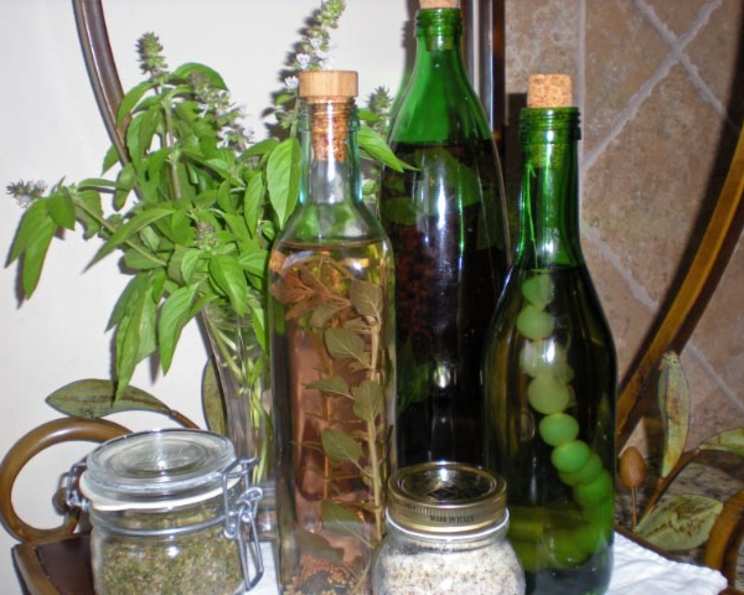
- Assemble the Flavors: Add your chosen aromatics to the warm bottles. This could be the peeled shallots or white pearl onions, the lightly crushed garlic cloves, or your selected seeds, berries, or herb sprigs.
- Special Handling for Tarragon: If you are using tarragon, it requires a slightly different approach. Select a long sprig that is approximately twice the height of the bottle. Bend it double and carefully push it down the neck of the bottle. This ensures the tarragon will be fully submerged in the vinegar once the bottle is filled.
- Fill and Seal: Carefully fill the bottles with the warm vinegar, leaving a small amount of headspace at the top. Immediately cork down tightly.
- Mature and Infuse: Place the sealed bottles on a sunny window sill. This is where the magic happens. Allow the vinegar to mature for 4 to 6 weeks before using. The sunlight and warmth, combined with the patient steeping time, will allow the flavors to fully infuse into the vinegar.
Expert Tips & Tricks
- Sterilization is Key: While the oven and hot water steps are crucial, ensure all your tools and hands are scrupulously clean to prevent unwanted microbial growth.
- Quality Ingredients: Use the freshest, most aromatic herbs and the plumpest garlic and onions you can find. The quality of your additions directly impacts the final flavor.
- Don’t Rush: The 4-6 week infusion period is non-negotiable for truly developed flavor. Resist the urge to taste it too early; patience is rewarded.
- Layering Flavors: While this recipe offers single-flavor infusions, once you’ve mastered them, consider combining compatible ingredients like garlic and rosemary, or shallots and thyme.
Serving & Storage Suggestions
Infused vinegars are incredibly versatile. They are excellent as a base for vinaigrettes, adding a sophisticated depth to salads. A drizzle over roasted vegetables, grilled meats, or fish can elevate simple dishes. They can also be used in marinades or even added to sauces for a bright, acidic note.
Store your infused vinegars in a cool, dark place. While they have a long shelf life due to the acidity, the vibrancy of the flavors will be best preserved for up to 6 months. Ensure the cork remains tight to prevent oxidation. If you notice any cloudiness or off-smells, it’s best to discard.
Nutritional Information
| Nutrient | Amount per Serving (approximate, per 1 tbsp) | % Daily Value |
|---|---|---|
| Calories | 15.4 kcal | |
| Calories from Fat | ||
| Total Fat | 0.3 g | 0% |
| Saturated Fat | 0 g | 0% |
| Cholesterol | 0 mg | 0% |
| Sodium | 2.5 mg | 0% |
| Total Carbohydrate | 1.5 g | 0% |
| Dietary Fiber | 0.2 g | 0% |
| Sugars | 0.2 g | |
| Protein | 0.3 g |
Note: Nutritional values are estimates and can vary based on the specific ingredients used.
Variations & Substitutions
The beauty of infused vinegar lies in its adaptability.
- Citrus Zest: For a bright, zesty vinegar, consider adding strips of lemon or orange zest (ensure no pith is included, as it can be bitter).
- Peppercorns: Black or pink peppercorns add a subtle warmth and complexity.
- Chiles: For a spicy kick, add dried chiles or a small fresh chile (seeds removed for less heat).
- Fruit Infusions: While not traditional for this specific recipe, berries like raspberries or even sliced pears can be infused for a sweeter, fruitier vinegar, though these may have a shorter shelf life.
FAQs
Q: Why do I need to heat the bottles and scald the corks?
A: Heating the bottles helps to sanitize them and ensures they are completely dry. Scalding the corks makes them more pliable for a secure seal.
Q: Can I use apple cider vinegar or red wine vinegar instead of white vinegar?
A: Yes, you can. Different vinegars will impart different base flavors, so choose one that complements your desired infusion.
Q: How do I know when the vinegar is ready?
A: The vinegar is ready after the 4-6 week infusion period. It will have a noticeably more complex aroma and flavor than plain vinegar.
Q: What if I can’t find pearl onions or shallots?
A: You can omit them or substitute with a couple of cloves of garlic if you wish to maintain an aromatic element.
Q: Can I leave the aromatics in the bottle indefinitely?
A: While they can remain, it’s generally recommended to strain them out after the infusion period to prevent them from becoming mushy or altering the flavor negatively over time.
Final Thoughts
Crafting your own flavored vinegars is an accessible way to bring a touch of gourmet flair into your kitchen. It’s a rewarding endeavor that connects you to a centuries-old culinary tradition. The process itself is a meditative practice, and the resulting liquid gold is a testament to the power of time and simple, quality ingredients. So gather your bottles, select your favorite herbs and aromatics, and embark on this delicious journey of flavor transformation. I’d love to hear about your creations and how you’re using them to brighten up your meals!