
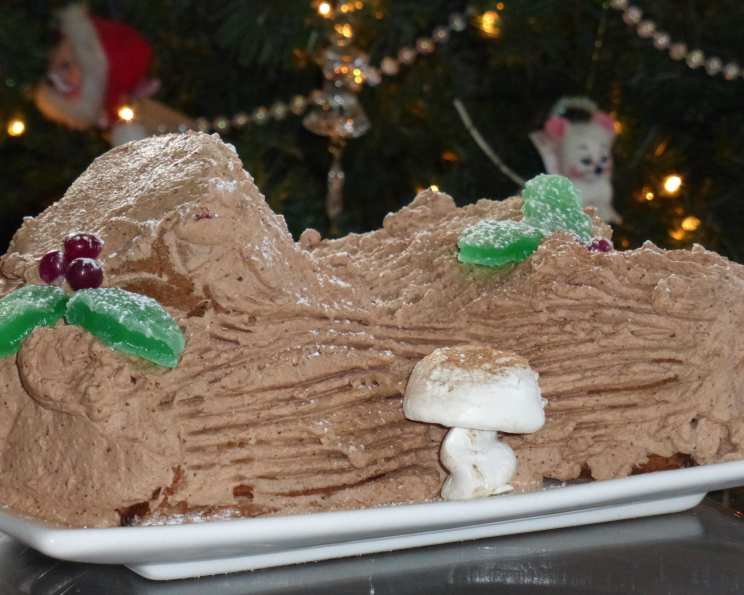
The Enchanting Meringue Mushroom: A Whimsical Touch for Your Bûche de Noël
There’s a certain magic that descends upon my kitchen when the holiday season approaches, a feeling that harks back to childhood wonder and the scent of pine needles and baking spices. For me, no festive celebration is complete without the iconic Bûche de Noël, that glorious chocolate roulade that transforms the humble dessert into a winter wonderland. And the crown jewel, the pièce de résistance that truly brings the illusion to life, is the whimsical meringue mushroom. I still remember the first time I saw them, delicately placed amongst marzipan moss and sugared rosemary sprigs, each one a tiny, perfect specimen that sparked my imagination and made the whole cake feel like a forest floor come to life. It’s a small detail, perhaps, but one that elevates the dessert from delicious to truly unforgettable.
Recipe Overview
- Prep Time: 30 minutes
- Cook Time: 1 hour 15 minutes
- Total Time: 1 hour 45 minutes (plus cooling time)
- Servings: Approximately 24-36 mushrooms (depending on size)
- Yield: A collection of decorative meringue mushrooms
- Dietary Type: Gluten-Free, Dairy-Free (when using dairy-free chocolate)
Ingredients
For the Meringue Mushrooms:
- 2 large egg whites, at room temperature
- 1 pinch cream of tartar
- 1⁄2 cup granulated sugar
For Optional Chocolate Coating:
- 1⁄4 cup chocolate chips (semi-sweet or dark chocolate are excellent choices)
- Optional: additional white chocolate for specific finishing
- Optional: cocoa powder, for dusting
Equipment Needed
- Large mixing bowl
- Electric mixer (handheld or stand mixer)
- Spatula
- Piping bag or a large zip-top bag
- Baking sheets
- Parchment paper
- Small bowl (for melting chocolate, if using)
- Toothpick or skewer
- Cooling rack
- Microwave-safe dish (if melting chocolate in microwave)
Instructions
Creating these delicate meringue mushrooms is a journey into precision and patience, but the reward is a charming decoration that will undoubtedly impress.
- Prepare Your Meringue Base: In a large, impeccably clean mixing bowl, begin to beat the egg whites with your electric mixer set to low speed. Continue beating until the egg whites become frothy and airy. It’s crucial that the bowl and beaters are free from any trace of fat or yolk, as this will prevent the egg whites from whipping properly.
- Stabilize and Sweeten: Once frothy, add the cream of tartar to the egg whites. This acts as a stabilizer, helping to create a more robust meringue. Gradually increase the mixer speed to medium-high and continue beating until soft peaks begin to form. These peaks will gently curl over when the beaters are lifted.
- Achieve Glossy Perfection: Now, begin to add the sugar slowly, a tablespoon at a time, while the mixer continues to run on medium-high speed. Allow each addition of sugar to incorporate fully before adding the next. Continue beating until the meringue is glossy and stiff peaks form. When you lift the beaters, the peaks should stand straight up without drooping. This glossy, firm meringue is the foundation for your delicate mushrooms.
- Prepare Your Piping Tools: Transfer the meringue mixture into a piping bag fitted with a plain round tip, or into a large zip-top bag. If using a zip-top bag, carefully push the meringue mixture towards one corner. Fold the opposite corner over the meringue and twist it tightly to create a controlled nozzle. Cut off just the very tip of the exposed corner. You want a small opening, no more than about 1/4 inch in diameter, to allow for precise piping.
- Anchor Your Parchment: Line your baking sheets with parchment paper. To secure the parchment paper and prevent it from shifting in the oven, dot four small beads of meringue at the corners of the baking sheet. Then, gently lay the parchment paper over the top of these meringue dots, pressing down slightly. These beads will act as glue, holding the paper firmly in place.
- Form the Mushroom Caps: Hold the piping bag directly over the parchment paper. Gently push the meringue out of the bag, creating a mound. Continue pushing until a roughly 1-inch mound of meringue has formed. These will be your mushroom caps.
- Smooth the Caps: Once you have piped your meringue mounds, wet the tip of your finger with a little water. Gently go over the peaks and rough edges of each meringue mound, smoothing them down to create a more rounded and uniform cap shape.
- Create the Mushroom Stems: For the mushroom stems, you will pipe smaller, elongated shapes. Hold the piping bag a short distance above the parchment paper and push the meringue out. As you push, pull the bag up and away from the surface, creating a tapered peak. Aim for stems that are thinner at the top and slightly wider at the base. Ensure they are smaller in diameter than your mushroom caps.
- The Crucial Bake: Preheat your oven to 200°F (93°C). Carefully place the prepared baking sheets into the preheated oven. Bake the meringues for 1 hour.
- Dry Them Out: After the initial hour of baking, turn the oven temperature down to 175°F (79°C). Leave the meringues in the oven until they are completely dry to the touch. This slow, low-temperature baking process ensures that the meringues dry out thoroughly without browning, resulting in a crisp texture. This can take an additional 15-30 minutes, or sometimes longer, depending on your oven and the size of your meringues. Once dry, turn off the oven, prop the door open slightly with a wooden spoon, and let the meringues cool completely inside the oven. This gradual cooling helps prevent cracking.
Optional Chocolate Enhancement:
If you wish to add the charming detail of chocolate-coated mushroom bases or a chocolate “glue” to assemble them, follow these steps:
- Melt the Chocolate: Melt the chocolate chips in a small, heatproof glass dish. You can do this in the microwave by heating for about one minute, stirring every 20-30 seconds until smooth and melted. Alternatively, use a double boiler. Allow the melted chocolate to cool slightly so it’s not piping hot.
- Coat the Caps (Option 1): Once the meringue caps are completely cool, you can coat the bottom of each cap with the melted dark chocolate. Let the chocolate set. For an extra layer of detail, you can then coat them again with white chocolate. Once the white chocolate is set, you can use a toothpick to scratch in delicate lines to mimic mushroom gills.
- Assemble with Chocolate Glue (Option 2): If not coating the entire bottom of the cap, you can opt for a simpler assembly. Use a toothpick or skewer to make a hole in the bottom of a mushroom cap, smaller than a pea. Then, dip the tip of a stem in the slightly cooled melted chocolate. Immediately press the chocolate-dipped stem into the hole in the mushroom cap. The chocolate will act as a natural glue. Allow the chocolate “glue” to harden, which typically takes only a minute or two.
- Final Flourish: Once the mushrooms are assembled (with or without chocolate), you can place them upright on their stems. For a final touch of realism, dust the cap lightly with cocoa powder using a fine-mesh sieve. This mimics the natural earthy tone of real mushrooms.
Expert Tips & Tricks
- Room Temperature Egg Whites: This is paramount for successful meringue. Cold egg whites won’t whip to their full volume. If you forget to take them out in advance, place them in a bowl over warm (not hot) water for a few minutes.
- Cleanliness is Key: As mentioned, any trace of fat or yolk will ruin your meringue. Ensure your bowl, beaters, and any utensils that come into contact with the egg whites are sparkling clean and dry. A quick wipe with a bit of vinegar on a paper towel can help ensure cleanliness.
- Sugar Gradual Addition: Adding sugar too quickly can deflate the meringue. Slow and steady wins the race to a stable, glossy meringue.
- Doneness Test: The meringues are done when they are completely dry and lift easily off the parchment paper. They should feel light and hollow.
- Oven Quirks: Ovens can vary greatly. If your meringues start to brown too quickly, even at the low temperature, you can try covering them loosely with foil. Conversely, if they seem to be taking too long to dry, you might need to increase the drying time slightly.
- Make Ahead: Meringue mushrooms can be made several days in advance and stored in an airtight container at room temperature. Humidity is their enemy, so avoid storing them in the refrigerator.
Serving & Storage Suggestions
Once your meringue mushrooms are cooled and decorated, they are ready to adorn your Bûche de Noël or any other festive dessert. They are best placed on the cake just before serving to maintain their crispness.
Storage: Store completely cooled meringue mushrooms in an airtight container at room temperature. They will remain crisp for up to two weeks, provided they are kept away from humidity. Never store meringues in the refrigerator, as the moisture will cause them to become soft and sticky.
Nutritional Information
| Nutrient | Amount per Serving (approx.) | % Daily Value |
|---|---|---|
| Calories | 15-20 kcal | 1% |
| Total Fat | < 0.1 g | 0% |
| Saturated Fat | < 0.1 g | 0% |
| Cholesterol | 0 mg | 0% |
| Sodium | 1 mg | 0% |
| Total Carbohydrate | 3-4 g | 1% |
| Dietary Fiber | < 0.1 g | 0% |
| Sugars | 3-4 g | 7% |
| Protein | < 0.1 g | 0% |
Note: Nutritional information is an estimate and can vary based on ingredient brands and optional additions like chocolate.
Variations & Substitutions
- Color Infusion: For a touch of whimsy, you can add a tiny drop of food coloring to the meringue when it’s nearly stiff. Swirl it gently for a marbled effect, or mix it in for a uniform color. Pink or a very light brown can add a unique look.
- Nutty Undertones: While not traditional, a tiny pinch of finely ground nut flour (like almond or hazelnut) could be added to the dry ingredients for a subtle flavor variation. However, ensure it’s extremely fine to not disrupt the meringue’s texture.
- Chocolate Variety: Experiment with different types of chocolate chips for coating, such as milk chocolate or even white chocolate for a paler mushroom.
FAQs (Frequently Asked Questions)
Q: Why did my meringue not get stiff peaks?
A: This is usually due to fat contamination (from unwashed bowl or beaters, or egg yolk in the whites) or not beating long enough. Ensure all equipment is spotlessly clean and continue beating until stiff, glossy peaks form.
Q: My meringues are sticky or soft. What went wrong?
A: This is almost always a humidity issue. Meringues absorb moisture from the air. They may not have been dried out sufficiently in the oven, or they were stored in a humid environment. Ensure they are completely dry and stored in an airtight container in a dry place.
Q: Can I make meringue mushrooms ahead of time?
A: Yes! Meringue mushrooms are excellent candidates for making ahead. Store them in an airtight container at room temperature for up to two weeks.
Q: Can I make meringue mushrooms without cream of tartar?
A: Cream of tartar is a stabilizer, but you can omit it. However, the meringue might be slightly less stable. Some people have success substituting it with a teaspoon of lemon juice or white vinegar, but cream of tartar is the most reliable option.
Q: My meringues cracked while baking. Is it a problem?
A: A few small cracks are usually cosmetic and don’t affect the taste or texture. Larger cracks can sometimes happen if the oven temperature is too high or if they are cooled too rapidly. Propping the oven door open for slow cooling helps.
A Sweet Finale
The creation of meringue mushrooms is more than just a recipe; it’s an exercise in patience and a delightful journey into the art of confectionery. These delicate, airy confections bring a touch of enchantment to any dessert, transforming a simple chocolate cake into a woodland scene. Don’t be discouraged if your first batch isn’t absolutely perfect – like any baking endeavor, practice makes perfect. The joy of decorating your Bûche de Noël with these whimsical creations, or simply enjoying them as a light, sweet treat, is truly a reward in itself. Gather your ingredients, embrace the process, and let your creativity bloom!