
French Onion Bread: A Savory Embrace
There’s a particular kind of magic that happens when humble pantry staples transform into something extraordinary. For me, this French Onion Bread is a testament to that alchemy. I remember stumbling upon an almost-forgotten packet of French onion soup mix, a relic from a long-ago pot roast experiment. Instead of discarding it, a culinary whim struck, a gentle nudge to see what wonders it could bring to a simple loaf of bread. It felt a little unconventional, almost daring, to infuse a bread dough with the concentrated essence of caramelized onions and savory broth. But as the aroma filled my kitchen, a comforting blend of yeasty warmth and that unmistakable onion perfume, I knew I’d stumbled upon something special – a comforting, savory embrace in loaf form.
Recipe Overview
- Prep Time: 15 minutes
- Cook Time: 30 minutes
- Total Time: 2 hours 30 minutes (includes resting time)
- Servings: 8-10 slices
- Yield: 1 loaf
- Dietary Type: Vegetarian
Ingredients
This recipe is remarkably straightforward, relying on readily available ingredients to deliver a surprisingly complex flavor profile.
- 3 ½ cups whole wheat flour
- 2 cups warm water (divided)
- 1 (¼ ounce) packet dry active yeast
- 1 tablespoon sugar
- 2 tablespoons olive oil
- 1 (1 ¼ ounce) package French onion soup mix
- 1 teaspoon salt
For the Egg Wash:
- 1 egg
- 1 tablespoon water
Equipment Needed
- Large mixing bowl
- Measuring cups and spoons
- Small bowl
- Whisk or fork
- Clean kitchen towel or plastic wrap
- Baking sheet
- Parchment paper
- Wire cooling rack
- Pastry brush
Instructions
Crafting this French Onion Bread is a rewarding process that involves a bit of patience and a lot of anticipation. Follow these steps carefully to achieve a beautifully flavored and textured loaf.
-
Begin by activating the yeast. In one of the cups of warm water (ensure it’s not too hot, or it will kill the yeast), stir in the sugar and the dry active yeast. Gently stir to combine, then set this mixture aside for about five minutes. You’ll know the yeast is alive and ready when it becomes foamy and bubbly on the surface – a sure sign of happy fermentation.
-
While the yeast is awakening, prepare your dry ingredients. In a large mixing bowl, combine the whole wheat flour, the contents of the French onion soup mix package, and the salt. Whisk these together to ensure the soup mix and salt are evenly distributed throughout the flour. This pre-mixing is key to a consistent flavor in the final bread.
-
Create a well in the center of your dry ingredient mixture. Pour in the activated yeast mixture, the remaining cup of warm water, and the olive oil. Gradually bring the ingredients together with your hands, or a sturdy spoon, until a shaggy dough begins to form. The mixture will be a bit sticky at this stage.
-
Turn the dough out onto a lightly floured surface. Now comes the satisfying work of kneading. Knead the dough for a full 10 minutes. This process develops the gluten, which is essential for the bread’s structure and chewy texture. You’re looking for a smooth, elastic dough that springs back slightly when poked.
-
Lightly oil a clean bowl. Place the kneaded dough into the oiled bowl, turning it once to coat all sides with oil. Cover the bowl tightly with plastic wrap or a clean, damp kitchen towel. Set the bowl in a warm, draft-free place to rest for 1 hour and 30 minutes, or until the dough has visibly doubled in size. This crucial resting period allows the yeast to work its magic, creating air pockets and developing flavor.
-
Once the dough has sufficiently rested, it’s time to preheat your oven. Set the oven temperature to 400 degrees Fahrenheit. Line a baking sheet with parchment paper. This will prevent the bread from sticking and make for easy cleanup.
-
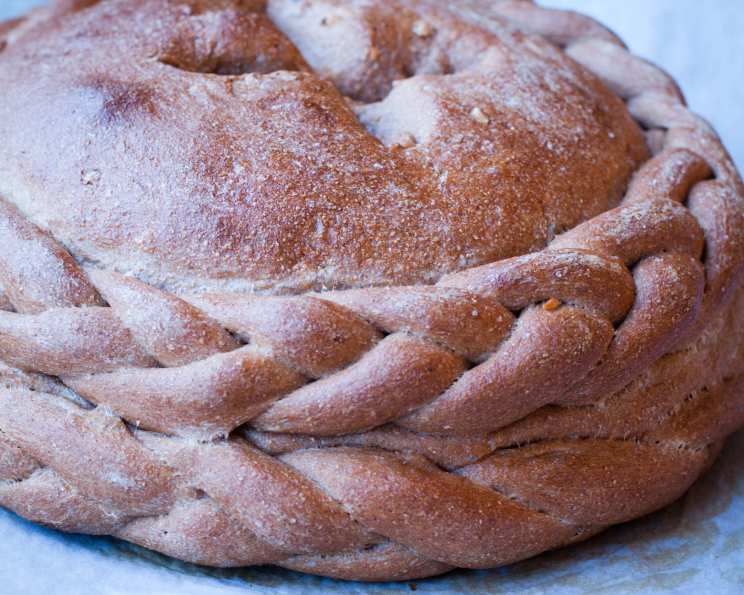
Gently remove the risen dough from the bowl, being careful not to punch out all the air. Work the dough into your desired shape. The original recipe describes a beautiful, rustic formation: use one-third of the dough to create braids and shape the remaining two-thirds into a ball. Then, ring the braids around the outside of the ball. Place the shaped loaf onto the prepared baking sheet. Cover the loaf loosely with plastic wrap or a kitchen towel and allow it to rest for another 45 minutes to 1 hour. This second rest, often called proofing, allows the dough to relax and puff up once more before baking.
-
Prepare the egg wash. In a small bowl, whisk together the egg and water until thoroughly combined. Once the dough has completed its final rest, uncover it and generously brush the top with the prepared egg wash. This will give the bread a beautiful golden-brown sheen and a slightly crisp crust.
-
Place the baking sheet with the egg-washed loaf into the preheated oven. Bake at 400 degrees Fahrenheit for the first 15 minutes.
-
After the initial 15 minutes of baking, turn down the oven to 350 degrees Fahrenheit. Continue to bake for an additional fifteen minutes. This two-stage baking process ensures a good rise and a perfectly baked interior without burning the crust. The total baking time will be approximately 30 minutes.
-
Once baked, carefully remove the French Onion Bread from the oven. Transfer the loaf to a wire cooling rack and let it cool completely before slicing and serving. This cooling period is essential for the bread’s texture to set properly; slicing too early can result in a gummy interior.
Expert Tips & Tricks
- Warm Water Temperature: Aim for water that feels comfortably warm to the touch, around 105-115°F (40-46°C). Water that is too hot will kill the yeast, while water that is too cool won’t activate it properly.
- Kneading Technique: If you find your dough is too sticky to knead effectively, add flour a tablespoon at a time. Conversely, if it feels too dry, add water a teaspoon at a time. The goal is a pliable, not sticky, dough.
- Proofing Environment: A slightly warm oven (turned off, with the light on) or near a sunny window can be ideal for dough proofing. Avoid drafts, as they can dry out the dough and hinder its rise.
- Checking for Doneness: Beyond the specified baking time, you can check if the bread is done by tapping the bottom. If it sounds hollow, it’s ready. An instant-read thermometer inserted into the thickest part of the loaf should register around 200-210°F (93-99°C).
- Shape Variations: While the braided ring around a ball is visually appealing, feel free to shape the dough into a simple round loaf, a classic boule, or even individual rolls for a different presentation.
Serving & Storage Suggestions
This French Onion Bread is incredibly versatile. It’s magnificent served warm, fresh from the oven, with a generous slather of butter. It pairs wonderfully with hearty soups, stews, or roasted meats, adding a depth of savory flavor to any meal. For a truly decadent experience, consider slicing it, toasting it lightly, and topping it with a bit of Gruyère cheese and a quick broil – a simplified, delicious take on French onion soup.
Leftovers can be stored in an airtight container or bread bag at room temperature for 2-3 days. For longer storage, wrap the cooled bread tightly in plastic wrap and then in foil, and freeze for up to 2-3 months. To reheat, thaw at room temperature, then warm in a 350°F (175°C) oven for 10-15 minutes, or until heated through. Slicing and toasting are also excellent ways to revive slightly stale bread.
Nutritional Information
| Nutrient | Amount per Serving | % Daily Value |
|---|---|---|
| Calories | 2381.7 kcal | |
| Calories from Fat | 391 g | |
| Total Fat | 43.5 g | 66% |
| Saturated Fat | 7.3 g | 36% |
| Cholesterol | 186 mg | 62% |
| Sodium | 18057.8 mg | 752% |
| Total Carbohydrate | 445 g | 148% |
| Dietary Fiber | 59.8 g | 239% |
| Sugars | 23.5 g | 94% |
| Protein | 79.3 g | 158% |
Note: Nutritional values are estimates and can vary based on specific ingredients and portion sizes.
Variations & Substitutions
While this recipe is fantastic as is, here are a few ideas to customize it further:
- Herbs: Incorporate a tablespoon of chopped fresh chives or parsley into the dough for a fresh, herbaceous note.
- Cheese: For an even more decadent loaf, sprinkle about ½ cup of shredded Gruyère or Parmesan cheese over the dough during the final shaping, just before the egg wash.
- Flour Swap: While whole wheat flour provides a lovely nutty depth, you can substitute up to half of it with all-purpose flour for a slightly lighter texture.
- Yeast Alternative: If you have instant yeast on hand, you can skip the proofing step and add it directly to the dry ingredients. You’ll still need to let the dough rise twice as instructed.
FAQs
Q: Can I use a different type of flour?
A: Yes, you can substitute up to half of the whole wheat flour with all-purpose flour for a lighter loaf. For gluten-free options, you would need a specialized gluten-free flour blend designed for bread making, and the dough handling and resting times might differ.
Q: My yeast didn’t get foamy. What went wrong?
A: This usually means the yeast was old, the water was too hot, or the sugar was insufficient. Try again with fresh yeast and ensure your water is the correct temperature.
Q: Can I make this dough ahead of time?
A: You can let the dough complete its first rise in the refrigerator overnight. In the morning, let it come to room temperature for about an hour before proceeding with shaping and the second rise.
Q: Why is my bread crust so hard?
A: A hard crust can sometimes be due to over-baking or insufficient steam in the oven. Ensure you follow the two-stage baking temperature, and for an even crisper crust, you can add a pan of hot water to the bottom rack of your oven during the initial baking period.
Q: How do I store leftover French Onion Bread?
A: Store cooled, wrapped bread in an airtight container or bread bag at room temperature for 2-3 days. For longer storage, freeze it for up to 2-3 months.
A Slice of Comfort
There’s a profound satisfaction in pulling a golden, fragrant loaf of homemade bread from the oven, and this French Onion Bread offers that joy with an extra layer of savory intrigue. It’s more than just bread; it’s a comforting aroma, a delightful texture, and a testament to the delicious possibilities that arise from simple ingredients. I encourage you to embrace the process, enjoy the journey, and savor every warm, savory bite. This loaf is perfect alongside a hearty beef stew or a creamy tomato soup, or simply enjoyed on its own, perhaps with a glass of crisp white wine or a robust amber ale. Happy baking!