
The Sublime Simplicity of Fresh Homemade Ricotta Cheese
There’s a certain magic that happens when you transform humble, everyday ingredients into something truly extraordinary. For me, this magic is most potent in the creation of fresh ricotta. I can vividly recall my first attempt, standing in my small kitchen, the scent of gently simmering milk filling the air. It felt like an ancient ritual, a connection to generations of cooks who had coaxed creaminess from dairy. That first spoonful, tasted directly from the cheesecloth-lined colander, was a revelation – a delicate, milky sweetness I’d never experienced in store-bought versions. It was a moment that cemented my love for homemade cheese and proved that culinary alchemy isn’t just for professionals; it’s a joy accessible to anyone willing to try.
Recipe Overview
- Prep Time: 15 minutes
- Cook Time: 3 minutes (plus standing time)
- Total Time: 23 minutes (plus draining time)
- Servings: 4-6
- Yield: Approximately 2 cups
- Dietary Type: Dairy
Ingredients
Making ricotta is wonderfully straightforward, requiring just a few core components:
- 2 quarts whole milk
- 3 tablespoons fresh lemon juice
- Salt, to taste
A note on milk: While you can use lower-fat milk, the richer flavor and creamier texture of whole milk is truly the star here. Avoid ultra-pasteurized milk, as the high heat can sometimes interfere with the curdling process.
Equipment Needed
For this simple yet rewarding process, you’ll need a few essential tools:
- A large, heavy-bottomed saucepan
- A fine-mesh sieve or a colander
- Cheesecloth (at least two layers recommended)
- A large bowl
- A slotted spoon with small holes
- A measuring cup
- A whisk or spoon for stirring
Instructions
The journey from milk to ethereal ricotta is a surprisingly quick and deeply satisfying one. Follow these steps meticulously, and you’ll be rewarded with a cheese that sings with freshness.
-
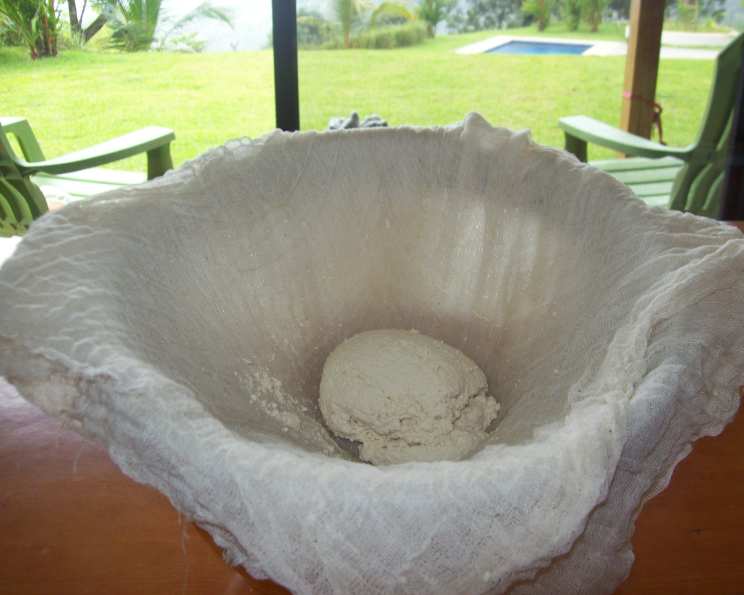
Prepare the Draining Station: Begin by lining a colander with cheesecloth. It’s crucial that the cheesecloth is moistened first. You can do this by running it under cool water and gently wringing out the excess. Place the lined colander over a large bowl. This setup will catch the whey, which is the byproduct of cheese making, and allow your ricotta to drain.
-
Gently Heat the Milk: Pour the 2 quarts of whole milk into the large, heavy-bottomed saucepan. Place the saucepan over medium heat. Your goal is to bring the milk to a gentle boil. This means watching it closely, stirring occasionally to prevent any scorching on the bottom, and as soon as you see the first signs of bubbling around the edges and steam rising, it’s ready. You want the milk to reach approximately 180-190°F (82-88°C).
-
Introduce the Acid and Encourage Curdling: Once the milk has reached its gentle boil, remove the saucepan from the heat. Immediately add the 3 tablespoons of fresh lemon juice. Now, stir the milk very gently. You’ll begin to observe a magical transformation: the milk will start to separate into white, fluffy curds and a translucent, yellowish liquid called whey.
-
Allow the Curds to Firm: Cover the saucepan and let it stand off the heat for about 5 minutes. During this time, the curds will firm up slightly, making them easier to handle in the next step.
-
Scoop the Curds: Using a slotted spoon with small holes, gently scoop the formed curds from the saucepan and transfer them into the cheesecloth-lined colander. Try to be as delicate as possible to preserve the delicate texture of the curds. Discard the whey that collects in the bowl – it can be saved and used in other recipes, such as bread or smoothies, if desired.
-
Initial Draining: Allow the ricotta to drain in the colander for about 15 minutes. The weight of the curds themselves will help press out some of the excess moisture.
-
Flip and Continue Draining: After the initial 15 minutes of draining, gently lift the edges of the cheesecloth to flip the curd over. This exposes a different surface to the air and helps the ricotta drain more evenly. Let it drain for another 15 minutes to achieve your desired consistency. For a firmer, drier ricotta, you can extend this draining time. For a softer, creamier ricotta, you can drain it for less time.
-
Season and Serve: Carefully transfer the drained ricotta from the cheesecloth into a clean bowl. Season generously with salt to your taste. Stir gently to incorporate. Your fresh, homemade ricotta is now ready to be enjoyed!
Expert Tips & Tricks
- The Power of Patience: While this recipe is quick, the draining phase is crucial for texture. Don’t be tempted to rush it. The longer it drains, the firmer your ricotta will be.
- Whey Wisdom: Don’t pour the whey down the drain immediately! It’s packed with protein and can be a fantastic ingredient in baking. Try using it in place of water or milk in bread dough for extra tenderness and flavor.
- Lemon Juice vs. Vinegar: Lemon juice is my preferred acid for its mild flavor. However, you can also use white vinegar; you might need slightly less, so start with 2 tablespoons and add more if needed.
- Gentle is Key: From stirring the milk to scooping the curds, always handle the ingredients gently. Rough handling can result in a less desirable texture.
- Achieving Peak Creaminess: For an ultra-smooth ricotta, after draining, you can pass it through a food mill or give it a very brief pulse or two in a food processor. However, I find the rustic charm of hand-scooped ricotta to be quite appealing.
Serving & Storage Suggestions
Fresh ricotta is incredibly versatile. Its delicate flavor and creamy texture make it a star in both sweet and savory dishes.
Serving:
- Sweet Applications: Dollop it onto pancakes, waffles, or French toast. Swirl it into fruit salads, or use it as a filling for pastries like cannoli or tarts. A drizzle of honey and a scattering of toasted nuts is divine.
- Savory Applications: Spread it on toasted baguette slices, then top with fresh herbs, a drizzle of olive oil, and a sprinkle of black pepper. It’s a wonderful base for bruschetta, a creamy element in pasta dishes, or layered into lasagna. Try it with roasted vegetables for a light yet satisfying meal. The serving suggestion from Food and Wine Magazine – spread ricotta on toasted baguette slices, top with radish slices and chopped arugula – is a particularly delightful and refreshing option.
Storage:
Fresh homemade ricotta is best enjoyed within a day or two of making it. Store it in an airtight container in the refrigerator. It can be kept for up to 3 days. Because it contains no preservatives, its shelf life is shorter than commercial varieties. It’s not ideal for freezing, as the texture can become grainy upon thawing.
Nutritional Information
The nutritional profile of homemade ricotta will vary slightly based on the fat content of the milk used. This estimate is based on whole milk.
| Nutrient | Amount per Serving (approx. 1/2 cup) | % Daily Value (approx.) |
|---|---|---|
| Calories | 150.1 kcal | |
| Calories from Fat | 71 kcal | |
| Total Fat | 7.9 g | 12% |
| Saturated Fat | 4.5 g | 22% |
| Cholesterol | 24.4 mg | 8% |
| Sodium | 105 mg | 4% |
| Total Carbohydrate | 12.1 g | 4% |
| Dietary Fiber | 0 g | 0% |
| Sugars | 12.5 g | 49% |
| Protein | 7.7 g | 15% |
Note: Nutritional values are estimates and can vary.
Variations & Substitutions
While the classic recipe is perfection, here are a few ways to experiment:
- Herbed Ricotta: Stir in finely chopped fresh herbs like chives, parsley, basil, or dill into the finished ricotta.
- Citrus Zest: Add a bit of finely grated lemon or orange zest for a fragrant twist.
- Sweet Ricotta: For a dessert ricotta, sweeten it with a touch of honey or maple syrup and stir in vanilla extract.
FAQs
Q: Why did my ricotta not curdle properly?
A: This can happen if you don’t bring the milk to a sufficient temperature, use ultra-pasteurized milk, or don’t add enough acid. Ensure you heat the milk to a gentle boil and add the full amount of lemon juice.
Q: Can I use skim milk instead of whole milk?
A: You can, but the resulting ricotta will be much less creamy and flavorful. Whole milk yields the best texture and taste for this recipe.
Q: How long does homemade ricotta last?
A: Fresh ricotta is best consumed within 1-3 days. Always store it in an airtight container in the refrigerator.
Q: What is whey and can I use it?
A: Whey is the liquid left behind after the curds have formed. It’s rich in protein and can be used in baking, smoothies, or even to boil pasta for added nutrients.
Q: Is it important to use cheesecloth?
A: Yes, cheesecloth is essential for straining the curds effectively while allowing the whey to pass through. If you don’t have cheesecloth, you can use a clean, fine-mesh nut milk bag or multiple layers of tightly woven cheesecloth.
Final Thoughts
There’s a profound satisfaction that comes with creating something as simple and elegant as fresh ricotta cheese. It’s a testament to the power of basic ingredients and a gentle hand. This recipe, originally found in the pages of Food and Wine Magazine, is a true gem because it delivers on its promise of deliciousness with effortless grace. I encourage you to embark on this simple culinary journey. Taste the difference, feel the connection, and share this wonderful cheese with loved ones. Whether it graces your breakfast table or becomes the creamy heart of your next dinner party, your homemade ricotta will undoubtedly bring a smile and a sigh of pure delight.