
The Sweet Surprise: Unveiling the Magic of Fruit-Filled Dessert Quesadillas
I remember the first time I encountered a dessert quesadilla. It was at a bustling street food festival, a cacophony of savory aromas mingling with the promise of something sweet. A vendor, with hands a blur of flour and fruit, was folding golden-brown tortillas into perfect crescents. The scent that wafted from his grill was intoxicating – a warm hug of toasted flour, caramelized fruit, and a hint of something creamy. It was a revelation: a simple, humble tortilla transformed into an elegant, utterly delightful dessert, proving that indulgence doesn’t always require a whisk and a stand mixer.
Recipe Overview
- Prep Time: 14 minutes
- Cook Time: 4 minutes (per quesadilla)
- Total Time: 18 minutes (approximate)
- Servings: 5
- Yield: 5 quesadillas
- Dietary Type: Vegetarian (can be adapted)
Ingredients
This recipe is blessedly straightforward, relying on pantry staples and a bit of fruit-forward magic.
- 10 (10-inch) flour tortillas: The foundation of our dessert. Look for soft, pliable ones that won’t crack when folded.
- 2 teaspoons melted butter or 2 teaspoons melted margarine: For that irresistible golden-brown crispiness and subtle richness.
- Confectioners’ sugar or cinnamon sugar: For a final dusting of sweetness and visual appeal.
- 1 (21-ounce) can Comstock brand pie filling (any variety) or 1 (21-ounce) can Wilderness brand pie filling (any variety): This is where the flavor really shines! Whether you choose the tartness of cherry, the warmth of apple, or the tropical sweetness of pineapple, select your favorite. These pre-made fillings are a fantastic shortcut, packed with fruit and flavor.
- 1 (12-ounce) container soft low-fat cream cheese (optional): This adds a delightful creamy counterpoint to the sweet fruit. It’s a welcome addition for a richer, more luxurious experience.
Equipment Needed
The beauty of this dessert is its minimal equipment requirement.
- Large skillet or griddle
- Spatula
- Measuring cups and spoons
- Small bowl (if using cream cheese)
- Knife or pizza cutter (for serving)
Instructions
Get ready to assemble these sweet little parcels of joy. The process is incredibly quick, making them perfect for a last-minute dessert craving or an easy treat for a crowd.
- Prepare the Tortillas: Lay five of your flour tortillas flat on a clean surface. Lightly brush one side of each tortilla with the melted butter or melted margarine. This is the side that will face down in the skillet and achieve that beautiful golden hue.
- Add the Creamy Layer (Optional): If you’ve opted for the cream cheese, spread a thin layer of the soft low-fat cream cheese over the buttered side of each of the five tortillas. Be sure to leave a small border around the edges to prevent it from oozing out during cooking.
- Fill with Fruit: Spoon approximately 1/4 cup of your chosen pie filling onto one half of the cream cheese-covered side of each tortilla. Gently fold the other half of the tortilla over the filling, creating a half-moon shape. Press the edges lightly with your fingers to seal them, encouraging the filling to stay contained.
- Cook to Golden Perfection: Heat a large skillet or griddle over medium-low heat. Carefully place the folded quesadillas into the hot skillet, ensuring not to overcrowd the pan. Cook for about 4 minutes on the first side, until the tortilla is lightly browned and beginning to crisp.
- Flip and Brown the Other Side: Using a spatula, carefully flip each quesadilla and cook for an additional 4 minutes, or until the second side is also lightly browned. You’re looking for a lovely golden-crisp exterior with a warm, gooey filling.
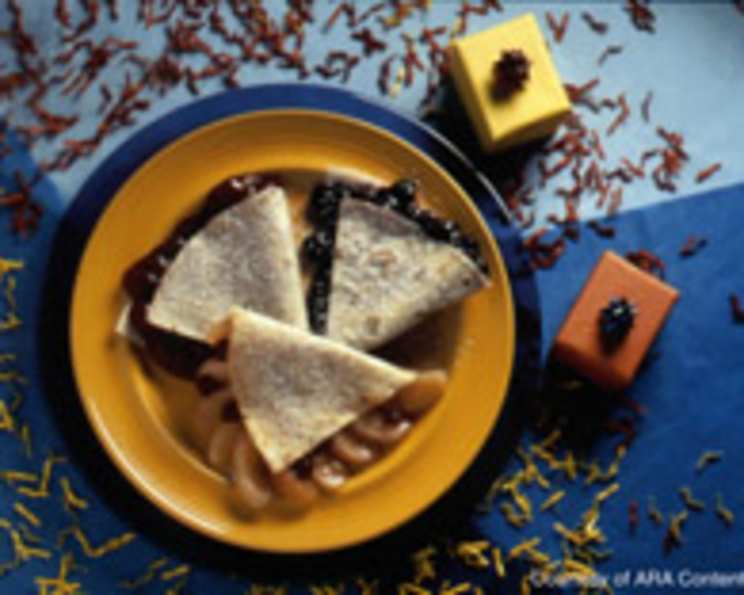
- Serve with a Sweet Finish: Once cooked, remove the quesadillas from the skillet. To serve, generously dust them with confectioners’ sugar or cinnamon sugar. This final touch adds a delightful sweetness and a beautiful presentation.
- Enjoy Immediately: Each quesadilla may be served whole or cut into 3-4 wedges before serving, making them perfect for sharing. These are best served hot right off the griddle, allowing you to savor the contrast between the crisp tortilla and the warm, luscious fruit filling.
Expert Tips & Tricks
Elevate your fruit-filled dessert quesadillas with these professional insights:
- Don’t Overfill: While it’s tempting to pack in as much fruit as possible, resist the urge. Overfilling can lead to leakage during cooking, creating a mess and a less aesthetically pleasing dessert.
- Medium-Low Heat is Key: Patience is a virtue here. Cooking over medium-low heat ensures that the tortilla browns beautifully without burning, and allows the filling to heat through perfectly. Too high a heat will result in a burnt exterior and a cold, unset interior.
- Cream Cheese Consistency: Ensure your cream cheese is truly soft. If it’s too cold, it will be difficult to spread evenly and might tear the tortilla. A few minutes on the counter at room temperature usually does the trick.
- Spice it Up: For an extra flavor boost, consider adding a pinch of cinnamon, nutmeg, or even a touch of cardamom to the cream cheese layer before spreading. This pairs wonderfully with apple or cherry fillings.
- Draining Excess Juice: If your pie filling seems particularly juicy, you can drain off a tablespoon or two before spooning it onto the tortillas. This further minimizes the risk of leakage.
Serving & Storage Suggestions
These dessert quesadillas are best enjoyed fresh, as the tortilla’s crispness is at its peak. However, if you find yourself with leftovers, they can be stored and reheated.
Serving: Serve them warm, dusted with confectioners’ sugar or cinnamon sugar. For an extra touch of decadence, consider a dollop of whipped cream, a scoop of vanilla ice cream, or a drizzle of chocolate sauce. They make a delightful standalone dessert or can accompany a cup of coffee or tea.
Storage: Store any leftover quesadillas in an airtight container at room temperature for up to a day. If you need to store them for longer, refrigerate them in an airtight container for up to 2-3 days.
Reheating: To reheat, place them in a skillet over medium-low heat for a few minutes per side until warmed through and the tortilla is re-crisped. Alternatively, you can gently warm them in a toaster oven or a conventional oven preheated to 300°F (150°C) for about 5-7 minutes. Avoid microwaving, as it will make the tortilla soft and soggy.
Nutritional Information
Please note: This nutritional information is an estimate and can vary based on specific brands and ingredient choices, especially the pie filling and the optional cream cheese.
| Nutrient | Amount per Serving | % Daily Value |
|---|---|---|
| Calories | 450.2 kcal | |
| Calories from Fat | 111 g | |
| Total Fat | 12.4 g | 19% |
| Saturated Fat | 3.6 g | 18% |
| Cholesterol | 4 mg | 1% |
| Sodium | 901.2 mg | 37% |
| Total Carbohydrate | 71.9 g | 23% |
| Dietary Fiber | 4.3 g | 17% |
| Sugars | 2.7 g | 10% |
| Protein | 11.6 g | 23% |
Variations & Substitutions
The beauty of this dessert lies in its adaptability. Feel free to experiment with different pie fillings to suit your mood or the season.
- Fruit Fillings: Beyond the classic cherry, apple, and pineapple, try blueberry, peach, mixed berry, or even lemon meringue pie filling. Each offers a unique flavor profile.
- Savory Twist (Sweetened): While this is a dessert, you could explore a slightly less sweet variation by using a less sweet pie filling and perhaps a pinch of salt in the cream cheese.
- Gluten-Free Option: For a gluten-free version, use your favorite gluten-free flour tortillas. Be mindful of their texture when cooking, as they can sometimes be more delicate.
- Dairy-Free Option: Omit the cream cheese and use a dairy-free butter substitute for brushing the tortillas. Ensure your pie filling is also dairy-free.
- Fresh Fruit: In season, you can certainly use fresh fruit. Slice apples or pears and sauté them with a little sugar and spice until tender before assembling. Berries can also be used, though they may release more liquid.
FAQs
Q: Can I make these quesadillas ahead of time?
A: While they are best enjoyed fresh, you can assemble them ahead of time and refrigerate them. However, for the best texture, it’s recommended to cook them just before serving.
Q: What if I don’t have pie filling?
A: You can create a simple fruit filling by sautéing fresh or frozen fruit with a little sugar, lemon juice, and a thickener like cornstarch or flour until it reaches a jam-like consistency.
Q: How can I prevent the tortillas from getting soggy?
A: Ensure your skillet is hot enough and cook them over medium-low heat. Don’t overcrowd the pan, and avoid overfilling the quesadillas, which can lead to the filling leaking and making the tortilla soggy.
Q: Can I bake these instead of frying them?
A: Yes, you can bake them! Place the assembled and folded quesadillas on a baking sheet lined with parchment paper. Bake at 375°F (190°C) for about 10-12 minutes, flipping halfway through, until golden brown and heated through.
Q: What’s the best way to cut them for serving?
A: A sharp knife or a pizza cutter works best. You can cut them in half or into quarters for smaller, more manageable portions, especially if serving to children or as part of a dessert buffet.
Final Thoughts
There’s an inherent charm in transforming the everyday into the extraordinary, and the fruit-filled dessert quesadilla does just that. It’s a playful, approachable dessert that brings smiles to faces of all ages. The simplicity of its preparation belies the depth of flavor and comfort it offers. So, gather your ingredients, embrace the ease, and let the warm, fruity goodness of these quesadillas enchant your palate. I encourage you to try this delightful recipe and discover your favorite pie filling combination – it’s a sweet adventure waiting to happen!