
I-Love-You Scones: A Heartfelt Baking Experience
There are certain recipes that transcend mere sustenance; they become edible declarations of affection, imbued with the warmth and care of their maker. The “I-Love-You Scones,” as I’ve come to fondly call them, fall squarely into that category. I remember the first time I encountered this charming recipe, tucked away on a popular culinary website, and a spark ignited. The notion of shaping dough into hearts, while requiring a touch more effort, felt intrinsically romantic, perfect for those moments when words simply aren’t enough. My initial attempt, with the delicate sweetness of raspberry preserves nestled within, was a quiet triumph, a delicious testament to a special occasion. These aren’t overly sweet scones, allowing the nuanced flavors of almond and fruit to truly sing, and the act of crafting them by hand feels like a gentle caress.
Recipe Overview
- Prep Time: 20 minutes
- Cook Time: 12-15 minutes
- Total Time: 32-35 minutes
- Servings: 9
- Yields: 9 scones
- Dietary Type: Vegetarian
Ingredients
To craft these delightful “I-Love-You Scones,” you’ll need the following:
- 1 egg
- 1/3 cup milk
- 1/4 cup applesauce
- 2 tablespoons butter or 2 tablespoons margarine, melted
- 1 teaspoon almond extract
- 2 cups all-purpose flour
- 1/2 cup sliced almonds
- 1/3 cup granulated sugar
- 3 teaspoons baking powder
- 1/2 teaspoon salt
- 4 1/2 teaspoons strawberry preserves or 4 1/2 teaspoons raspberry preserves
- Powdered sugar, for dusting
Equipment Needed
- Baking sheet
- Medium bowl
- Whisk or fork
- Measuring cups and spoons
- Spatula or spoon
- Cooling rack
Instructions
Embarking on the creation of these scones is a journey of simple pleasures, culminating in a treat that’s as beautiful as it is delicious. Follow these steps with care, and you’ll be rewarded with a batch of lovingly crafted scones.
-
Preheat your oven to 400°F (200°C). Prepare a baking sheet by lightly greasing it. This ensures your scones won’t adhere to the pan during baking.
-
In a medium bowl, gently beat the egg until it’s slightly frothy.
-
To the beaten egg, add the milk, applesauce, melted butter (or margarine), and almond extract. Stir these wet ingredients together until they are well blended. The applesauce contributes moisture and a subtle sweetness, while the almond extract provides a wonderfully aromatic depth.
-
Now, it’s time to incorporate the dry ingredients. Add the all-purpose flour, sliced almonds, granulated sugar, baking powder, and salt to the bowl with the wet ingredients. Stir everything together just until the batter is moist. Be careful not to overmix; a few lumps are perfectly acceptable and can even contribute to a tender crumb. Overworking the dough can result in tough scones.
-
Drop approximately 1/4 cupfuls of dough onto the prepared baking sheet. Ensure you leave about 3 inches of space between each dollop of dough to allow for spreading.
-
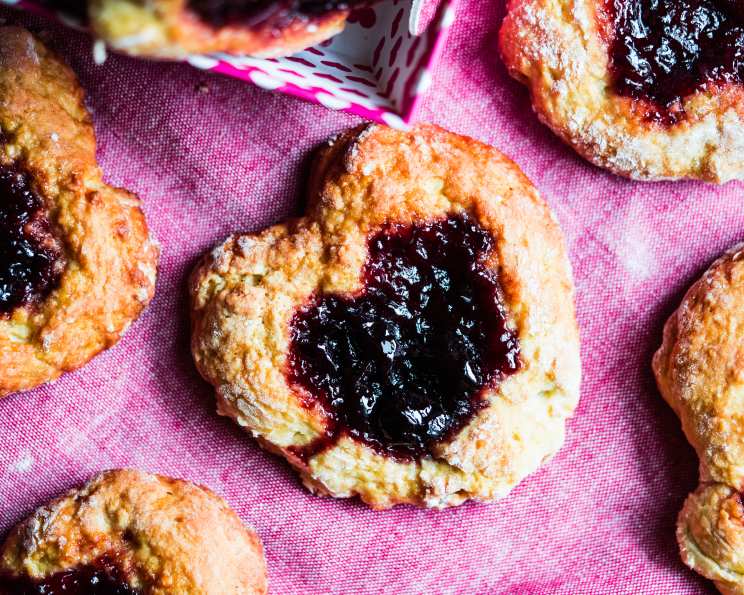
This is where the “I-Love-You” charm truly comes to life. Lightly dust your fingers with flour. Using your dusted fingers, gently pat each mound of dough into a heart shape. Aim for a width of about 3 inches and a thickness of approximately 1/2 inch. This step requires a little patience and tender handling, but the visual result is incredibly rewarding.
-
To create a perfect little pocket for the preserves, dip the back of a spoon into flour. Use this floured spoon to make a shallow well in the center of each heart-shaped scone.
-
Carefully place about 1/2 teaspoon of your chosen preserves (strawberry or raspberry) into each well. The original recipe suggests 1/2 teaspoon, but I’ve found that a full teaspoonful really makes the fruit filling sing. Whichever you choose, ensure it’s a generous dollop to provide that burst of fruity sweetness.
-
Bake the scones in the preheated oven at 400°F (200°C) for 12 to 15 minutes, or until they are golden brown around the edges and on top. The exact baking time will depend on your oven, so keep an eye on them.
-
Once baked to perfection, remove the scones from the baking sheet and transfer them to a cooling rack.
-
While the scones are still warm, sprinkle them generously with powdered sugar. The warmth of the scone will cause the sugar to melt slightly, creating a beautiful, snowy finish.
-
Serve warm for the best texture and flavor.
Expert Tips & Tricks
As a seasoned chef, I often look for ways to elevate even the simplest of recipes, and these scones are no exception. The original recipe offers a couple of fantastic time-saving tips that are worth highlighting:
- Make-Ahead Magic: To streamline your morning or the moment you wish to serve these, you can measure out all your dry ingredients the night before. Store them in a sealed container. On the day of, simply whisk together the wet ingredients, combine with the pre-measured dry ingredients, and proceed with shaping and baking. This significantly reduces the active preparation time.
- Extract Swap: While almond extract offers a distinct and sophisticated aroma, if it’s not a flavor you particularly enjoy or don’t have it on hand, you can absolutely substitute it with vanilla extract. The vanilla will provide a classic, comforting flavor that complements the preserves beautifully.
When shaping the hearts, don’t strive for absolute perfection. A slightly imperfect, hand-shaped heart often carries more charm and authenticity, a true sign of a homemade gesture.
Serving & Storage Suggestions
These “I-Love-You Scones” are best enjoyed fresh and warm, ideally within a few hours of baking. Their delicate crumb and tender interior are at their peak when served right out of the oven, dusted with that final touch of powdered sugar.
For any inevitable (and highly unlikely!) leftovers, store them in an airtight container at room temperature for up to 2 days. While they will retain their flavor, their texture might soften slightly. If you need to store them for longer, they can be kept in the refrigerator for up to 4 days, though it’s always best to let them come back to room temperature before serving.
To reheat them and recapture some of that fresh-baked warmth, you can place them on a baking sheet in a low oven (around 300°F / 150°C) for 5-7 minutes, or until warmed through. A quick zap in the toaster oven works well too. Freezing is also an option for longer-term storage. Once completely cooled, wrap individual scones tightly in plastic wrap and then place them in a freezer-safe bag or container for up to 2 months. Thaw overnight in the refrigerator and reheat as desired.
Nutritional Information
Here’s an estimated breakdown of the nutritional content per scone:
| Nutrient | Amount per Serving | % Daily Value |
|---|---|---|
| Calories | 212.1 kcal | |
| Calories from Fat | ||
| Total Fat | 6.2 g | 9% |
| Saturated Fat | 2.2 g | 11% |
| Cholesterol | 28.7 mg | 9% |
| Sodium | 288.8 mg | 12% |
| Total Carbohydrate | 34.3 g | 11% |
| Dietary Fiber | 1.5 g | 6% |
| Sugars | 9.3 g | 37% |
| Protein | 5 g | 10% |
Note: Nutritional values are estimates and can vary based on specific ingredients and brands used.
Variations & Substitutions
The beauty of these scones lies in their adaptable nature. While the core recipe is delightful, here are a few ideas to personalize them further:
- Fruit Variations: Beyond strawberry and raspberry preserves, consider other fruit flavors like apricot, blueberry, or even a tart cherry preserve. For a more rustic feel, you could use a small dollop of homemade fruit compote.
- Nutty Twists: If you’re not a fan of almonds, or simply want to change things up, try chopped walnuts or pecans in place of the sliced almonds. You could even incorporate finely chopped dried cranberries or raisins into the dough itself for little bursts of chewiness.
- Citrus Zest: A teaspoon of lemon or orange zest added to the dry ingredients can provide a bright, refreshing counterpoint to the sweetness of the preserves.
- Glaze Instead of Powdered Sugar: For a sweeter finish, you could mix a few tablespoons of powdered sugar with a tiny amount of milk or lemon juice to create a simple glaze and drizzle it over the cooled scones.
FAQs
Q: Why do the scones need to be shaped by hand?
A: The hand-shaping allows for the distinctive heart shape and ensures the preserves are nestled securely in the center before baking.
Q: Can I make these scones gluten-free?
A: While not explicitly tested in this recipe, you could experiment with a good quality gluten-free all-purpose flour blend. You might need to adjust the liquid slightly as gluten-free flours can absorb moisture differently.
Q: My scones didn’t spread much. What went wrong?
A: This can sometimes happen if the dough is overmixed, or if the baking powder has lost its potency. Ensure you’re not overworking the batter and check the expiry date of your baking powder.
Q: How much preserves should I really use?
A: The recipe suggests 1/2 teaspoon, but a full teaspoonful is my preferred amount for a more pronounced fruit flavor in each bite. Adjust to your personal preference.
Q: Can I use whole wheat flour instead of all-purpose?
A: You can try substituting up to half of the all-purpose flour with whole wheat flour. This will result in a slightly denser and heartier scone.
Final Thoughts
These “I-Love-You Scones” are more than just a recipe; they are an invitation to share a moment of sweetness and affection. Whether you’re celebrating a special occasion, expressing gratitude, or simply wanting to brighten someone’s day, the act of creating and sharing these heart-shaped delights is sure to convey a heartfelt message. They pair wonderfully with a cup of freshly brewed tea or a rich, steaming mug of coffee. As you bake them, imagine the smiles they’ll bring, and savor the simple joy of creating something truly from the heart. I encourage you to give them a try, and perhaps even share your own creations and experiences with me. Happy baking, and more importantly, happy sharing!