
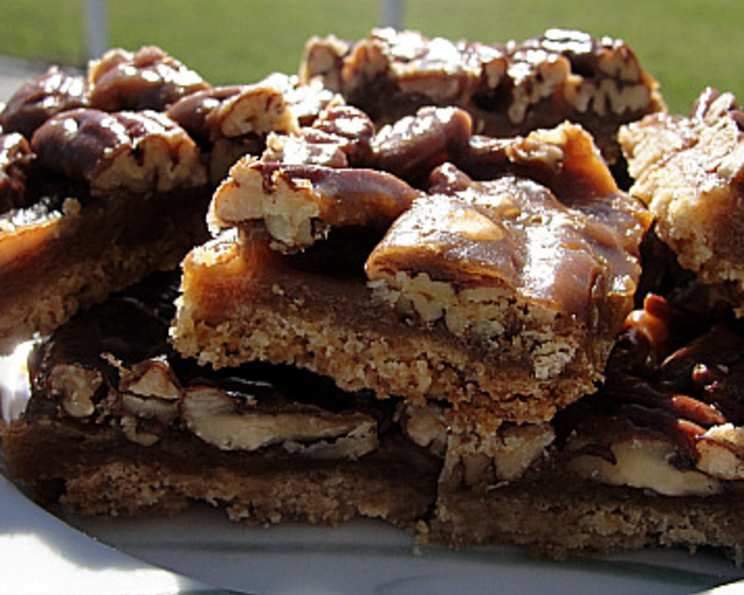
I’m a Little Nutty Pecan Pie Bars
I remember the first time I saw a picture of these pecan pie bars. It was tucked away in a local newspaper, the accompanying photograph so mouthwatering it practically leaped off the page, promising a decadent, nutty, caramelized bliss. My heart did a little flutter, the kind reserved for discovering a hidden culinary gem. It was one of those moments that reignites your passion in the kitchen, making you eager to recreate that visual promise in your own home. The thought of transforming simple ingredients into something so utterly satisfying was irresistible, and I knew immediately that this recipe was destined for my personal collection.
Recipe Overview
- Prep Time: 20 minutes
- Cook Time: 40 minutes
- Total Time: 1 hour
- Servings: 21
- Yield: 1 pie (in a 9×13 pan)
- Dietary Type: Vegetarian (can be adapted for vegan, see variations)
Ingredients
This recipe is a testament to how a few carefully selected ingredients can come together to create something truly spectacular. The beauty lies in its simplicity and the classic combination of sweet, buttery crust and rich, nutty filling.
For the Crust:
- 1 ¼ cups unsalted butter, divided
- 2 cups flour
- ½ cup packed brown sugar
- ½ teaspoon salt
For the Filling:
- 1 cup packed brown sugar
- 8 ounces pecans, coarsely chopped
- ⅓ cup honey
- 2 tablespoons heavy whipping cream
Equipment Needed
To bring these delightful bars to life, you’ll need a few essential kitchen tools.
- 9×13 inch baking pan
- Food processor (optional, but helpful for the crust)
- Medium, heavy-bottomed saucepan
- Measuring cups and spoons
- Spatula or wooden spoon
- Wire cooling rack
- Sharp knife
Instructions
Crafting these pecan pie bars is a straightforward process that yields incredibly rewarding results. Follow these steps precisely for a flawless bake.
- Preheat your oven to 350 degrees F (175 degrees C). This consistent temperature is crucial for achieving a perfectly golden-brown crust and a lusciously set filling.
- Prepare the Crust Base: Cut ¾ cup of the unsalted butter into ½-inch pieces. This ensures it will incorporate smoothly into the dry ingredients.
- Create the Crumb Crust: In a food processor, combine the ¾ cup of butter pieces, 2 cups of flour, ½ cup of the packed brown sugar, and ½ teaspoon of salt. Pulse the mixture until it resembles coarse crumbs. If you don’t have a food processor, you can use your fingertips or a pastry blender to achieve a similar crumbly texture.
- Form the Crust: Sprinkle this crumb mixture evenly into a 9×13 inch baking pan. Use your fingers or the bottom of a measuring cup to press the mixture firmly and evenly onto the bottom of the pan. A well-compacted crust prevents crumbling later on.
- Bake the Crust: Place the pan on the middle rack of your preheated oven and bake for 20 minutes, or until the crust is golden brown. Keep a close eye on it, as ovens can vary.
- Prepare the Pecans: While the crust is baking, coarsely chop the 8 ounces of pecans. You want some texture, not finely ground nuts.
- Assemble the Filling: In a medium, heavy-bottomed saucepan, combine the remaining ½ cup of butter (this is the remaining ¼ cup from the initial measurement, plus another ¼ cup which was not explicitly listed but implied by the “divided” ingredient), the remaining 1 cup of packed brown sugar, the ⅓ cup of honey, and the 2 tablespoons of heavy whipping cream.
- Simmer the Filling: Place the saucepan over medium heat. Simmer the mixture, stirring occasionally, for 1 minute. This brief simmering time helps to dissolve the sugars and meld the flavors, creating that signature caramel-like consistency.
- Incorporate the Pecans: Stir the coarsely chopped pecans into the simmering filling mixture until they are well coated.
- Pour and Spread: Immediately pour the pecan filling mixture over the hot crust in the baking pan. Use a spatula to spread it evenly across the entire surface of the crust. Work relatively quickly as the filling will begin to set.
- Bake the Bars: Return the pan to the middle rack of your oven. Bake for an additional 20 minutes, or until the filling is bubbling. The bubbling indicates the sugars have caramelized beautifully.
- Begin Cooling: Carefully remove the pan from the oven. Let the bars cool in the pan for about 15-20 minutes.
- Loosen the Edges: Once slightly cooled, run a sharp knife around the edge of the pan to loosen the bars. This is a crucial step to prevent sticking when you cut them later.
- Complete Cooling: Allow the bars to cool completely in the pan. This allows the filling to set properly, ensuring clean cuts. Rushing this step will lead to messy bars.
- Cut and Store: Once fully cooled, cut the entire pan into bars. These bars will keep for 5 days, covered at room temperature.
Expert Tips & Tricks
- Butter’s Role: The butter is divided for a reason. The cold butter in the crust creates a tender, flaky texture when baked, while the melted butter in the filling contributes to that rich, glossy finish.
- Brown Sugar Packing: When measuring brown sugar, pack it firmly into the cup. This ensures you have the correct amount for optimal sweetness and caramelization.
- Saucepan Choice: Using a heavy-bottomed saucepan for the filling helps to distribute heat evenly, preventing scorching and ensuring a smooth caramelization of the sugar and honey.
- Cooling Patience: While the temptation to cut into warm bars is strong, resisting it is key. Complete cooling allows the filling to firm up, making for much cleaner and more attractive bars.
- Crust Uniformity: Pressing the crust mixture evenly is vital. Uneven pressure can lead to some parts of the crust being overbaked while others are undercooked.
Serving & Storage Suggestions
These I’m a Little Nutty Pecan Pie Bars are wonderful served at room temperature. Their inherent richness means they stand beautifully on their own, but a dollop of unsweetened whipped cream or a scoop of vanilla bean ice cream can elevate them to pure indulgence. For an extra touch, a dusting of powdered sugar or a drizzle of chocolate ganache can be delightful.
For storage, these bars are remarkably well-behaved. Once completely cooled, cover the pan tightly with plastic wrap or transfer the cut bars to an airtight container. They will keep wonderfully for up to 5 days at room temperature. If your kitchen is particularly warm, or you prefer them chilled, they can also be stored in the refrigerator, though they might become a bit firmer. To reheat, a few seconds in a warm oven or microwave can bring back their gooey charm.
Nutritional Information
Here’s an estimated nutritional breakdown for these delicious pecan pie bars. Please note that these are approximate values and can vary based on specific ingredients and portion sizes.
| Nutrient | Amount per Serving | % Daily Value |
|---|---|---|
| Calories | 296 kcal | 15% |
| Total Fat | 19.4 g | 25% |
| Saturated Fat | 8 g | 40% |
| Cholesterol | 31 mg | 10% |
| Sodium | 62.2 mg | 3% |
| Total Carbohydrate | 30.5 g | 11% |
| Dietary Fiber | 1.4 g | 5% |
| Total Sugars | 20.1 g | 40% |
| Protein | 2.4 g | 5% |
Note: % Daily Value is based on a 2,000 calorie diet. Your daily values may be higher or lower depending on your calorie needs.
Variations & Substitutions
While this recipe is classic and delightful as is, it’s a fantastic canvas for creativity!
- Nut Variations: If pecans aren’t your favorite, walnuts make a superb substitute. You could also try a blend of pecans and walnuts, or even add some chopped almonds for a different textural element.
- Gluten-Free Crust: To make a gluten-free version, substitute a good quality gluten-free all-purpose flour blend for the wheat flour in the crust. Ensure the blend contains xanthan gum.
- Vegan Adaptation: For a vegan twist, you can make a few substitutions. Replace the unsalted butter with a good quality vegan butter substitute. For the heavy whipping cream, a full-fat coconut milk (the thick cream from the top of a chilled can) or a vegan heavy cream alternative will work beautifully. The crust base might require a touch more moisture; you can add a tablespoon or two of non-dairy milk if the mixture seems too dry after processing.
- Spice it Up: Add a pinch of cinnamon or nutmeg to the crust mixture for a subtle warmth that complements the nutty filling.
FAQs
Q: Can I make the crust ahead of time?
A: Yes, you can prepare the crust mixture and store it in the refrigerator for up to two days. You may need to press it slightly more firmly into the pan before baking.
Q: My filling looks too liquidy after baking, what went wrong?
A: This can sometimes happen if the filling wasn’t simmered for quite long enough to thicken, or if your oven temperature was slightly lower than indicated. Ensure the filling bubbles for the full minute and bake until it’s noticeably bubbling. Complete cooling is also essential for it to set properly.
Q: Can I use pre-chopped pecans?
A: While pre-chopped pecans will work, they might be a bit too fine. Aim for a coarse chop to maintain a pleasing texture within the bar.
Q: How do I know when the crust is perfectly golden brown?
A: Look for an even, rich golden hue across the entire surface of the crust. Avoid dark brown edges, which could indicate overbaking.
Q: Can I double this recipe?
A: Doubling this recipe would require a larger pan and potentially longer baking times. It’s generally best to bake in batches to ensure even cooking and proper setting.
Final Thoughts
These I’m a Little Nutty Pecan Pie Bars are more than just a dessert; they are a comforting embrace, a sweet indulgence that brings a touch of homemade magic to any occasion. They are perfect for potlucks, holiday gatherings, or simply for a quiet afternoon treat with a steaming mug of coffee. The satisfying crunch of the buttery crust, met with the gooey, caramelized pecan filling, is a symphony of textures and flavors that will have everyone reaching for a second (or third!) bar. I encourage you to give them a try, share them with loved ones, and savor every single nutty bite. They’re truly a little piece of heaven in bar form.