
The Enchanting Italian Donut: A Sweet Journey with Ciambella Bolognese
There’s a special kind of magic that happens when a familiar name conjures up entirely unexpected flavors. This was precisely my experience the first time I encountered the Ciambella Bolognese. Hearing “Bolognese” instantly transports me to images of rich, slow-cooked ragùs, and the idea of a donut by the same name seemed like a delightful culinary oxymoron. Yet, what emerged from my oven was not savory, but a tender, subtly sweet, lemony cake-like bread, a revelation that quickly cemented its place in my repertoire. It’s a treat best savored slowly, perfect for dipping into a warm mug of milk or a fragrant cup of tea, or for an afternoon indulgence alongside a glass of sweet Moscato.
Recipe Overview
- Prep Time: 40 minutes
- Cook Time: 25 – 30 minutes
- Total Time: 1 hour 10 minutes (approximate, including cooling)
- Servings: 12-15
- Yield: 1 large donut
- Dietary Type: Vegetarian
Ingredients
The beauty of this Ciambella Bolognese lies in its simplicity, showcasing a few key ingredients to create a wonderfully aromatic and light cake.
- 4 cups cake flour
- 3/4 cup granulated sugar
- 1/4 teaspoon salt
- 3 teaspoons baking powder
- 1 large lemon, rind finely grated (about 1-2 tablespoons zest)
- 70 g unsalted butter, softened to room temperature
- 3 large eggs, at room temperature
- 1/2 cup whole milk, at room temperature
- 3 tablespoons colored sprinkles (for decoration)
- 1/2 cup icing sugar (powdered sugar), for dusting
Equipment Needed
To bring this delightful Ciambella Bolognese to life, you’ll need a few essential kitchen tools:
- A large mixing bowl
- A whisk or fork
- A rubber spatula or wooden spoon
- A baking sheet (preferably a small pizza tray)
- Baking parchment paper
- A grater for zesting the lemon
- A clean, lightly floured surface for kneading
- A cooling rack
Instructions
Embarking on the creation of this Ciambella Bolognese is a straightforward and rewarding process, yielding a charming, ring-shaped cake that’s as pleasing to the eye as it is to the palate.
-
Preheat and Prepare: Begin by preheating your oven to 180° Celsius (350° Fahrenheit). Line a small pizza tray or a similarly sized baking sheet with baking parchment paper. This ensures your beautiful donut won’t stick and makes for easy cleanup.
-
Combine Dry Ingredients: In a large mixing bowl, combine the cake flour, granulated sugar, salt, and baking powder. Add the finely grated lemon rind to this dry mixture. Whisk everything together thoroughly to ensure the leavening agents and flavor are evenly distributed.
-
Incorporate the Butter: Add the softened butter to the bowl with the dry ingredients. Using your fingertips, rub the butter into the flour mixture until it resembles coarse breadcrumbs. This technique, known as ‘rubbing in,’ is crucial for creating a tender crumb in your cake. Work quickly to avoid melting the butter too much.
-
Create the Dough Base: In a separate small bowl or jug, lightly beat the large eggs with the milk. Pour this wet mixture into the flour and butter mixture. Stir with a rubber spatula or wooden spoon until a soft but firm dough begins to form. It should be cohesive enough to handle, but not sticky.
-
Shape the Donut: Turn the dough out onto a lightly floured board. Knead the dough lightly for just a minute or two, adding a touch more flour if it feels too sticky. The goal here is to gently bring it together, not to develop gluten. Once lightly kneaded, shape the dough into a long, uniform sausage or rope.
-
Form the Ring: Carefully place the dough sausage around the edge of your prepared pizza tray, forming a distinct ring shape. Gently join the ends together to create a continuous circle. Press the seam gently to ensure it holds its shape during baking.
-
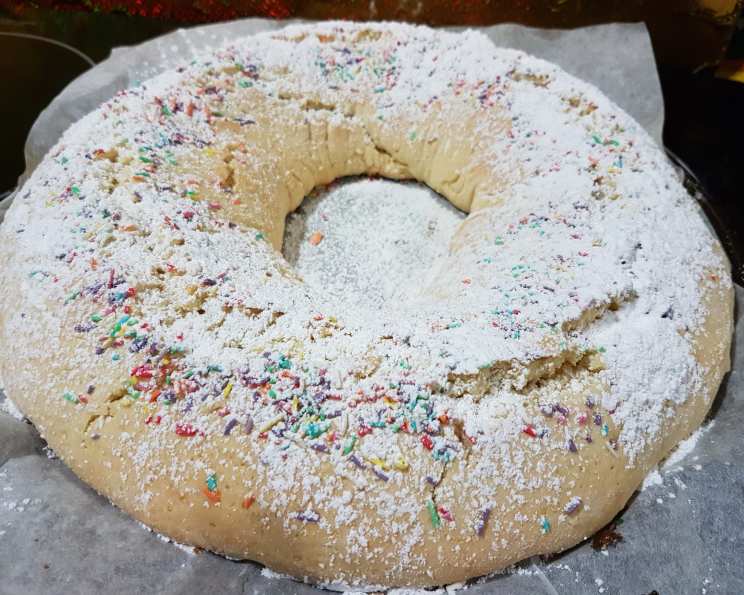
Decorate with Sprinkles: Now for the fun part! Sprinkle the colored sprinkles heavily over the entire surface of the dough ring. Use your fingertips to pat them in lightly, adhering them to the dough. This decorative touch adds a whimsical charm and a subtle textural contrast.
-
Bake to Golden Perfection: Place the prepared baking tray into the preheated oven. Bake for 25 to 30 minutes. You’re looking for the Ciambella Bolognese to be lightly browned on top and to have puffed up nicely. A skewer inserted into the thickest part of the cake should come out clean.
-
The Icing Sugar Finish: As soon as the Ciambella Bolognese is removed from the oven, immediately dust it heavily with icing sugar. Don’t be shy; a generous snowfall of powdered sugar is key to its characteristic appearance and taste.
-
Cool Completely: Allow the Ciambella Bolognese to cool completely on a wire rack before slicing or serving. This is an important step to allow the cake to set properly and for the flavors to meld.
Expert Tips & Tricks
To elevate your Ciambella Bolognese experience, consider these professional insights:
- Room Temperature is Key: Ensure your eggs and milk are at room temperature. This allows them to emulsify better with the other ingredients, leading to a smoother, more uniform dough and a finer cake crumb.
- Gentle Handling: The dough for this Ciambella is quite soft. Avoid over-kneading, as this can lead to a tough cake. Light, gentle handling is all that’s required to bring it together.
- Lemon Zest Power: For maximum lemon aroma and flavor, zest the lemon just before you need it. Avoid zesting into the white pith, as this can impart bitterness.
- Don’t Skimp on the Icing Sugar: The immediate dusting of icing sugar is not just for decoration; it also helps to create a beautiful, slightly crusty exterior as the cake cools.
Serving & Storage Suggestions
The Ciambella Bolognese is a wonderfully versatile treat. It’s traditionally served for breakfast with milk or tea, or as an afternoon treat with a glass of moscato. The porous texture is perfect for dipping, allowing it to soak up your beverage beautifully. While I personally prefer it undipped to savor the cake’s delicate texture, dipping is a time-honored tradition that’s certainly worth trying. It also pairs wonderfully with a dollop of jam or Nutella for an extra layer of indulgence.
Leftovers can be stored in an airtight container at room temperature for up to 3 days. It doesn’t typically require refrigeration, which can sometimes dry out baked goods. If you find it has become a little firm after a day or two, you can gently warm a slice in a toaster oven or microwave for a few seconds to revive its softness.
Nutritional Information
Here’s an estimated nutritional breakdown for a single serving of Ciambella Bolognese, assuming it is cut into 15 slices.
| Nutrient | Amount per Serving | % Daily Value |
|---|---|---|
| Calories | 301.7 kcal | |
| Total Fat | 6.7 g | 10% |
| Saturated Fat | 3.7 g | 18% |
| Cholesterol | 60.4 mg | 20% |
| Sodium | 204.6 mg | 8% |
| Total Carbohydrate | 54.6 g | 18% |
| Dietary Fiber | 1 g | 3% |
| Sugars | 17.7 g | 70% |
| Protein | 5.8 g | 11% |
Note: Nutritional values are approximate and can vary based on specific ingredients and portion sizes.
Variations & Substitutions
While the classic Ciambella Bolognese is delightful as is, here are a few ideas to put your own spin on this charming cake:
- Citrus Twist: If you love citrus, consider adding the zest of half an orange along with the lemon for a more complex flavor profile.
- Almond Embrace: For a subtle nutty undertone, substitute a tablespoon or two of almond extract for an equivalent amount of milk, or add finely ground almond flour to the dry ingredients (adjusting the cake flour slightly).
- Glazed Delight: Instead of a simple icing sugar dusting, you could prepare a simple lemon glaze by mixing icing sugar with a little lemon juice until you achieve a pourable consistency. Drizzle this over the cooled cake for a more pronounced citrus note and a glossy finish.
FAQs (Frequently Asked Questions)
Q: Why is it called “Bolognese” if it’s a sweet cake?
A: The naming is a delightful culinary quirk! It likely refers to the ring shape, which can resemble the open center of a traditional ring-shaped pasta cutter, or perhaps a historical regional connection that has been lost to time.
Q: Can I make this ahead of time?
A: Yes, absolutely! The Ciambella Bolognese keeps well at room temperature for a few days, making it an excellent candidate for make-ahead baking.
Q: What kind of milk is best to use?
A: Whole milk provides the richest texture and flavor, but you can substitute with 2% milk or even a non-dairy milk like almond or soy if needed.
Q: My dough seems too sticky, what should I do?
A: If your dough is too sticky to handle, lightly dust your board and hands with a little extra cake flour. Knead very gently until it’s manageable. Avoid adding too much flour, as this can make the cake tough.
Q: Can I bake this in a different pan?
A: While a pizza tray or a similarly sized flat baking sheet is ideal for achieving the classic ring shape, you could potentially shape it on a larger tray, or even try baking it in a bundt pan, adjusting baking time as needed.
A Sweet Farewell
The Ciambella Bolognese is a testament to the joy of culinary surprises. It’s a simple yet utterly charming cake that brings a touch of Italian sweetness and sunshine to any occasion. Whether enjoyed with a morning coffee, an afternoon tea, or a leisurely glass of wine, it’s a reminder that sometimes, the most unexpected names hold the most delightful secrets. I encourage you to bake this gem, share it with loved ones, and savor every lemony, tender bite. Don’t hesitate to let me know how yours turns out – I always cherish hearing about your baking adventures!