
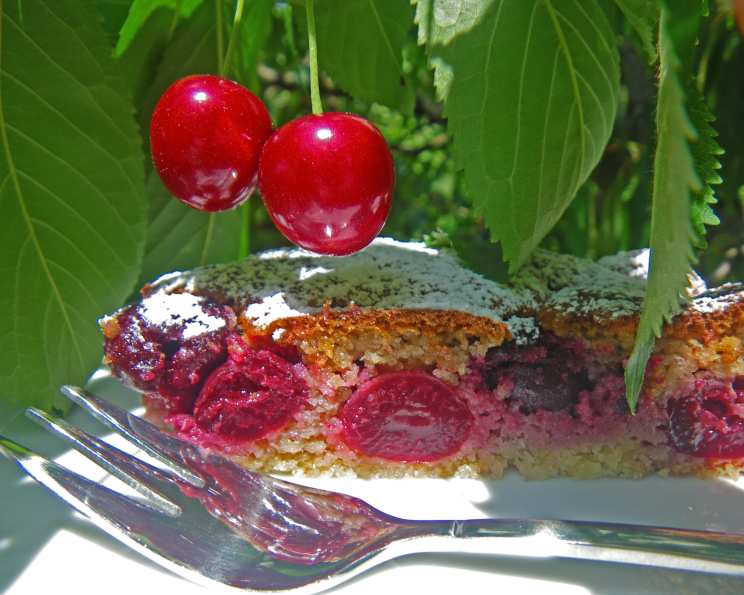
Dolce di Ciliegie: A Taste of Old-World Italian Charm
The aroma of baking cherries and toasted almonds has always been a comforting presence in my kitchen, a sensory postcard from my grandmother’s humble home in rural Italy. This Dolce di Ciliegie, or “Sweet Cherry Cake,” isn’t just a dessert; it’s a whisper of history, a recipe lovingly preserved from a time when ingredients were scarce but culinary ingenuity flourished. I remember watching Nonna, her hands dusted with flour, meticulously prepare this simple yet elegant confection, her lips murmuring ancient blessings over the batter. It’s a dish that transcends mere sweetness, embodying warmth, family, and the enduring magic of Italian home cooking.
Recipe Overview
- Prep Time: 30 minutes
- Cook Time: 30 minutes
- Total Time: 1 hour
- Servings: 6-8
- Yield: 1 cake
- Dietary Type: Dessert
Ingredients
This recipe, a treasured heirloom, calls for straightforward ingredients that come together to create something truly special.
For the Mold Preparation:
- 1 teaspoon butter or 1 teaspoon vegetable oil
- 2 ounces almonds, ground
- 1 tablespoon breadcrumbs, finely grated
For the Filling:
- 1/2 lb cherries (about 250g, can be frozen or fresh)
- 4 large eggs, divided
- 4 ounces icing sugar (about 120g)
- 2 ounces breadcrumbs, finely grated (about 60g)
- 1/2 tablespoon cornstarch (only if using frozen cherries and they release a lot of juice)
- 2 tablespoons nuts liqueur (alternatively, Amaretto or Maraschino liqueur)
- 1/2 teaspoon vanilla extract OR 1/2 lemon, grated peel only
For Serving:
- 2 tablespoons icing sugar (for dusting)
Equipment Needed
To bring this delightful Dolce di Ciliegie to life, you’ll need a few key pieces of equipment:
- A mixing bowl (or two, for separating eggs)
- A whisk (or electric mixer)
- A spatula
- A baking mold or cake pan (approximately 10 to 10 inches, or a similar sized round or square pan)
- An oven
- A cooling rack
Instructions
Crafting this Dolce di Ciliegie is a straightforward process, a beautiful dance of simple steps that yield an exquisite result. Follow these instructions carefully to capture the authentic taste of this classic Italian dessert.
-
Begin by preparing your cherries. If using fresh cherries, wash them thoroughly and then carefully remove the pits. If you are using frozen cherries, you can proceed directly to the next step, but be mindful of any excess juice released during the baking process, which is where the cornstarch comes in handy.
-
Next, prepare your baking mold. Grease the mold generously with either butter or vegetable oil. This ensures that your cake will release cleanly after baking.
-
Once the mold is greased, evenly distribute the ground almonds and one tablespoon of breadcrumbs across the bottom and slightly up the sides of the mold. This creates a delightful, slightly nutty crust that complements the soft cake and tart cherries.
-
Now, let’s prepare the filling. In a clean mixing bowl, combine the egg yolks with the icing sugar. Whisk them together vigorously until the mixture becomes creamy and pale yellow, with a soft, light texture.
-
To this creamy egg yolk mixture, gradually incorporate the finely grated breadcrumbs. If you are using frozen cherries and notice they have released a significant amount of juice, this is the point to add the cornstarch. Then, stir in the nuts liqueur (or your chosen alternative), vanilla extract, or lemon zest. If you’re using fresh lemon, ensure you are only adding the zest, not the pith, as the pith can be bitter. If using frozen cherries, you can also add a little of their reserved juice here for extra flavor.
-
In a separate, spotlessly clean bowl, beat the egg whites until soft peaks form. It’s crucial that this bowl and your whisk are free of any grease for the egg whites to whip properly.
-
Gently fold the beaten egg whites into the egg yolk and breadcrumb mixture. Use a spatula and a light, folding motion, taking care not to deflate the airy egg whites. The goal is to create a light, fluffy batter.
-
Carefully spread this soft batter evenly into the prepared mold, over the almond and breadcrumb base.
-
Arrange the prepared cherries over the top of the batter. You can place them in a decorative pattern or simply distribute them evenly.
-
Preheat your oven to 400 degrees Fahrenheit (200°C).
-
Bake the Dolce di Ciliegie in the preheated oven for approximately 30 minutes. The exact time can vary depending on your oven’s calibration and whether it’s a convection oven. The cake is ready when it’s golden brown and appears cooked through. You can test for doneness by inserting a skewer or toothpick into the center; it should come out clean.
-
Once baked, remove the cake from the oven.
-
Dust the top generously with icing sugar before serving.
-
This Dolce di Ciliegie can be enjoyed hot or cold, offering a slightly different but equally delightful experience.
Expert Tips & Tricks
To elevate your Dolce di Ciliegie from delicious to truly exceptional, consider these seasoned chef insights:
- Cherry Quality Matters: While frozen cherries are convenient, using ripe, in-season fresh cherries will impart a more vibrant flavor. If using frozen, thaw them first and drain off as much liquid as possible to avoid a soggy cake; the cornstarch is your friend here.
- The Almond Crust: For an even more pronounced nutty flavor, you can lightly toast your ground almonds before adding them to the mold. This adds an extra layer of complexity.
- Liqueur Depth: Don’t be afraid to experiment with the liqueur. Amaretto offers a distinct almond note, while Maraschino provides a classic cherry enhancement. A good quality sherry can also add a subtle, sophisticated warmth.
- Zest is Best: When using lemon zest, ensure you only grate the yellow outer layer. The white pith is bitter and can overpower the delicate flavors of the cake.
- Egg White Perfection: For the fluffiest cake, make sure your bowl and whisk are absolutely free of any fat or oil. This ensures the egg whites can achieve maximum volume.
- Oven Savvy: Ovens can be temperamental. If you know your oven runs hot or cool, adjust the baking temperature and time accordingly. A convection oven often bakes faster, so keep a close eye on it.
Serving & Storage Suggestions
This Dolce di Ciliegie is as versatile in its presentation as it is in its flavor.
- Serving: The most traditional way to serve is dusted with icing sugar. For an extra special touch, as suggested by a delightful presentation tip, place a slice on a plate, drizzle with a tablespoon of cherry liqueur, Maraschino, or even sherry, and gently heat in the microwave for about 15-20 seconds until warm. This awakens the aromas and flavors beautifully. It is absolutely sublime served with a scoop of vanilla ice cream – the contrast of warm cake and cool ice cream is heavenly.
- Storage: Leftovers can be stored in an airtight container at room temperature for up to 2 days, provided your kitchen is not excessively warm. For longer storage, keep it in the refrigerator for up to 4 days. To reheat, gently warm slices in the oven or microwave. It can also be frozen for up to 2 months; thaw overnight in the refrigerator before serving.
Nutritional Information
Here’s an approximate nutritional breakdown for a serving of Dolce di Ciliegie:
| Nutrient | Amount per Serving | % Daily Value |
|---|---|---|
| Calories | 345.9 kcal | |
| Calories from Fat | ||
| Total Fat | 9.8 g | 15% |
| Saturated Fat | 2 g | 10% |
| Cholesterol | 125.7 mg | 41% |
| Sodium | 174.3 mg | 7% |
| Total Carbohydrate | 45.7 g | 15% |
| Dietary Fiber | 2.6 g | 10% |
| Sugars | 33.6 g | 134% |
| Protein | 8.4 g | 16% |
(Note: Nutritional values are estimates and can vary based on specific ingredients and portion sizes.)
Variations & Substitutions
While this recipe is a masterpiece in its classic form, it also lends itself beautifully to creative adaptations.
- Nut-Free Option: If nut allergies are a concern, you can omit the ground almonds and increase the breadcrumbs slightly for the mold. The cake will still be delicious, though the nutty depth will be missed.
- Booze-Free: For a non-alcoholic version, substitute the liqueur with an equal amount of cherry juice or a simple syrup infused with vanilla bean.
- Other Fruits: While cherries are traditional, this cake base can be adapted. Berries (fresh or frozen), plums, or even diced apples could be used, though baking times and the need for cornstarch might need adjustment.
- Gluten-Free Flour: While breadcrumbs are the base here, a gluten-free baker could experiment with a mix of almond flour and gluten-free breadcrumbs or a blend of gluten-free flours for a different texture.
FAQs
Here are some common questions about making and enjoying this classic Italian dessert:
Q: Why do I need cornstarch if I use frozen cherries?
A: Frozen cherries tend to release more liquid when baked. Cornstarch helps to absorb this excess moisture, preventing the cake from becoming too wet or soggy.
Q: Can I make this cake ahead of time?
A: Yes, the Dolce di Ciliegie can be made a day in advance. It stores well at room temperature or in the refrigerator.
Q: My egg whites didn’t get stiff, what went wrong?
A: Ensure your bowl and whisk are completely clean and free of any fat or grease. Even a tiny amount can prevent egg whites from whipping properly.
Q: How do I know if the cake is fully baked?
A: A skewer or toothpick inserted into the center of the cake should come out clean. The top should also be golden brown and the edges slightly pulling away from the pan.
Q: Is it necessary to use liqueur?
A: Liqueur adds a wonderful depth of flavor and aroma, but it’s not strictly essential. You can substitute with cherry juice or a vanilla-infused simple syrup for a non-alcoholic option.
Final Thoughts
This Dolce di Ciliegie is more than just a recipe; it’s an invitation to step back in time, to experience the heart and soul of Italian home baking. It’s a testament to how simple ingredients, prepared with care and love, can create something truly extraordinary. I encourage you to bake this cake, to share its warmth and charm with your loved ones, and to savor every delicious bite. Perhaps you’ll even create your own cherished memories around its sweet, fruity embrace. Buon appetito!