
Karissa’s Soft and Yummy Peanut Butter Cookies: A Hug in Every Bite
There are some recipes that just feel like coming home, aren’t there? For me, Karissa’s Soft and Yummy Peanut Butter Cookies are precisely that. They’re not fancy, they don’t demand exotic ingredients, and they certainly don’t require a degree in pastry to master. Yet, every time I bake a batch, the scent wafting from the oven transports me back to my grandmother’s kitchen, where a worn-out recipe card, smudged with flour and love, sat on the counter. These cookies, with their perfectly tender crumb and rich peanut butter embrace, are more than just a dessert; they’re a tangible reminder of simple joys and shared moments, a comforting whisper from the past that always manages to brighten the present.
Recipe Overview
- Prep Time: 20 minutes
- Cook Time: 8-10 minutes per batch
- Total Time: Approximately 20 minutes + baking time
- Servings: About 24 cookies
- Yield: 24 cookies
- Dietary Type: Classic Cookie
Ingredients
For a batch of these delightful cookies, you’ll need a few pantry staples and one star ingredient: peanut butter! The beauty of this recipe lies in its straightforwardness.
- 1 ¾ cups all-purpose flour
- 1 teaspoon baking soda
- ½ teaspoon salt
- ½ cup unsalted butter, softened
- ⅓ cup creamy peanut butter (your favorite brand works wonderfully!)
- ½ cup granulated sugar
- 1 teaspoon vanilla extract
- 1 large egg
- ½ cup packed light brown sugar
- Granulated sugar for rolling (optional, but recommended for that classic crinkle-top finish)
Optional Addition: For those who adore the classic peanut butter blossom, a Hershey’s chocolate kiss per cookie is the perfect, iconic topping.
Equipment Needed
While these cookies are wonderfully simple, a few basic kitchen tools will ensure a smooth baking experience:
- Mixing bowls (at least two: one for dry ingredients, one for wet)
- Whisk or fork for sifting dry ingredients
- Electric mixer (handheld or stand mixer) or a sturdy wooden spoon for creaming
- Measuring cups and spoons
- Baking sheets
- Parchment paper or silicone baking mats (optional, for easier cleanup)
- Fork for creating the classic criss-cross pattern
- Wire cooling rack
Instructions
The process for creating Karissa’s Soft and Yummy Peanut Butter Cookies is a delightful journey from simple ingredients to irresistible treats. Follow these steps precisely, and you’ll be rewarded with cookies that are the epitome of soft and yummy.
- Preheat Your Oven: Begin by preheating your oven to 350°F (175°C). This ensures your oven is at the optimal temperature when the cookies are ready to bake, leading to even cooking.
- Combine Dry Ingredients: In a medium-sized mixing bowl, sift together the all-purpose flour, baking soda, and salt. Whisk them gently to ensure they are well combined and aerated. Set this bowl aside.
- Cream the Wet Ingredients: In a separate, larger mixing bowl, cream together the softened butter, creamy peanut butter, granulated sugar, and vanilla extract. Beat them until the mixture is light and fluffy. If you’re using an electric mixer, this will typically take about 2-3 minutes.
- Incorporate the Egg and Brown Sugar: Add the egg to the creamed mixture and beat until well incorporated. Then, add the packed light brown sugar and beat again until the mixture is smooth and homogenous.
- Gradually Add Flour Mixture: Now, it’s time to introduce the dry ingredients to the wet. Slowly incorporate the flour mixture into the wet ingredients. Mix on low speed or by hand until just combined. The batter will become quite stiff at this stage; this is perfectly normal. Be careful not to overmix, as this can lead to tough cookies.
- Shape the Cookies: Roll rounded teaspoonfuls of dough into balls. If you’re aiming for that classic look, you can optionally roll each ball in additional granulated sugar for a subtle crunch and sparkle.
- Prepare for Baking: Place the dough balls onto an ungreased baking sheet. Leave about 2 inches of space between each cookie to allow for spreading.
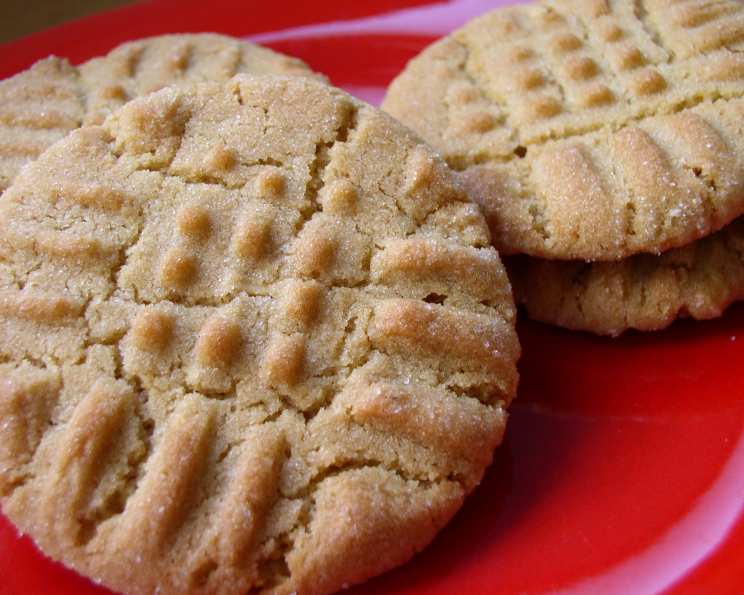
- Create the Iconic Pattern: For a traditional peanut butter cookie, use the tines of a fork to press down lightly on each cookie, creating a criss-cross pattern. This not only looks charming but also helps the cookies bake evenly.
- Bake to Perfection: Bake for about 8 to 10 minutes. The cookies should appear set around the edges but may still look slightly soft in the center. They will continue to firm up as they cool.
- Cool the Cookies: Once baked, carefully transfer the cookies to a wire cooling rack to cool completely. This allows air to circulate around them, preventing them from becoming soggy.
For Peanut Butter Blossoms (Optional Variation):
If you’re making peanut butter blossoms, skip the fork press in step 8. Simply place the dough balls on the baking sheet and bake for about 8 minutes, or until the edges are set. Immediately upon removing the cookies from the oven, gently press a chocolate kiss onto the top of each warm cookie. The residual heat will soften the chocolate, allowing it to meld slightly into the cookie. You might need to return them to the oven for another couple of minutes to ensure the cookie cracks just a bit around the kiss, creating that signature look.
Expert Tips & Tricks
As a chef, I always look for ways to elevate even the simplest recipes. For these soft and yummy peanut butter cookies, a few small adjustments can make a big difference:
- Butter Temperature is Key: Ensure your butter is truly softened, not melted. You should be able to indent it with your finger easily. This creaminess is crucial for the cookie’s texture.
- Peanut Butter Choice: While any creamy peanut butter will work, a good quality, unsalted peanut butter will give you the best flavor control. If you prefer a saltier cookie, you can adjust the salt accordingly.
- Don’t Overbake! This is perhaps the most critical tip for achieving soft cookies. Cookies continue to bake on the hot baking sheet after they’re removed from the oven. Pull them out when they look slightly underdone in the center.
- Chilling the Dough: For slightly chewier cookies and better shape retention, you can chill the dough for 30 minutes before scooping and rolling. This is especially helpful in warmer kitchens.
- Uniform Size: Using a cookie scoop ensures all your cookies are the same size, which leads to more even baking.
Serving & Storage Suggestions
Karissa’s Soft and Yummy Peanut Butter Cookies are best enjoyed at room temperature, allowing their full flavor and soft texture to shine. They are absolutely delightful with a tall glass of cold milk, a steaming mug of coffee, or even a rich hot chocolate.
For storage, these cookies are quite forgiving. Once completely cooled, store them in an airtight container at room temperature. They will stay wonderfully soft and delicious for 3-4 days. If you find they start to dry out, you can pop a slice of bread into the container; the moisture from the bread will help re-soften the cookies.
If you need to store them for longer, freeze the cooled cookies in a single layer on a baking sheet until firm, then transfer them to a freezer-safe bag or container. They can be stored in the freezer for up to 2-3 months. Thaw them at room temperature before enjoying.
Nutritional Information
Here’s an estimated nutritional breakdown for one cookie, assuming a yield of 24 cookies and excluding the optional chocolate kiss:
| Nutrient | Amount per Serving | % Daily Value |
|---|---|---|
| Calories | 125 kcal | 6% |
| Total Fat | 5.9 g | 8% |
| Saturated Fat | 2.9 g | 14% |
| Cholesterol | 19 mg | 6% |
| Sodium | 149.5 mg | 6% |
| Total Carbohydrate | 16.3 g | 5% |
| Dietary Fiber | 0.5 g | 2% |
| Sugars | 9 g | 18% |
| Protein | 2.1 g | 4% |
Note: Nutritional values are approximate and can vary based on specific ingredients used.
Variations & Substitutions
While the classic recipe is perfection, here are a few ways to put your own spin on Karissa’s Soft and Yummy Peanut Butter Cookies:
- Nut Butter Swap: Feel free to experiment with other creamy nut butters like almond butter or cashew butter. The flavor profile will change, but the soft texture should remain.
- Add-Ins: For a textural contrast, consider folding in chocolate chips, butterscotch chips, or even chopped nuts into the dough before shaping.
- Spice It Up: A pinch of cinnamon or nutmeg in the dry ingredients can add a warm, cozy undertone.
- Gluten-Free: For a gluten-free version, you can substitute a good quality gluten-free all-purpose flour blend for the wheat flour. You may need to adjust the liquid slightly depending on the blend.
FAQs
Q: Why are my peanut butter cookies so hard?
A: This is usually due to overmixing the dough after adding the flour, or overbaking the cookies. Ensure you mix until just combined and pull them from the oven when they still appear slightly soft in the center.
Q: Can I use crunchy peanut butter instead of creamy?
A: Yes, you can! Using crunchy peanut butter will add a delightful textural element to your cookies, but the overall texture might be slightly less uniformly soft.
Q: How do I prevent my cookies from spreading too much?
A: Ensure your butter is softened but not melted, and avoid over-creaming the butter and sugar. Chilling the dough for about 30 minutes before baking can also help prevent excessive spreading.
Q: Can I make these cookies ahead of time?
A: Absolutely! The dough can be made a day in advance and stored in the refrigerator. Alternatively, you can bake the cookies and store them in an airtight container at room temperature for up to 4 days.
Q: What’s the secret to the classic criss-cross pattern?
A: It’s all in the gentle press of a fork! Make sure the cookies are firm enough to hold the pattern without collapsing. Lightly greasing the fork can also help prevent sticking.
Final Thoughts
There’s an enduring magic in a simple, perfectly executed cookie. Karissa’s Soft and Yummy Peanut Butter Cookies are a testament to that. They are the kind of treat that brings smiles, sparks conversations, and creates comforting memories. Whether you’re a seasoned baker or just starting your culinary adventure, I wholeheartedly encourage you to whip up a batch. They’re uncomplicated, deeply satisfying, and possess a certain charm that’s hard to resist. Share them with loved ones, or savor them yourself with a quiet moment and a warm drink. I’d love to hear your thoughts once you’ve baked them – happy baking!