
Kelly’s Amazing Andes Mint Thumbprint Cookies
There are certain flavors that instantly transport me back in time, conjuring up vivid memories of cozy kitchens and joyful gatherings. For me, the bright, refreshing scent of peppermint, especially when paired with rich dark chocolate, is one of those flavor profiles. I remember the first time I encountered Kelly’s Amazing Andes Mint Thumbprint Cookies; they were a revelation at my friend Donna’s annual cookie exchange. Each bite was a perfect symphony of crisp, buttery cookie, a cool minty center, and that unmistakable dark chocolate kiss. When everyone at the party started clamoring for the recipe, I knew this was a cookie worth sharing far and wide.
Recipe Overview
- Prep Time: 25 minutes
- Cook Time: 10-12 minutes per batch
- Total Time: Approximately 1 hour and 40 minutes (including cooling and setting)
- Servings: 36 cookies
- Yield: 36 cookies
- Dietary Type: Standard baking
Ingredients
Here’s what you’ll need to recreate these delightful minty morsels:
- 1 cup (2 sticks) unsalted butter, softened
- 1 cup powdered sugar
- 1 ½ teaspoons peppermint extract
- 2 large egg yolks
- 16 drops green food coloring (or to achieve your desired minty hue)
- 2 ¼ cups all-purpose flour
- ½ teaspoon baking powder
- ¼ teaspoon salt
For the Chocolate Filling and Garnish:
- ¾ cup dark chocolate chips
- 3 tablespoons heavy cream
- 3 tablespoons unsalted butter
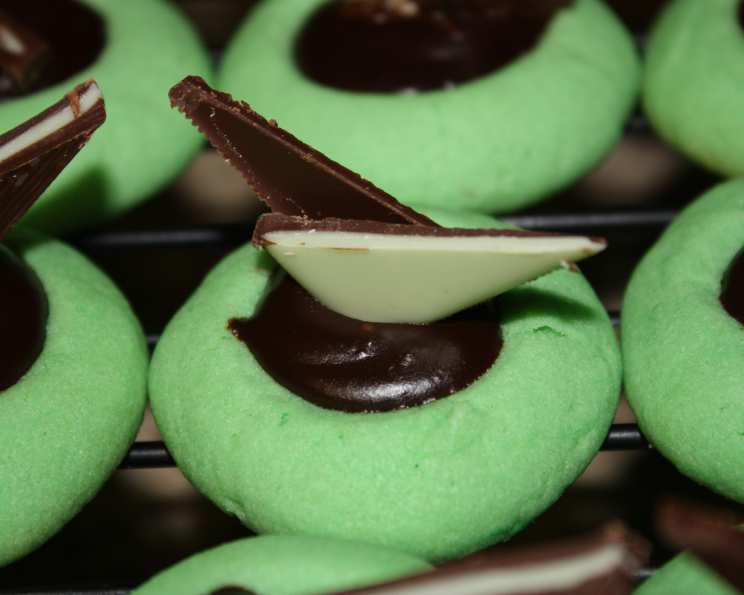
- 18 Andes mint candies, cut in half diagonally
Equipment Needed
To make these cookies a breeze, gather these kitchen essentials:
- Large mixing bowl
- Electric mixer (handheld or stand mixer)
- Measuring cups and spoons
- Baking sheets
- Parchment paper (optional, but recommended for easy cleanup)
- Small bowl or microwave-safe bowl for melting chocolate
- Spoon or small whisk for stirring chocolate
- Wooden spoon (for creating the thumbprint wells)
- Wire cooling rack
Instructions
Follow these steps meticulously to achieve cookie perfection:
-
Preheat Your Oven: Begin by preheating your oven to 350 degrees Fahrenheit (175 degrees Celsius). Line your baking sheets with parchment paper if you wish, for an easier cleanup.
-
Cream the Butter and Sugar: In a large bowl, combine the 1 cup of softened butter and 1 cup of powdered sugar. Using your electric mixer, beat these ingredients on medium speed until the mixture is light and fluffy. This process incorporates air, which is crucial for a tender cookie.
-
Incorporate Wet Ingredients and Color: Next, beat in the 1 ½ teaspoons of peppermint extract, the 2 large egg yolks, and the 16 drops of green food coloring. Continue to beat until everything is thoroughly blended and the dough takes on a lovely, consistent green hue.
-
Add Dry Ingredients: In a separate, smaller bowl, whisk together the 2 ¼ cups of flour, ½ teaspoon of baking powder, and ¼ teaspoon of salt. Gradually add these dry ingredients to the wet mixture in the large bowl. Beat on low speed until just combined. Be careful not to overmix the dough at this stage, as it can lead to tough cookies.
-
Shape the Cookies: Roll the dough into 1-inch balls. Place these dough balls about 2 inches apart on your prepared baking sheets.
-
Create the Thumbprints: This is where the magic happens! Using the end of the handle of a wooden spoon (or even your thumb, lightly floured), press a deep well into the center of each cookie. Aim for a good indentation that will hold the chocolate filling.
-
Bake the Cookies: Bake for 10 to 12 minutes, or until the edges of the cookies are just set. They should not be golden brown; you want them to remain pale to preserve their tender texture.
-
Reshape the Wells: As soon as the cookies come out of the oven, while they are still hot and pliable, use the end of the wooden spoon again to gently reshape the wells. This ensures they are deep enough to hold the chocolate filling after they have cooled slightly.
-
Cool Completely: Transfer the cookies to a wire cooling rack and allow them to cool completely. This will take approximately 15 minutes or more. It’s essential they are fully cooled before adding the chocolate, otherwise, the chocolate will melt too quickly and won’t set properly.
-
Prepare the Chocolate Filling: While the cookies are cooling, prepare the decadent chocolate filling. In a medium microwavable bowl, combine the ¾ cup of dark chocolate chips, 3 tablespoons of heavy cream, and 3 tablespoons of butter. Microwave on high for 1 minute, or until the mixture looks melted. Carefully stir the mixture until it is smooth and glossy. If it’s not fully melted, continue microwaving in 15-second intervals, stirring between each, until smooth. Be cautious not to overheat the chocolate.
-
Fill the Cookies: Once the chocolate mixture has cooled slightly (about 10 minutes after microwaving), it’s time to fill the wells. Spoon about 1 teaspoon of the chocolate mixture into each well of the cooled cookies.
-
Garnish with Mints: Before the chocolate fully sets, garnish each cookie with a half Andes mint candy, cut diagonally. You may need to gently press the candy into the slightly warm chocolate to secure it. It’s a good idea to test one candy to ensure it adheres well before garnishing all the cookies.
-
Let the Chocolate Set: Allow the cookies to stand at room temperature for at least 1 hour until the chocolate is completely set. This ensures a clean bite and prevents the chocolate from smearing.
Expert Tips & Tricks
- Butter Softness is Key: Ensure your butter is truly softened, not melted. This will help it cream properly with the powdered sugar, creating a light and airy cookie base.
- Don’t Overmix: Overmixing the dough after adding the flour can develop the gluten too much, resulting in tough cookies. Mix until just combined.
- Reshaping Wells is Important: Those freshly baked wells are fragile. Taking a moment to gently reshape them with the wooden spoon ensures they’re perfectly formed for the chocolate filling.
- Chocolate Tempering (Optional but Recommended): For an extra professional finish and a glossy sheen that snaps when bitten, consider tempering your dark chocolate. However, the simple microwave method provided works beautifully and is much easier for home bakers.
- Andes Mint Prep: Cutting the Andes mints diagonally creates a beautiful presentation that fits perfectly into the thumbprint well. You can also chop them if you prefer a more dispersed minty flavor throughout the chocolate.
- Cooling is Crucial: Patience is a virtue here! Letting the cookies cool completely before adding the chocolate is essential. Warm cookies will melt the chocolate too quickly, creating a messy situation.
Serving & Storage Suggestions
These cookies are a delight to serve as is, their festive green hue and chocolate-topped appearance making them instantly appealing. They are perfect for holiday cookie platters, afternoon tea, or simply as a sweet treat with a cup of coffee or hot chocolate.
For storage, let the cookies stand at room temperature for an hour until the chocolate is fully set. Once set, store them in an airtight container at room temperature. They will remain fresh and delicious for 3 to 4 days. Due to the chocolate coating, it’s best to avoid refrigerating them unless your kitchen is exceptionally warm, as condensation can affect the cookie’s texture. If you need to freeze them, place them in a freezer-safe container with parchment paper between layers for up to 2 months. Thaw them at room temperature before serving.
Nutritional Information
Here’s an estimated nutritional breakdown per cookie:
| Nutrient | Amount per Serving | % Daily Value |
|---|---|---|
| Calories | 134.6 kcal | |
| Calories from Fat | N/A | |
| Total Fat | 8.8 g | 13% |
| Saturated Fat | 5.5 g | 27% |
| Cholesterol | 27 mg | 9% |
| Sodium | 76.5 mg | 3% |
| Total Carbohydrate | 13.6 g | 4% |
| Dietary Fiber | 0.8 g | 3% |
| Sugars | 6.1 g | 24% |
| Protein | 1.5 g | 2% |
Note: Nutritional values are approximate and can vary based on specific ingredients and brands used.
Variations & Substitutions
While these cookies are already spectacular, here are a few ideas to put your own spin on them:
- Chocolate Variation: If dark chocolate isn’t your preference, feel free to substitute milk chocolate chips or semi-sweet chocolate chips for the dark chocolate.
- Mint Intensity: Adjust the peppermint extract to your liking. Start with 1 teaspoon and add more if you desire a stronger mint flavor.
- Food Coloring: If you prefer a more natural green hue, you can try using matcha powder or spirulina powder, though this will slightly alter the flavor profile.
- Andes Mints Alternatives: If Andes mints are hard to come by, you could try other small mint-flavored candies that can be cut in half, or even a drizzle of melted mint-flavored chocolate.
FAQs
Q: Why are my cookies spreading too much during baking?
A: This can often be due to the butter being too soft or the dough being overmixed. Ensure your butter is at room temperature but not melted, and mix the dry ingredients in gently.
Q: Can I make the dough ahead of time?
A: Yes, you can prepare the cookie dough, cover it tightly with plastic wrap, and refrigerate it for up to 2 days. Allow it to soften slightly at room temperature before shaping and baking.
Q: How can I ensure the chocolate filling doesn’t spill out?
A: Make sure you press a deep enough well into the cookie dough. When filling, don’t overfill the well; about 1 teaspoon of the chocolate mixture should be sufficient.
Q: My Andes mints are melting too quickly when I place them on the cookies. What should I do?
A: Ensure the chocolate filling has cooled for at least 10 minutes after microwaving before spooning it onto the cookies. The filling should be warm, not hot. Also, work relatively quickly to place the mints before the chocolate sets too much.
Q: The food coloring is making my hands green. Is there a way to avoid this?
A: Wearing gloves while handling the dough can help prevent staining. Alternatively, you can use a gel food coloring, which is often more concentrated and requires fewer drops.
Final Thoughts
Kelly’s Amazing Andes Mint Thumbprint Cookies are more than just a treat; they’re a little bite of happiness. The perfect balance of buttery cookie, cool mint, and rich chocolate makes them an irresistible indulgence. I encourage you to try them, perhaps for your next holiday gathering or simply as a delightful way to brighten an ordinary afternoon. I’m confident they’ll become a treasured recipe in your baking repertoire, just as they have in mine. Share them with friends, savor them with a steaming cup of coffee, and enjoy every delightful, minty moment.