
Kitchen Princess Christmas Cookies: A Timeless Tradition of Sweet Merriment
The scent of Christmas baking is, to me, the olfactory equivalent of a warm hug and a crackling fireplace. It conjures images of twinkling lights, loved ones gathered close, and the sheer joy of creating edible magic. These Kitchen Princess Christmas Cookies hold a special place in my heart, not just because they are utterly delightful, but because they remind me of countless holiday seasons spent in the kitchen with my own “Kitchen Princess” – my grandmother. She possessed a remarkable ability to transform simple ingredients into festive treasures, and these cookies, with their charming simplicity and potential for decoration, were always a highlight. I remember the sheer delight of cutting out shapes, the anticipation of the aroma wafting from the oven, and, of course, the race to gobble them up before they could even be considered for ornament duty!
Recipe Overview
- Prep Time: Approximately 30-35 minutes (including chilling time)
- Cook Time: 12-13 minutes per batch
- Total Time: Approximately 45 minutes (plus chilling)
- Servings: 20 cookies
- Yield: 20 cookies
- Dietary Type: Traditional
Ingredients
This recipe, a gem from the “Kitchen Princess” collection, relies on a few pantry staples to create its magic. The beauty of these cookies lies in their simplicity, allowing for endless creative decorating possibilities.
- 1/2 cup soft flour
- 1/2 cup sugar
- 1 small egg
- 7 tablespoons butter
Equipment Needed
For this delightful baking project, you won’t need an elaborate setup. Just a few common kitchen tools will do the trick:
- A medium-sized mixing bowl
- A wooden spoon or sturdy spatula
- A cutting board
- A rolling pin
- Cookie cutters (festive shapes are highly recommended!)
- A baking sheet
- Wax paper or parchment paper
- An oven
- A wire cooling rack
Instructions
The process for these Kitchen Princess Christmas Cookies is straightforward, designed for bakers of all levels to achieve delightful results. Follow these steps with care, and you’ll soon be rewarded with a batch of festive, melt-in-your-mouth treats.
- Begin by ensuring your butter is softened to room temperature. This is crucial for achieving a smooth, well-combined dough. Place the softened butter in your mixing bowl and use a wooden spoon to crush it thoroughly.
- Once the butter is creamy, add the sugar to the bowl. Continue to stir the butter and sugar mixture together until it is well incorporated and has a lighter, fluffier consistency.
- Next, add the small egg to the bowl. Mix everything together until the egg is fully blended into the butter and sugar mixture.
- Now, it’s time for the flour. Sieve the flour directly into the mixing bowl with the other ingredients. Stir the mixture until all the ingredients are combined and the dough starts to come together. The goal is to reach a point where no white flour chunks remain visible. The dough will be soft and slightly sticky at this stage.
- Wrap the dough securely in plastic wrap (saran wrap). Place the wrapped dough in the refrigerator to chill for at least 30 to 35 minutes. This chilling period is essential for making the dough easier to handle and cut.
- Once the dough has chilled sufficiently, pour some flour onto a clean cutting board. This will prevent the dough from sticking as you roll it out. Place the chilled dough from the refrigerator onto the floured cutting board.
- Using a rolling pin, flatten the dough to your desired thickness. For crisp cookies that hold their shape well, aim for about 1/4 inch thickness. Be consistent with your rolling to ensure even baking.
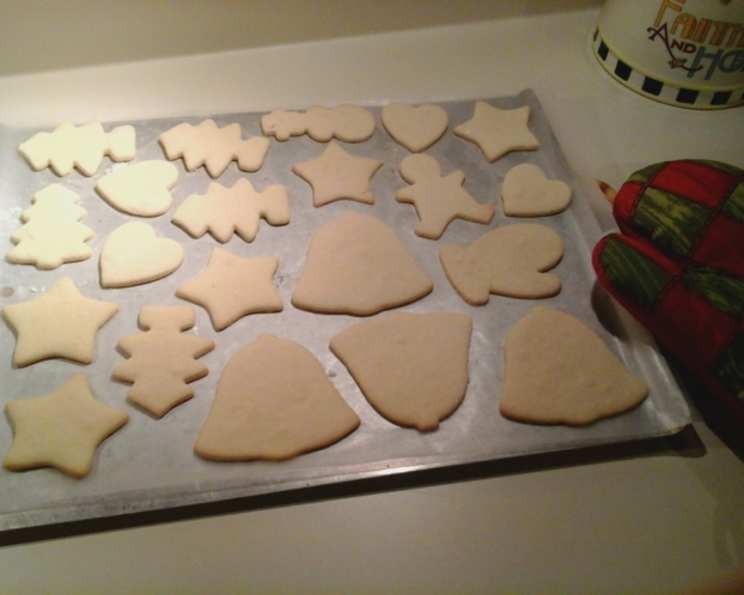
- Now for the fun part! Cut out pieces using your favorite cookie cutters. Whether you choose stars, trees, gingerbread men, or festive rounds, have fun with it!
- Lay out the cut-out cookie shapes onto a baking sheet that has been covered with wax paper (or parchment paper for easier cleanup). Ensure there is a little space between each cookie to prevent them from merging as they bake.
- Preheat your oven to 350 degrees Fahrenheit.
- Bake the cookies in the preheated oven for 12 to 13 minutes. Keep a close eye on them, as oven temperatures can vary. You’re looking for the edges to be lightly golden.
- After the cookies are baked, carefully remove the baking sheet from the oven. Allow the cookies to cool on the baking sheet for a minute or two before transferring them to a wire cooling rack to cool completely.
Expert Tips & Tricks
To elevate your Kitchen Princess Christmas Cookies from good to truly spectacular, consider these professional insights:
- Butter Softness is Key: While the recipe calls for “soft” butter, aim for butter that is pliable but not melted. Too soft and your dough might be too greasy; too cold and it will be difficult to cream with the sugar.
- Don’t Overwork the Dough: Once you add the flour, mix just until it’s combined. Overworking can develop the gluten too much, leading to tough cookies.
- Chill Time Matters: Resist the urge to skip or shorten the chilling time. A well-chilled dough is significantly easier to roll and cut, and it helps the cookies maintain their shape during baking. If your kitchen is warm, you might even consider a second quick chill after cutting.
- Even Rolling for Even Baking: Use your rolling pin to ensure the dough is rolled out to an even thickness. This guarantees that all your cookies bake at the same rate and come out perfectly done.
- Know Your Oven: Oven temperatures can fluctuate. If you find your cookies bake quickly, reduce the time slightly or lower the oven temperature by 10-15 degrees Fahrenheit for future batches. Conversely, if they need a bit longer, adjust accordingly.
- Cooling is Crucial: Let the cookies cool on the baking sheet for a couple of minutes before moving them to a wire rack. This allows them to set slightly and prevents them from breaking when you transfer them.
Serving & Storage Suggestions
These Kitchen Princess Christmas Cookies are delightful served simply with a dusting of powdered sugar or, for a true festive flair, decorated with royal icing. They are perfect alongside a steaming mug of hot chocolate, mulled wine, or a classic cup of tea.
For storage, once the cookies are completely cool, they can be kept in an airtight container at room temperature for up to a week. If you plan to decorate them with icing, ensure the icing is fully dry before stacking them in the container. They also freeze beautifully; pack them in layers between parchment paper in a freezer-safe container for up to 3 months. Thaw at room temperature.
Nutritional Information
Here is an approximate nutritional breakdown for these delightful cookies. Please note that these values can vary slightly based on the specific brands and exact measurements used.
| Nutrient | Amount per Serving | % Daily Value |
|---|---|---|
| Calories | 69.1 kcal | – |
| Calories from Fat | 38 g | – |
| Total Fat | 4.2 g | 6% |
| Saturated Fat | 2.6 g | 13% |
| Cholesterol | 18.5 mg | 6% |
| Sodium | 31.3 mg | 1% |
| Total Carbohydrate | 7.4 g | 2% |
| Dietary Fiber | 0.1 g | 0% |
| Sugars | 5 g | 20% |
| Protein | 0.6 g | 1% |
Variations & Substitutions
While these cookies are wonderful in their classic form, they also lend themselves beautifully to customization:
- Citrus Zest: For a brighter, more fragrant cookie, add the zest of half a lemon or orange to the butter and sugar mixture.
- Spice It Up: Introduce a touch of warmth by adding 1/4 teaspoon of cinnamon or a pinch of nutmeg to the flour.
- Almond Extract: A few drops of almond extract can add a subtle, sophisticated flavor note.
- Gluten-Free Option: While not explicitly detailed in the original recipe, you could experiment with a good quality all-purpose gluten-free flour blend that contains xanthan gum. You may need to adjust the liquid content slightly.
- Decorative Delights: The primary variation for these cookies comes in their decoration! Once cooled, they are a perfect canvas for sprinkles, colored icing, edible glitter, or even pressed edible flowers before baking.
FAQs
Q: Why is it important to soften the butter?
A: Softened butter creams better with sugar, creating air pockets that contribute to a tender cookie texture.
Q: Can I make these cookies ahead of time?
A: Yes, the dough can be made and chilled for up to 3 days, or even frozen. Baked and cooled cookies can also be stored in an airtight container.
Q: My cookies spread too much during baking. What went wrong?
A: This can happen if the butter was too soft, the dough wasn’t chilled sufficiently, or if the oven temperature was too low. Ensure your butter is just softened and your dough is well-chilled.
Q: How long does it take for the cookies to cool completely?
A: Cooling time can vary depending on the size and thickness of your cookies and the ambient temperature, but typically, they will be cool enough to decorate within 30-60 minutes.
Q: Can I use parchment paper instead of wax paper?
A: Absolutely! Parchment paper is a great alternative to wax paper and often makes for even easier cleanup.
Final Thoughts
The magic of the Kitchen Princess Christmas Cookies lies not just in their taste and charming appearance, but in the memories they help create. Whether you’re dusting them with powdered sugar for a simple elegance or transforming them into intricate works of edible art, each bite is a testament to the joy of home baking. So, gather your loved ones, put on some festive music, and embark on this delightful culinary adventure. These cookies are more than just a treat; they are a warm invitation to share in the season’s spirit. Enjoy every delicious crumb!