
Quesadillas with Roasted Poblano Chiles: A Taste of Tradition
There’s a certain magic that happens when you combine the humble masa harina with the earthy heat of roasted poblanos and the comforting embrace of melted cheese. For me, it evokes memories of bustling kitchens, the gentle thud of a tortilla press, and the intoxicating aroma of chiles charring just so. This quesadilla, born from the pages of a beloved cookbook, is more than just a recipe; it’s an invitation to slow down, engage with simple, honest ingredients, and create something truly delicious, something that feels both authentic and deeply satisfying, a dish that whispers of tradition and family.
Recipe Overview
- Prep Time: 25 minutes
- Cook Time: 10 minutes
- Total Time: 35 minutes
- Servings: 6
- Yield: 12 quesadillas
- Dietary Type: Vegetarian
Ingredients
For the Tortillas:
- 2 cups masa harina (Mexican corn flour)
- 1 ¼ cups plus 2 tablespoons warm water
- ¼ teaspoon salt
For the Filling:
- 1 tablespoon canola oil
- 1 medium white onion, thinly sliced
- 2 cloves garlic, finely chopped
- ½ teaspoon dried oregano
- 2 large poblano chiles, roasted, peeled, seeded, then cut lengthwise into 12 strips each
- ½ teaspoon sea salt
- 2 cups Monterey Jack cheese, shredded (or 1/2 lb. Mexican Cheese Blend)
For Cooking and Serving:
- Canola oil (for deep frying)
- Guacamole, for serving
- Salsa, for serving
Equipment Needed
- Large mixing bowl
- Frying pan
- Tortilla press (or rolling pin and wax paper)
- Deep, heavy frying pan or Dutch oven
- Slotted spatula
- Paper towels
- Heatproof platter
Instructions
Crafting the Tortillas
- Begin by preparing your tortilla dough. In a large mixing bowl, combine the masa harina with 1 ¼ cups plus 2 tablespoons of warm water.
- Using your hands, thoroughly mix the masa harina and water together. Continue to squish and combine until a cohesive, smooth, and pliable dough mass is formed. The texture should feel like soft playdough.
- Cover the bowl with a barely damp kitchen towel and let the dough rest for 5 to 10 minutes. This allows the masa harina to fully absorb the moisture.
- After resting, gently knead the dough in the bowl for another minute, incorporating the ¼ teaspoon of salt.
- Divide the dough into 12 equal portions. Roll each portion into a ball using your palms. Keep the dough balls covered with the damp towel to prevent them from drying out while you work.
Preparing the Flavorful Filling
- To create the delicious filling, heat 1 tablespoon of canola oil in a frying pan over medium heat.
- Add the thinly sliced white onion to the hot oil and sauté until it turns a beautiful golden brown. This will take about 5 minutes. Patience here will yield a sweeter, richer onion flavor.
- Stir in the finely chopped garlic cloves and the dried oregano. Cook for 1 minute more, just until fragrant, being careful not to burn the garlic.
- Add the prepared poblano chile strips and ½ teaspoon of sea salt to the pan. Toss everything together until all the ingredients are thoroughly heated through.
- Taste the filling and adjust seasoning with additional salt if needed. Set this flavorful mixture aside.
Assembling the Quesadillas
- Prepare your workstation for assembling the quesadillas. If using a tortilla press, place two sheets of plastic (cut from a plastic storage bag or use a good quality plastic grocery bag) inside. If you don’t have a press, you’ll use two sheets of wax paper with the dough ball placed between them.
- Place a dough ball between the plastic sheets (or wax paper). Gently press down the top plate of the tortilla press to flatten the dough into a circular shape. Alternatively, if using a rolling pin, gently roll the dough ball into a circular shape between the sheets of wax paper. Aim for a thin, even circle.
- Carefully remove the top piece of plastic or wax paper. On one half of the flattened tortilla, place a generous tablespoon of the shredded Monterey Jack cheese (or Mexican Cheese Blend), making sure to leave the edges free of cheese.
- Arrange a couple of poblano chile strips and a few onion slices over the cheese.
- Using the bottom piece of plastic or wax paper as a guide, gently lift the uncovered side of the tortilla to fold it over the filling, creating a half-moon shape.
- Using your fingers, press the edges of the quesadilla together to seal them.
- Carefully remove the assembled quesadilla from the press or wax paper. Set it aside, keeping it covered with the damp towel along with the other uncooked quesadillas to maintain their pliability.
- Repeat this process until all 12 quesadillas have been assembled.
Cooking the Quesadillas to Golden Perfection
- Preheat your oven to 200°F (95°C). This will be used to keep the cooked quesadillas warm.
- In a deep, heavy frying pan or Dutch oven, pour canola oil to a depth of about 1 inch. Place the pan over medium-high heat and allow the oil to heat until it shimmers. A good test is to drop a tiny piece of dough into the oil; it should sizzle immediately.
- Carefully fry the quesadillas, one at a time, in the hot oil. They will cook quickly, usually between 1 to 2 minutes per side, until they are a beautiful golden brown.
- Using a slotted spatula, transfer the cooked quesadillas to a plate lined with paper towels to drain briefly.
- Once drained, transfer the quesadillas to the heatproof platter and place them in the preheated oven to keep warm.
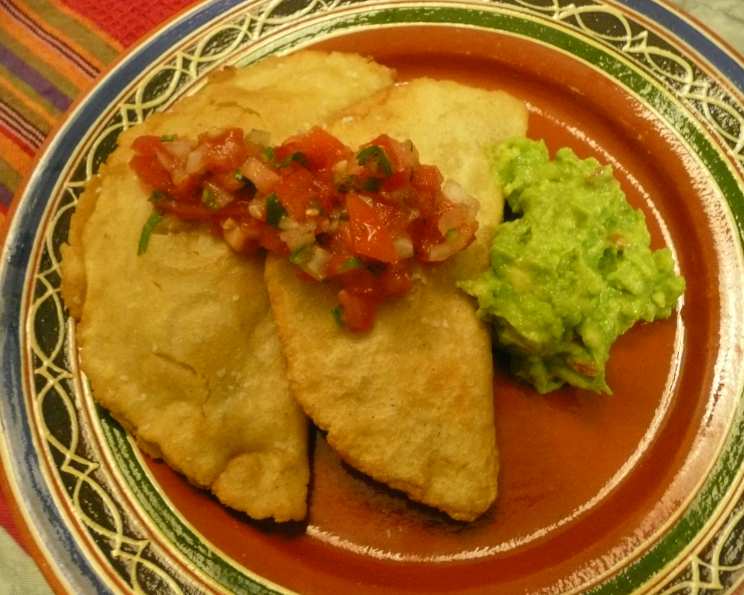
- Serve the quesadillas as soon as possible for the best texture and flavor.
A quick note from my kitchen: I often find myself with a little extra filling. In these moments, I don’t let it go to waste! I simply spoon the extra onion, cheese, and chile mixture onto a store-bought corn tortilla, top it with another corn tortilla, and then heat it on a dry frying pan until the cheese is beautifully melted. It’s a delightful little bonus treat!
Expert Tips & Tricks
When working with masa dough, remember that humidity can play a role. If your dough feels too dry, add a tablespoon of warm water at a time until it reaches the right pliable consistency. If it feels too wet, you can add a tiny bit more masa harina. Roasting the poblano chiles beforehand is key to developing their smoky, sweet flavor and making them easy to peel. Don’t rush this step! For a deeper char, you can place the poblanos directly on a gas burner flame or under a broiler, turning them until the skin is blackened on all sides. When frying, ensure your oil is at the correct temperature. If it’s too cool, the quesadillas will absorb too much oil and become greasy. If it’s too hot, they’ll brown too quickly on the outside before the cheese has a chance to fully melt.
Serving & Storage Suggestions
These quesadillas are best enjoyed fresh from the fryer, with their crispy exteriors and gooey interiors. Serve them immediately after they come out of the oven, accompanied by generous dollops of fresh guacamole and your favorite salsa. The bright, cool notes of the guacamole and the zesty tang of the salsa perfectly complement the warmth and richness of the quesadillas. Leftovers, if any, can be stored in an airtight container in the refrigerator for up to 2 days. To reheat, place them in a skillet over medium heat or in a toaster oven until warmed through and crispy again. They do not freeze well due to the texture of the masa.
Nutritional Information
| Nutrient | Amount per Serving | % Daily Value |
|---|---|---|
| Calories | 315 kcal | |
| Total Fat | 15.3 g | 23% |
| Saturated Fat | 7.6 g | 37% |
| Cholesterol | 33.5 mg | 11% |
| Sodium | 498 mg | 20% |
| Total Carbohydrate | 32.8 g | 10% |
| Dietary Fiber | 3 g | 12% |
| Sugars | 1.7 g | 6% |
| Protein | 13.3 g | 26% |
Note: Nutritional information is an estimate and may vary based on specific ingredients and portion sizes used.
Variations & Substitutions
While this recipe focuses on the classic combination of masa harina and poblano chiles, feel free to explore variations! For a different cheesy flavor profile, try using a blend of Oaxaca cheese, queso fresco, or pepper jack for a touch of heat. If you’re looking for a vegetarian protein boost, you could add some seasoned black beans or refried beans to the filling. For those seeking a gluten-free option, ensure your masa harina is certified gluten-free. If poblano chiles are unavailable or too mild for your liking, consider using jalapeños or serrano peppers (adjusting the quantity to your heat preference).
FAQs
Q: Can I make the masa dough ahead of time?
A: Yes, you can prepare the masa dough a few hours in advance. Keep it covered tightly with plastic wrap or a damp towel at room temperature.
Q: How do I know if the oil is hot enough for frying?
A: A small piece of dough dropped into the oil should sizzle immediately and float to the surface. If it browns too quickly, the oil is too hot; if it barely sizzles, it’s too cool.
Q: What’s the best way to keep the quesadillas warm?
A: Placing them on a heatproof platter in a low oven (around 200°F or 95°C) is an effective way to keep them warm and slightly crisp until serving.
Q: Can I make these ahead and reheat them?
A: It’s best to serve them fresh. While they can be reheated, they won’t have the same crispness as when they are freshly fried.
Q: Are there any dairy-free cheese options for this recipe?
A: Yes, you can use a good quality dairy-free shredded cheese blend that melts well for a dairy-free version.
Final Thoughts
This Quesadilla recipe, with its heart of roasted poblanos and beautifully prepared masa, is a testament to the simple pleasures of good food made with care. It’s a dish that invites conversation, brings people together, and nourishes the soul as much as the body. I encourage you to dust off that tortilla press or roll out your dough with a rolling pin and experience the satisfaction of creating these flavorful quesadillas from scratch. They are truly a delight, especially when served piping hot with creamy guacamole and a vibrant salsa. Enjoy the process, savor the flavors, and share this culinary journey with loved ones.