
Quick and Easy Pumpkin Pie Bars: A Weeknight Wonder
The scent of pumpkin spice immediately transports me back to my childhood kitchen, a place perpetually dusted with flour and filled with the comforting hum of my grandmother’s stand mixer. While I usually gravitate towards meticulously crafted, from-scratch desserts, there are moments when life calls for a delicious shortcut. I remember one crisp autumn evening, feeling the familiar pull of seasonal flavors but short on time. I stumbled upon a recipe that used a humble yellow cake mix and promised a stunning, layered bar. Skeptical at first, I dove in, and what emerged was nothing short of spectacular – a bar so delightful it became an instant go-to for those busy days when a taste of home is needed, fast.
Recipe Overview
- Prep Time: 20 minutes
- Cook Time: 45 to 50 minutes
- Total Time: 1 hour 5 minutes to 1 hour 10 minutes
- Servings: 16
- Yield: 13×9-inch pan of bars
- Dietary Type: Dessert
Ingredients
This recipe is a testament to how simple ingredients can come together to create something truly special. The beauty lies in its approachability, making it perfect for bakers of all skill levels.
For the Crust:
- 1 (18-ounce) package yellow cake mix
- 1/2 cup butter, melted and cooled
- 1 egg
For the Pumpkin Filling:
- 2 eggs
- 1 (16-ounce) can canned pumpkin puree
- 1 (5-ounce) can evaporated milk
- 1/2 cup packed brown sugar
- 2 1/2 teaspoons pumpkin pie spice
For the Topping:
- 2 tablespoons sugar
- 2 tablespoons butter, softened
- 1 teaspoon ground cinnamon
- Reserved cake mix mixture (from crust preparation)
For Serving (Optional):
- Whipped cream
- Additional pumpkin pie spice for sprinkling
Equipment Needed
- 13×9-inch baking pan
- Large mixing bowl
- Medium mixing bowl
- Electric mixer (handheld or stand mixer) or a sturdy whisk
- Measuring cups and spoons
- Rubber spatula or offset spatula
- Wire cooling rack
- Toothpicks for testing doneness
Instructions
Creating these delightful pumpkin pie bars is a straightforward process that yields impressive results. The layered approach ensures a tender crust, a creamy, spiced filling, and a crumbly, flavorful topping.
-
Prepare the Crust Base: In a large mixing bowl, combine the yellow cake mix, the 1/2 cup melted and cooled butter, and one egg. Beat these ingredients together until they are just combined. Don’t overmix; we’re looking for a cohesive, slightly crumbly mixture.
-
Reserve for Topping: Set aside one cup of this prepared cake-mix mixture. This reserved portion will be used later to create the delicious streusel-like topping.
-
Form the Crust: Spread the remaining cake-mix mixture evenly into an ungreased 13×9-inch baking pan. Use the bottom of a measuring cup or your fingers to press this mixture firmly into the pan, forming an even crust. This creates the sturdy base for our bars.
-
Mix the Pumpkin Filling: In a medium mixing bowl, beat together the remaining two eggs, the canned pumpkin puree, the evaporated milk, the packed brown sugar, and the 2 1/2 teaspoons of pumpkin pie spice. Mix until all the ingredients are thoroughly combined and the filling is smooth.
-
Assemble the Filling Layer: Gently pour the pumpkin mixture evenly over the prepared crust in the pan. Use a spatula to ensure the filling covers the entire surface.
-
Prepare the Topping Mixture: In a small bowl, combine the reserved cake-mix mixture (the one cup you set aside earlier), the 2 tablespoons of sugar, the 2 tablespoons of softened butter, and the ground cinnamon. Mix these ingredients together until they form a crumbly texture. You can use a fork or your fingertips for this.
-
Dot the Topping: Dot this crumbly topping mixture evenly over the pumpkin mixture. You don’t need to spread it perfectly; the crumbles will bake into delicious pockets of flavor.
-
Bake the Bars: Place the pan in a preheated oven at 350°F (175°C). Bake for 45 to 50 minutes, or until the bars are set and a toothpick inserted into the center comes out clean. The edges should be lightly golden, and the center should appear mostly set, with perhaps a slight wobble that will firm up as it cools.
-
Cool Completely: Once baked, remove the pan from the oven and place it on a wire cooling rack. It is crucial to let the bars cool completely in the pan. This allows the filling to set properly and prevents the bars from breaking apart when cut.
-
Cut and Serve: After the bars have cooled completely (this may take a couple of hours), cut them into 16 squares. For a more traditional pie-like presentation, you can then cut each square into triangles.
-
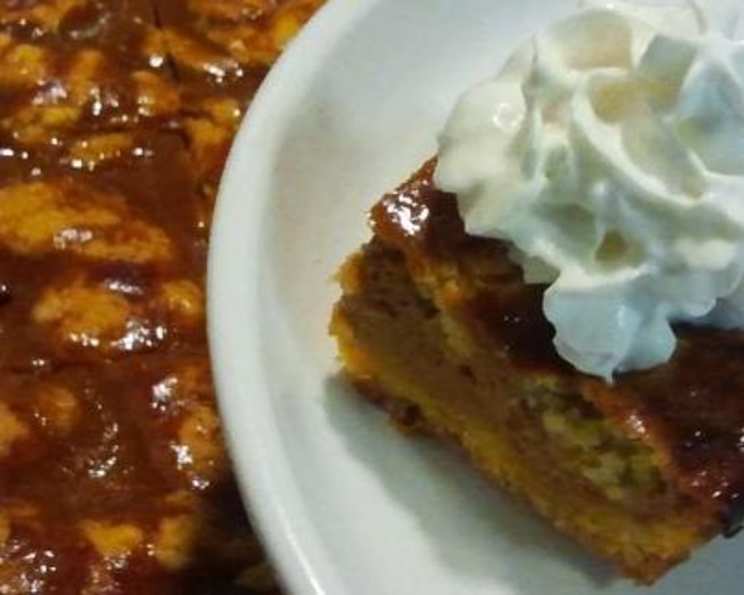
Garnish (Optional): Serve the pumpkin pie bars with a dollop of whipped cream and a light sprinkling of additional pumpkin pie spice on top. This adds a lovely visual appeal and an extra layer of flavor.
Expert Tips & Tricks
- Don’t Overbake: Keep a close eye on the bars during the last 10 minutes of baking. Overbaking can lead to a dry filling. A slight wobble in the center is perfectly fine, as it will solidify upon cooling.
- Cooling is Key: Patience is a virtue here! Allowing the bars to cool completely is essential for clean cuts and a firm texture. Trying to cut them while warm will result in a messy, unappealing presentation.
- Uniform Crust: When pressing the crust mixture into the pan, aim for an even thickness. This ensures consistent baking and a pleasant texture throughout.
- Softened Butter for Topping: Using softened butter for the topping mixture will make it easier to incorporate with the dry ingredients, creating those desirable crumbly bits.
- Spice Level Adjustment: If you prefer a more intense spice flavor, feel free to add a pinch more cinnamon or nutmeg to the filling.
Serving & Storage Suggestions
These pumpkin pie bars are incredibly versatile. They are fantastic served slightly warm or at room temperature. For a more decadent treat, a dollop of whipped cream and a dusting of pumpkin pie spice elevate them beautifully.
Storage:
- Room Temperature: Leftover bars can be stored in an airtight container at room temperature for up to 2 days. Ensure they are completely cooled before storing.
- Refrigerator: For longer storage, keep the bars in an airtight container in the refrigerator for up to 4 days. They will firm up slightly in the fridge, which can make them easier to cut.
- Freezer: These bars freeze remarkably well. Wrap individual bars tightly in plastic wrap and then place them in a freezer-safe bag or container. They can be stored in the freezer for up to 2-3 months. Thaw overnight in the refrigerator.
Nutritional Information
| Nutrient | Amount per Serving | % Daily Value |
|---|---|---|
| Calories | 353 kcal | 18% |
| Total Fat | 17 g | 22% |
| Saturated Fat | 8 g | 40% |
| Cholesterol | 76 mg | 25% |
| Sodium | 435 mg | 19% |
| Total Carbohydrate | 47 g | 17% |
| Dietary Fiber | 1 g | 4% |
| Total Sugars | 30 g | 60% |
| Protein | 5 g | 10% |
Note: Nutritional values are estimates and may vary based on specific ingredients used.
Variations & Substitutions
While this recipe shines with its simplicity, feel free to get creative:
- Gluten-Free: For a gluten-free version, substitute a good quality gluten-free yellow cake mix. Ensure all other ingredients are also gluten-free.
- Spice Blend: If you don’t have pre-mixed pumpkin pie spice, you can create your own by combining 1 teaspoon cinnamon, 1/2 teaspoon ginger, 1/4 teaspoon nutmeg, and 1/8 teaspoon cloves.
- Nutty Twist: Add 1/2 cup chopped pecans or walnuts to the topping mixture for a delightful crunch.
- Cream Cheese Swirl: Swirl a few tablespoons of softened cream cheese into the pumpkin filling before pouring it over the crust for an extra creamy layer.
FAQs (Frequently Asked Questions)
Q: Can I use a different flavor of cake mix?
A: While yellow cake mix is ideal for its mild sweetness and structure, you could experiment with a spice cake mix for a more intense flavor, but be mindful of its inherent spice content.
Q: Why do I need to use evaporated milk instead of regular milk?
A: Evaporated milk is concentrated and has a richer, creamier texture than regular milk, which is essential for achieving the characteristic smooth and dense pumpkin pie filling.
Q: How do I know if the bars are done baking?
A: A toothpick inserted into the center of the bars should come out clean. The edges should be lightly golden, and the center should appear mostly set.
Q: Can I make these in a different-sized pan?
A: Using a different pan size may alter the baking time. A smaller pan will require a longer baking time, and a larger pan will bake faster. It’s best to stick to the 13×9-inch pan for predictable results.
Q: What’s the best way to store leftovers?
A: For optimal freshness, store cooled bars in an airtight container in the refrigerator for up to 4 days.
Final Thoughts
These Quick and Easy Pumpkin Pie Bars are more than just a dessert; they are a little slice of autumnal comfort that can be whipped up with minimal fuss. They offer that beloved pumpkin pie flavor and texture in a portable, shareable format, making them perfect for potlucks, school events, or simply a cozy evening at home. Don’t be afraid to let your creativity shine with serving suggestions – a drizzle of caramel or a scoop of vanilla bean ice cream also makes for a delightful pairing. I encourage you to give these bars a try; I suspect they’ll quickly become a cherished recipe in your own collection.