
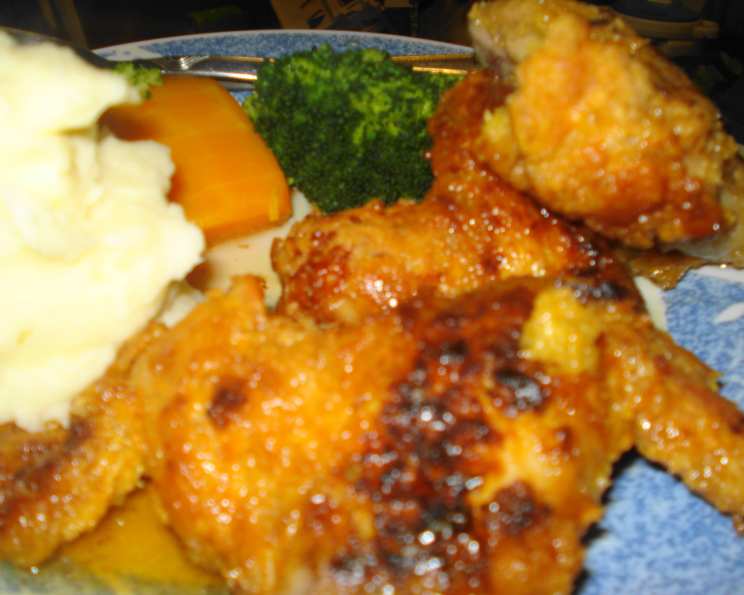
Quick Honey Chicken: A Taste of Serendipity
There are some dishes that just land in your lap, born out of necessity and a dash of kitchen chaos, yet they go on to become cherished family favorites. This Quick Honey Chicken is precisely one of those culinary miracles for me. I vividly recall a particular evening when my culinary intentions had veered wildly off course. The aroma of my intended masterpiece was nowhere to be found, replaced by the growing panic of an empty pantry where a crucial ingredient should have been. With chicken already prepped and coated, and my children’s dinner anticipation palpable, I made a split-second decision to pivot. Instead of a complete menu overhaul, I decided to embrace the unplanned, baking the coated chicken and then, in a moment of sheer, inspired improvisation, drizzling it generously with honey. The resulting dish was an unexpected triumph, a sticky, sweet, and savory revelation that instantly captivated my family, proving that sometimes, the greatest culinary discoveries happen when you least expect them.
Recipe Overview
- Prep Time: 20 minutes
- Cook Time: 10 minutes
- Total Time: 30 minutes
- Servings: 8
- Yield: 1 batch of chicken wings
- Dietary Type: Not specified
Ingredients
- 2 cups flour
- 2 large eggs, beaten
- 2 kg chicken wings
- 1 cup honey
- 1/4 cup oil, for frying
Equipment Needed
- Large bowl (for eggs)
- Shallow dish or plate (for flour)
- Large frying pan
- Tongs
- Baking dish
- Saucepan (for honey)
Instructions
- Begin by preparing your chicken for its delicious transformation. In a large bowl, beat the eggs until they are well combined and have a uniform consistency.
- Next, in a shallow dish or plate, place the flour.
- Take each chicken wing and first dip it into the beaten eggs, ensuring it is fully coated.
- Once coated in egg, roll the chicken wing in the flour, pressing gently to help the flour adhere. Make sure each wing is evenly coated with flour. Set aside the floured wings.
- Heat the oil in a large frying pan over medium-high heat. You’ll know the oil is ready when it shimmers or a small drop of flour sizzles upon contact.
- Carefully place the floured chicken wings into the hot oil, working in batches if necessary to avoid overcrowding the pan. Overcrowding can lead to uneven cooking and a less crispy exterior.
- Fry the chicken wings for approximately 5-7 minutes on each side, or until they are golden brown and cooked through. Use tongs to turn them to ensure even browning.
- Once the chicken wings are golden, remove them from the frying pan and transfer them to a baking dish.
- Place the baking dish into a preheated oven at 180 degrees Celsius. Bake the chicken wings for 10 minutes. This step helps to finish cooking the chicken and set the coating.
- While the chicken is in the oven, gently heat the honey in a small saucepan over low heat. You want to warm it slightly so it’s pourable, but be careful not to boil it.
- After the 10 minutes of baking, carefully remove the chicken wings from the oven.
- Pour the warm honey over the chicken wings. The recipe suggests doing this after taking them out of the oven. For an even better result and to prevent the honey from burning, it’s recommended to pour the honey over the wings AFTER transferring them to the plates for serving, or just before serving, to maintain their crispiness and prevent them from becoming overly sticky and difficult to handle in the baking dish.
Expert Tips & Tricks
The magic of this recipe lies in its simplicity, but a few chef-inspired touches can elevate it further. When frying the chicken, ensure your oil is at the correct temperature – too cool and the coating will absorb excess oil and become greasy; too hot and the outside will burn before the inside cooks. A quick test: drop a pinch of flour into the oil; if it sizzles and floats, it’s ready. For that extra crispy coating, you can even double-dip the chicken – once in egg, then flour, then back into egg, and finally into flour again before frying. This creates a thicker, more robust crust that holds up beautifully. When it comes to the honey, warming it gently is key. If it’s too thick, it won’t coat evenly; if it’s too hot, it can burn. A gentle simmer on the stovetop is perfect. And as the recipe wisely suggests, the timing of the honey application is crucial for texture. Drizzling it just before serving, or even at the table, keeps the wings wonderfully crisp on the outside while the honey provides that irresistible sweet glaze.
Serving & Storage Suggestions
This Quick Honey Chicken is best served immediately, piping hot, straight from the kitchen. The glistening honey glaze creates a beautiful presentation, making it an appealing appetizer or a crowd-pleasing main. It pairs wonderfully with a simple side salad to cut through the richness, or some fluffy rice to soak up any extra glaze. If you happen to have any leftovers (which is unlikely!), they can be stored in an airtight container in the refrigerator for up to 2-3 days. Reheat them in a moderate oven or an air fryer to help restore some of their original crispiness. Avoid microwaving, as this can make the coating soggy.
Nutritional Information
| Nutrient | Amount per Serving | % Daily Value |
|---|---|---|
| Calories | 876.2 kcal | – |
| Calories from Fat | 434 kcal | – |
| Total Fat | 48.3 g | 74% |
| Saturated Fat | 12.5 g | 62% |
| Cholesterol | 245.4 mg | 81% |
| Sodium | 202.3 mg | 8% |
| Total Carbohydrate | 58.9 g | 19% |
| Dietary Fiber | 0.9 g | 3% |
| Sugars | 35 g | 139% |
| Protein | 50.8 g | 101% |
Note: Nutritional values are estimates and can vary based on specific ingredients and portion sizes.
Variations & Substitutions
While the original recipe is wonderfully straightforward, you can certainly play with it! For those seeking a gluten-free option, a good quality gluten-free flour blend can be used in place of all-purpose flour. Ensure your gluten-free flour has good binding properties. If you’re not a fan of chicken wings, this honey glaze would also be delicious on chicken drumsticks or even boneless chicken thighs. For a touch of spice, consider adding a pinch of cayenne pepper or a dash of hot sauce to the flour mixture before coating the chicken. A sprinkle of sesame seeds or chopped fresh parsley over the finished dish can add a beautiful visual appeal and a fresh flavor contrast.
FAQs (Frequently Asked Questions)
Q: Why is it important to pour the honey over the chicken after it’s out of the oven?
A: Pouring the honey after cooking helps maintain the crispiness of the flour coating. If honey is applied too early or baked for too long, it can burn and make the chicken overly sticky and less pleasant in texture.
Q: Can I use a different part of the chicken for this recipe?
A: Absolutely! While chicken wings are classic, this honey glaze would also work well with chicken drumsticks, thighs, or even cutlets. Adjust cooking times accordingly to ensure the chicken is cooked through.
Q: How can I make the coating extra crispy?
A: For an even crispier coating, you can double-dip the chicken. After the first coating of flour, dip it back into the egg, then into the flour again before frying.
Q: Can I bake the chicken instead of frying it for a healthier option?
A: While the recipe specifies frying for crispiness, you could attempt baking. However, you might miss out on the initial crispness from frying. If baking, toss the floured chicken with a little oil and bake at a higher temperature, perhaps around 200°C, until golden and cooked through, then drizzle with honey.
Q: What’s the best way to reheat leftover honey chicken?
A: The best method for reheating is in a moderate oven (around 180°C) or an air fryer. This helps to crisp up the coating again. Microwaving can make the coating soggy.
Final Thoughts
The beauty of this Quick Honey Chicken lies in its elegant simplicity and the unexpected delight it brings to the table. It’s a testament to the fact that sometimes, the most memorable meals are born from happy accidents and a willingness to embrace improvisation in the kitchen. It’s the kind of dish that brings smiles to faces, especially those of little ones, and proves that deliciousness doesn’t always require a long ingredient list or complicated techniques. I encourage you to try this recipe, to let it bring a touch of serendipity to your own kitchen, and to savor every sticky, sweet bite. Perhaps you’ll even discover your own culinary happy accident along the way!