
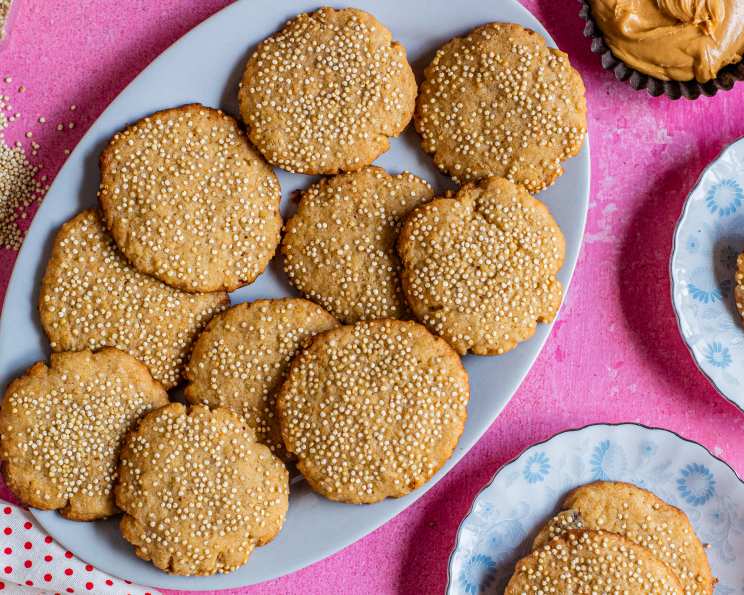
Quinoa Tahini Cookies: A Wholesome Hug in Every Bite
There are certain flavors that just transport me back to my grandmother’s kitchen – the comforting warmth, the scent of baking mingling with her gentle hum. For me, that’s often the smell of something wholesome, slightly nutty, and undeniably satisfying. These Quinoa Tahini Cookies are a perfect example of that feeling. They don’t rely on the usual suspects of refined flour or butter, yet they deliver a delightful crunch and a depth of flavor that surprises and delights. When I first encountered this recipe, it was a revelation – a way to capture that nostalgic cookie experience while adhering to a more mindful way of eating. The slightly earthy notes of quinoa and the creamy richness of tahini come together in a symphony of texture and taste, proving that restrictive diets don’t mean sacrificing joy in the kitchen. It’s a cookie that whispers comfort with every crisp bite.
Recipe Snapshot
- Prep Time: 15 minutes
- Cook Time: 10–14 minutes
- Total Time: 25–29 minutes (plus cooling time)
- Yields: 30-36 cookies
- Dietary Type: Vegan, Gluten-Free, Dairy-Free (adaptable for other dietary needs)
The Heart of the Matter: Ingredients You’ll Need
The beauty of these cookies lies in their simplicity and the wholesome nature of their ingredients. Don’t let the “unusual” suspects like quinoa and tahini deter you; they are the stars that bring this recipe to life.
-
Sweeteners & Fat:
- 1⁄2 cup honey (For a vegan option, you can substitute with maple syrup or agave nectar. If you’re not high altitude, you might find you need a touch less sweetener if using a very sweet liquid option.)
- 1⁄3 cup brown sugar (The molasses in brown sugar adds a wonderful depth of flavor. If you need to avoid it, a granulated sugar can work, though the cookie will have a slightly different character.)
- 1⁄2 cup butter or 1⁄2 cup margarine (If using butter, opt for unsalted. For a strictly vegan and dairy-free cookie, ensure your margarine is plant-based. The fat is crucial for texture and richness.)
- 1⁄2 cup tahini (This is where the magic happens! Tahini, made from ground sesame seeds, lends a wonderfully creamy, slightly nutty, and deeply satisfying flavor. If your diet allows and you prefer, peanut butter can be a good substitute, though it will alter the flavor profile significantly.)
-
The “Flour” & Grain:
- 1 1⁄4 cups rice flour (Rice flour provides a delicate, crumbly texture. A note on high altitude: if you are baking at sea level or lower, you will want to reduce this to 1 cup to prevent the cookies from becoming too dry.)
- 7⁄8 cup quinoa (This is the secret ingredient that gives these cookies their delightful chew and nutty undertones. It’s used here in its raw form and cooks slightly as the cookies bake, similar to delicate oatmeal. At high altitude (5200 feet), this measurement works well. If you are at low altitude, reduce the quinoa to 3/4 cup to ensure proper hydration.)
-
Leavening & Flavor Enhancers:
- 1 teaspoon baking soda (This provides lift and helps the cookies spread. Ensure it’s fresh for the best results.)
- 1⁄4 teaspoon salt (Salt is essential for balancing the sweetness and enhancing all the other flavors.)
- 1⁄2 teaspoon vanilla (Optional, but highly recommended! Vanilla extract adds a subtle warmth and complexity that rounds out the cookie beautifully.)
Essential Tools for Baking Bliss
While these cookies are straightforward, having the right equipment ensures a smooth baking process.
- Mixing Bowls: At least two medium-sized bowls.
- Whisk or Electric Mixer: For creaming the butter/margarine and sugars.
- Spatula or Wooden Spoon: For combining ingredients.
- Measuring Cups and Spoons: Precision is key in baking.
- Baking Sheets: Two standard-sized baking sheets are ideal.
- Parchment Paper or Silicone Baking Mats: To prevent sticking and ensure easy cleanup.
- Small Scoop or Two Spoons: For portioning the cookie dough.
- Wire Cooling Rack: Essential for allowing the cookies to cool properly and crisp up.
The Art of Creation: Step-by-Step Instructions
Follow these steps closely, and you’ll be rewarded with a batch of truly exceptional cookies. Remember to pay attention to the high-altitude adjustments if they apply to your baking environment.
-
Preheat Your Oven: Begin by preheating your oven to 350 degrees Fahrenheit (175 degrees Celsius). This ensures the oven is at the correct temperature when your cookies are ready to bake, promoting even cooking. Line your baking sheets with parchment paper or silicone baking mats.
-
Cream the Wet Ingredients: In a medium-sized mixing bowl, combine the 1⁄2 cup honey, 1⁄3 cup brown sugar, and 1⁄2 cup butter or margarine. If you’re using butter, ensure it’s softened but not melted. If using margarine, make sure it’s at room temperature. Using a whisk or an electric mixer, mix these ingredients until they are creamy and well combined. This process incorporates air, which contributes to the cookie’s texture.
-
Introduce the Tahini: Next, add the 1⁄2 cup tahini (or peanut butter, if using) to the creamy butter and sugar mixture. Mix again until the ingredients are thoroughly incorporated and the mixture is smooth and uniform. This is where the signature flavor of these cookies begins to develop.
-
Combine the Dry Ingredients: In a separate bowl, whisk together the 1 1⁄4 cups rice flour (remember to reduce to 1 cup if not at high altitude), the 7⁄8 cup quinoa (reduce to 3⁄4 cup if at low altitude), the 1 teaspoon baking soda, and the 1⁄4 teaspoon salt. If you are using the 1⁄2 teaspoon vanilla extract, add it to the wet ingredients at this stage and give it a quick stir. Whisk these dry ingredients together to ensure the baking soda and salt are evenly distributed throughout the flour and quinoa.
-
Bring It All Together: Gradually add the dry ingredients to the wet ingredients. Mix well using a spatula or wooden spoon until just combined. Be careful not to overmix at this stage, as it can lead to tougher cookies. The dough will be thick and a bit sticky.
-
Portion the Dough: Using a rounded teaspoonful of the cookie dough, drop portions onto the prepared baking sheets. Leave about 2 inches of space between each cookie, as they will spread slightly during baking. You can use a small cookie scoop for consistent sizing.
-
Bake to Golden Perfection: Place the baking sheets in the preheated oven. Bake for 10 to 14 minutes, or until the edges of the cookies start to turn golden brown. Keep a close eye on them during the last few minutes, as ovens can vary. The centers might still look a little soft, but they will continue to set as they cool.
-
Cooling is Key: Once baked, remove the baking sheets from the oven. Let the cookies cool on the baking sheets for a few minutes before carefully transferring them to a wire cooling rack to cool completely. This step is crucial for allowing them to firm up and achieve their signature crispness.
Chef’s Notes: Elevating Your Cookie Game
- Tahini Quality Matters: The flavor of your tahini will directly impact the final taste of your cookies. Use a good quality, smooth tahini for the best results. If it has separated, give it a really good stir before measuring.
- High Altitude Baking Nuances: Baking at high altitude (generally above 3,000 feet) requires adjustments because the lower air pressure causes moisture to evaporate more quickly and leavening agents to act faster. The recipe’s author has thoughtfully provided adjustments for flour and quinoa based on altitude, which are crucial for achieving the right texture. Always trust these specific altitude-related ingredient quantity changes.
- Doneness Test: The edges turning golden brown is your primary indicator. If you’re unsure, gently press the center of a cookie; if it feels firm and springs back slightly, it’s likely done. If it still feels very soft, give them another minute or two.
- Room Temperature Ingredients: For creaming butter and sugar effectively, ensure your butter (or margarine) is at room temperature – soft enough to indent with a finger but not melted. This allows for better emulsification and air incorporation.
Savoring and Storing Your Creations
These cookies are best enjoyed at room temperature, allowing their complex flavors to fully shine.
- Serving: Serve these Quinoa Tahini Cookies as a delightful afternoon treat with a cup of herbal tea, a glass of non-dairy milk, or even a strong black coffee. They also make a wonderful accompaniment to a bowl of fresh fruit.
- Storage: Once completely cooled, store the cookies in an airtight container at room temperature for up to 3-4 days. They tend to maintain their crispness best when stored this way. If you live in a very humid environment, you might consider adding a small food-safe desiccant packet to the container to help absorb excess moisture. For longer storage, you can freeze the baked cookies in an airtight container or freezer bag for up to 1-2 months. Thaw them at room temperature before enjoying.
A Peek at the Nutrition
While specific dietary needs vary, here’s an estimated nutritional breakdown per cookie, assuming a yield of 36 cookies and using the standard ingredient measurements (not high-altitude adjustments for flour).
| Nutrient | Amount per Serving | % Daily Value |
|---|---|---|
| Calories | 118.7 kcal | |
| Calories from Fat | ||
| Total Fat | 5.4 g | 8% |
| Saturated Fat | 2.3 g | 11% |
| Cholesterol | 8.1 mg | 2% |
| Sodium | 92.5 mg | 3% |
| Total Carbohydrate | 16.6 g | 5% |
| Dietary Fiber | 0.9 g | 3% |
| Sugars | 7 g | 28% |
| Protein | 1.9 g | 3% |
Note: Nutritional information is an estimate and can vary based on specific ingredients and quantities used.
Creative Twists and Delicious Substitutions
- Seed Power: For an added crunch and nutrient boost, consider folding in 1⁄4 cup of sesame seeds or poppy seeds along with the dry ingredients.
- Spice It Up: A pinch of cinnamon or cardamom (about 1/2 teaspoon) can add a warm, aromatic layer to the cookies.
- Citrus Zest: For a brighter flavor, add the zest of one lemon or orange to the wet ingredients.
- Nut-Free Option: If you need to avoid tahini and peanut butter, you can experiment with sunflower seed butter, though the flavor profile will change. Ensure your margarine is also nut-free.
- Date Sweetener: For a more natural sweetener, you can try pureeing dates and using them as part of the sweetener base, though this will change the moisture content and might require adjustments to the dry ingredients.
Your Burning Questions, Answered
Q: Why do these cookies resemble oatmeal cookies but are crispier?
A: The quinoa acts much like rolled oats, providing a hearty texture, while the rice flour and the specific baking time contribute to a crispier outcome compared to traditional oatmeal cookies.
Q: Can I make these cookies vegan?
A: Yes, absolutely! Ensure you use margarine instead of butter and maple syrup or agave nectar instead of honey for a fully vegan cookie.
Q: My cookies spread too much. What went wrong?
A: This could be due to several factors: the butter/margarine might have been too soft or melted, the oven temperature might have been too low, or there could be an issue with the ratio of wet to dry ingredients. Ensure your butter is softened but not melted, and double-check your oven temperature.
Q: How do I store these cookies to keep them crisp?
A: Store them in an airtight container at room temperature, and avoid overcrowding them. In humid conditions, a desiccant packet can help.
Q: Can I use a different type of flour?
A: While rice flour is recommended for its specific texture, you could experiment with a gluten-free all-purpose flour blend. However, this may alter the texture and moisture absorption, potentially requiring adjustments to the liquid and flour amounts.
A Sweet Conclusion
These Quinoa Tahini Cookies are more than just a recipe; they are a testament to the fact that delicious, satisfying treats can be crafted with mindful ingredients. They offer a unique texture and a nuanced flavor profile that’s both comforting and intriguing. Whether you’re navigating dietary restrictions or simply seeking a wholesome alternative to everyday cookies, I encourage you to bake a batch. Share them with loved ones, or savor them yourself with a quiet moment of indulgence. The simple joy of a perfectly baked cookie, made with intention, is a gift that keeps on giving. Happy baking!