
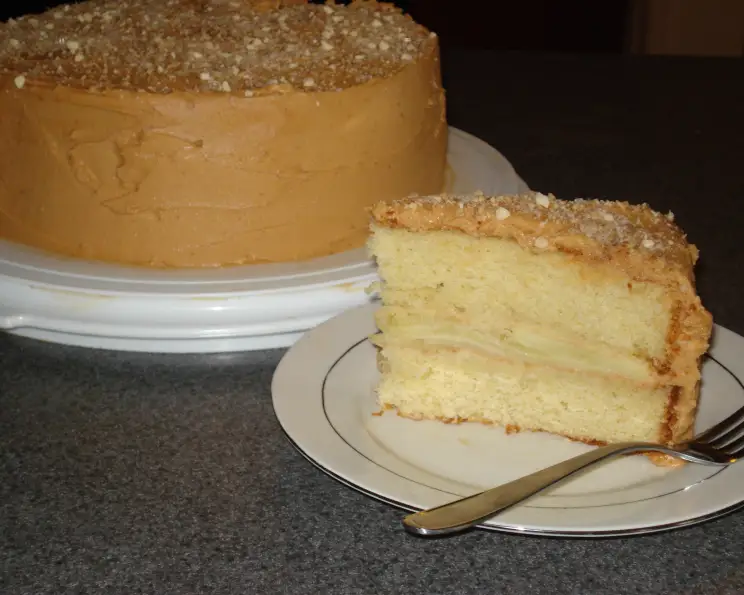
Rachael Ray’s Caramel Apple Layer Cake: A Slice of Autumnal Bliss
There’s something undeniably magical about the scent of baking apples and warm caramel that instantly transports me back to crisp autumn afternoons spent in my grandmother’s kitchen. She wasn’t a professional baker by any stretch, but the way she could transform simple ingredients into comforting, soul-warming treats was a culinary art form. This Rachael Ray Caramel Apple Layer Cake always brings those cherished memories to the forefront. The combination of tender, spice-kissed apple filling nestled between moist cake layers, all enveloped in a dreamy caramel frosting, is pure, unadulterated dessert perfection. It’s a celebration of fall’s bounty, a testament to the joy found in simple, well-executed baking.
Recipe Overview
- Prep Time: 40 minutes
- Cook Time: 45 minutes
- Total Time: 1 hour 25 minutes (plus cooling time)
- Servings: 12
- Yield: 1 Cake
- Dietary Type: Standard
Ingredients
For the Cake Layers:
- 2 1/4 cups all-purpose flour
- 1 1/2 cups granulated sugar, plus 1/3 cup granulated sugar
- 1 tablespoon baking powder
- 1 teaspoon salt
- 2 cups (4 sticks) unsalted butter, softened, divided (2 sticks for the cake, 2 sticks for the frosting)
- 3 large eggs, plus 2 large egg yolks
- 1/2 cup heavy cream, plus 3 tablespoons heavy cream
- 1/2 cup unsweetened applesauce
- 2 teaspoons pure vanilla extract
For the Caramel Apple Filling:
- 3 crisp apples, such as Gala, peeled and thinly sliced lengthwise (about 1 pound)
- 3 tablespoons unsalted butter, softened (from the softened 2 cups)
- 1/3 cup granulated sugar (from the initial 1 1/2 cups plus 1/3 cup)
- 3 tablespoons heavy cream (from the initial 1/2 cup plus 3 tablespoons)
For the Caramel Frosting:
- 2 cups (4 sticks) unsalted butter, softened (the remaining 2 sticks)
- 1 1/2 cups confectioners’ sugar
- 1 cup store-bought caramel sauce
Equipment Needed
- Two 9-inch round cake pans
- Electric mixer (stand mixer or hand mixer)
- Medium mixing bowls
- Medium skillet
- Whisk
- Spatula
- Offset spatula or butter knife
- Wire cooling rack
- Toothpicks
Instructions
-
Prepare the Cake Pans and Preheat the Oven: Begin by preheating your oven to 350°F (175°C). This ensures the oven is at the optimal temperature when your batter is ready. Next, generously grease and flour two 9-inch round cake pans. This is a crucial step to prevent the cakes from sticking, ensuring they release cleanly after baking. You can use butter or baking spray for greasing, followed by a light dusting of flour, tapping out any excess.
-
Combine Dry Ingredients: In a large bowl, using your electric mixer on low speed, combine the 2 1/4 cups of all-purpose flour, 1 1/2 cups of granulated sugar, the 1 tablespoon of baking powder, and the 1 teaspoon of salt. Give it a quick mix to evenly distribute these dry components.
-
Incorporate the Butter: Add 2 sticks (1 cup) of the softened unsalted butter to the dry ingredients. Continue mixing on low speed until the mixture resembles coarse crumbs. This method helps to create a tender crumb by coating the flour particles with fat.
-
Combine Wet Ingredients: In a separate medium bowl, whisk together the 3 large eggs, the 2 large egg yolks, 1/2 cup of heavy cream, the 1/2 cup of unsweetened applesauce, and the 2 teaspoons of pure vanilla extract. Whisk until these wet ingredients are well combined and smooth.
-
Combine Wet and Dry Mixtures: Gradually add the wet ingredients to the flour-butter mixture. Beat on medium speed until the batter is smooth, about 1 minute. Be careful not to overmix at this stage, as it can develop the gluten too much and result in a tougher cake.
-
Divide and Bake the Cake Layers: Divide the batter evenly between the two prepared 9-inch round cake pans. Spread the batter to create an even layer in each pan.
-
Bake the Cakes: Place the pans in the preheated oven. Bake for 25 to 30 minutes. You’ll know they are ready when the cakes are springy to the touch and a toothpick inserted into the center comes out with moist crumbs, not wet batter.
-
Cool the Cake Layers: Once baked, transfer the pans to a wire rack to cool for 10 minutes. After 10 minutes, carefully run a knife around the edges of each cake to loosen them from the pans. Invert the cakes onto the wire rack and let them cool completely. This step is vital; attempting to frost a warm cake will result in a melted, messy disaster.
-
Prepare the Caramel Apple Filling: While the cakes are cooling, prepare the apple filling. In a medium skillet, melt 3 tablespoons of softened unsalted butter over medium-low heat. Add the thinly sliced crisp apples and the remaining 1/3 cup of granulated sugar.
-
Cook the Apples: Cook, stirring often, until the apples are tender and the juice is syrupy, about 15 minutes. This process concentrates the apple flavor and creates a delightful, slightly thickened sauce.
-
Finish the Filling: Stir in the remaining 3 tablespoons of heavy cream into the apple mixture. Simmer for 3 minutes more, allowing the cream to meld with the apple syrupy juices. Remove from the heat and let the filling cool.
-
Prepare the Caramel Frosting: In a clean medium bowl (or using your electric mixer’s bowl), beat the remaining 2 sticks (1 cup) of softened unsalted butter and the 1 1/2 cups of confectioners’ sugar until the mixture is light and creamy. This creates your fluffy frosting base.
-
Incorporate Caramel Sauce: With the mixer on low speed, slowly mix in the 1 cup of store-bought caramel sauce until it is fully incorporated and the frosting is smooth and spreadable.
-
Assemble the Cake: Place one cooled cake layer on a serving plate or cake stand. Spread the cooled apple filling evenly on top of this layer. Then, carefully cover with the remaining cake layer.
-
Frost the Cake: Using an offset spatula or a butter knife, cover the top and sides of the cake with the caramel frosting. For a beautiful finish, gently swirl the top of the frosting to create a decorative pattern.
Expert Tips & Tricks
- Apple Selection: For the best texture and flavor in the filling, choose crisp, slightly tart apples that hold their shape well when cooked. Gala, Honeycrisp, Fuji, or even Granny Smith (for a bit more tartness) are excellent choices. Avoid softer apples like Red Delicious, which can turn mushy.
- Room Temperature Ingredients: Ensure your butter, eggs, and cream are at room temperature before you begin. This is crucial for achieving a smooth, well-emulsified batter and a creamy frosting. Cold ingredients can lead to a lumpy texture.
- Don’t Overmix: Overmixing the cake batter can lead to a tough cake. Mix just until the ingredients are combined and the batter is smooth.
- Cooling is Key: Patience is a baker’s virtue! Ensure the cake layers are completely cool before assembling and frosting. If they are still warm, the frosting will melt, and the cake layers might break.
- Caramel Sauce Consistency: If your store-bought caramel sauce is very thick, you can gently warm it for a few seconds in the microwave to make it easier to incorporate into the frosting. Be careful not to overheat it.
Serving & Storage Suggestions
This Caramel Apple Layer Cake is best served at room temperature, allowing the flavors and textures to truly shine. It makes a stunning centerpiece for any fall gathering or special occasion. To serve, cut generous slices with a sharp knife, wiping the blade clean between cuts for neatness.
Leftovers can be stored in an airtight container at room temperature for up to 2 days. If your kitchen is particularly warm, or if you have more than 2 days of leftovers, it’s best to refrigerate the cake. It will keep in the refrigerator for up to 5 days. Before serving refrigerated cake, allow it to sit at room temperature for about 30 minutes to soften the frosting and improve the texture. This cake also freezes beautifully; wrap it tightly in plastic wrap and then in foil, and freeze for up to 2 months. Thaw overnight in the refrigerator before bringing to room temperature.
Nutritional Information
| Nutrient | Amount per Serving | % Daily Value |
|---|---|---|
| Calories | 728.4 kcal | |
| Calories from Fat | 368 kcal | |
| Total Fat | 41 g | 51 % |
| Saturated Fat | 25.1 g | 125 % |
| Cholesterol | 195.8 mg | 65 % |
| Sodium | 411.7 mg | 17 % |
| Total Carbohydrate | 88.6 g | 29 % |
| Dietary Fiber | 1.8 g | 7 % |
| Sugars | 49.1 g | 196 % |
| Protein | 5.6 g | 11 % |
Variations & Substitutions
- Spiced Cake Layers: For an extra layer of autumn flavor, add 1 teaspoon of ground cinnamon and 1/2 teaspoon of ground nutmeg to the dry ingredients of the cake batter.
- Caramel Drizzle: After frosting the cake, consider a final drizzle of warmed caramel sauce over the top for an extra decadent touch.
- Nutty Crunch: Fold in 1/2 cup of chopped toasted pecans or walnuts into the apple filling before assembling the cake for a delightful crunch.
- Bourbon Caramel: If you enjoy a touch of sophistication, use a good quality bourbon caramel sauce for the frosting.
FAQs
Q: Can I use a different type of apple for the filling?
A: Yes, while crisp apples like Gala are recommended, you can experiment with other varieties. Just be mindful that softer apples might cook down more.
Q: My frosting seems too stiff. What should I do?
A: If your caramel frosting is too stiff, you can gently warm the caramel sauce slightly before incorporating it, or add a teaspoon of heavy cream at a time until you reach your desired consistency.
Q: How can I make this cake gluten-free?
A: You would need to substitute the all-purpose flour with a good quality gluten-free all-purpose baking blend. You may need to adjust liquid slightly depending on the blend used.
Q: Can I make the cake layers ahead of time?
A: Yes, the cake layers can be baked a day in advance, cooled completely, wrapped tightly in plastic wrap, and stored at room temperature.
Q: What is the best way to store the cake if I have leftovers?
A: Store leftovers in an airtight container at room temperature for up to 2 days, or in the refrigerator for up to 5 days.
Final Thoughts
This Caramel Apple Layer Cake is more than just a dessert; it’s an experience. It’s the kind of cake that brings people together, sparking conversation and creating sweet memories. The intricate layers of flavor – the comforting apple, the rich caramel, and the tender cake – are a testament to the beauty of well-loved recipes. I encourage you to gather your ingredients, embrace the cozy autumn vibes, and bake this delightful creation. I’m confident it will become a treasured recipe in your own culinary repertoire, just as it has in mine. Serve it with a scoop of vanilla bean ice cream or a dollop of freshly whipped cream for an extra touch of indulgence. Enjoy every single bite!