
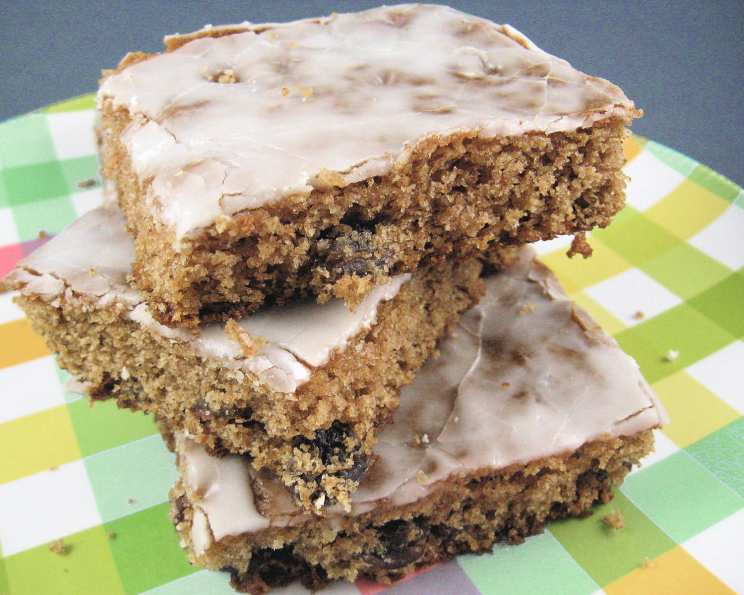
A Taste of Nostalgia: My Mother’s Raisin Bar Sheet Cake
There’s a particular magic to recipes that have been passed down through generations, isn’t there? They carry not just flavors, but a whole tapestry of memories. For me, this Raisin Bar Sheet Cake is a portal back to my childhood kitchen, a place filled with the scent of cinnamon and my mother’s gentle hum. It was the very first recipe I ever tackled on my own, a rite of passage that ended with a minor (but memorable!) kitchen incident involving a very hot metal bowl and some boiling water. My mother’s old cookbook still bears the faint watermark as a testament to my youthful enthusiasm. This cake, with its wonderfully moist crumb and delicately glazed top, is more than just a dessert; it’s a comforting embrace from the past, a delicious reminder of where I first learned to bake.
Recipe Overview
- Prep Time: 20 minutes
- Cook Time: 20 minutes
- Total Time: 40 minutes
- Servings: 24
- Yield: 1 sheet cake
- Dietary Type: Contains Eggs, Dairy (Butter), Gluten
Ingredients
This recipe calls for simple pantry staples, making it an easy and satisfying bake.
For the Cake:
- 2 large eggs
- 2 cups brown sugar, packed
- 1 to 1 ½ cups raisins (depending on your love for them!)
- 3 cups all-purpose flour
- 1 cup shortening
- 2 teaspoons ground cinnamon
- 1 teaspoon baking powder
- 1 teaspoon baking soda
- 1 cup boiling water
For the Icing:
- 1 ½ cups powdered sugar, sifted
- 1 ½ tablespoons boiling water
- 1 teaspoon butter, softened
- ½ teaspoon vanilla extract
- 1 teaspoon light corn syrup
Equipment Needed
- Large mixing bowl
- Medium mixing bowl
- Whisk
- Spatula or wooden spoon
- 17 x 11 x 2 inch baking pan (a dark baking pan might require slightly shorter baking time)
- Measuring cups and spoons
- Cooling rack
Instructions
Following these steps will ensure a perfectly moist and flavorful Raisin Bar Sheet Cake, just like the one from my childhood.
-
Preheat and Prepare: Begin by preheating your oven to 375 degrees Fahrenheit (190 degrees Celsius). Next, grease your 17 x 11 x 2 inch baking pan thoroughly. This step is crucial to prevent the cake from sticking.
-
Combine Dry Ingredients: In a large mixing bowl, whisk together the all-purpose flour, cinnamon, baking powder, and baking soda. Ensure these dry ingredients are well combined before proceeding.
-
Cream Wet Ingredients: In a separate medium mixing bowl, cream together the shortening and brown sugar until light and fluffy. This creates the base for our moist cake.
-
Incorporate Eggs: Add the eggs to the creamed shortening and sugar mixture, one at a time, beating well after each addition. Make sure each egg is fully incorporated before adding the next.
-
Add Raisins: Gently stir in the raisins into the wet ingredient mixture. Distribute them evenly.
-
Alternate Dry and Wet: Now, you’ll alternate adding the dry ingredients and the boiling water to the wet mixture. Begin by adding about a third of the dry ingredients and mixing until just combined. Then, add half of the boiling water and mix. Repeat this process, adding another third of the dry ingredients, followed by the remaining boiling water, and finally, the last of the dry ingredients. Mix until everything is just combined; do not overmix. The batter will be quite thin, and this is perfectly normal for this type of cake.
-
Pour and Bake: Pour the batter evenly into your prepared baking pan. Bake in the preheated oven for 20 minutes.
-
Check for Doneness: After 20 minutes, check the cake for doneness. A wooden skewer or toothpick inserted into the center should come out clean. Pro Tip: If you are using a dark baking pan, the cake might bake faster. Begin checking for doneness around the 15-minute mark to avoid overbaking.
-
Cool Slightly: Once baked, remove the cake from the oven and let it cool slightly in the pan on a wire rack. It’s important that it’s not completely cold before icing.
-
Prepare the Icing: While the cake is cooling, prepare the icing. In a medium bowl, combine the sifted powdered sugar, boiling water, softened butter, vanilla extract, and corn syrup.
-
Beat the Icing: Beat the icing ingredients together until creamy. If the icing is too thick, add a little more boiling water, a tiny bit at a time, until you achieve the desired consistency – it should be thick enough to drizzle but thin enough to spread easily. If it’s too thin, add a little more sifted powdered sugar.
-
Drizzle and Glaze: Drizzle the prepared icing evenly over the slightly warm cake. The warmth of the cake will help the icing spread and create a beautiful, glossy glaze.
Expert Tips & Tricks
- Raisin Prep: For plumper raisins that are less likely to sink to the bottom, you can soak them in warm water for about 10 minutes before draining them well and adding them to the batter. Pat them dry with a paper towel to remove excess moisture.
- Don’t Overmix: Overmixing the batter after adding the flour can develop the gluten too much, leading to a tougher cake. Mix only until the ingredients are just combined.
- The Power of Boiling Water: The boiling water in this recipe isn’t just for the icing; it’s also key to the cake’s incredibly moist texture. It helps to bloom the flour and create a tender crumb. Be careful when adding it!
- Dark Pan Caution: As mentioned in the instructions, dark baking pans absorb more heat and can cause baked goods to brown and cook faster. If you consistently find your cakes browning too quickly, consider lowering your oven temperature by 25°F (15°C) or using a lighter-colored pan.
Serving & Storage Suggestions
This Raisin Bar Sheet Cake is delightful served warm or at room temperature. Cut it into squares for easy serving. It pairs wonderfully with a cup of hot coffee or tea, or a scoop of vanilla ice cream.
For storage, allow the cake to cool completely before covering it. It can be stored at room temperature in an airtight container for up to 3 days. If you need to store it for longer, it will keep well in the refrigerator for up to 1 week. Bring it back to room temperature before serving for the best texture. This cake also freezes beautifully; wrap it tightly in plastic wrap and then in aluminum foil, and it will keep in the freezer for up to 2 months. Thaw it overnight in the refrigerator.
Nutritional Information
Here’s an approximate breakdown of the nutritional content per serving. Please note that these are estimates and can vary based on specific ingredients and brands used.
| Nutrient | Amount per Serving | % Daily Value |
|---|---|---|
| Calories | 258.3 kcal | |
| Total Fat | 9.3 g | 14% |
| Saturated Fat | 2.4 g | 11% |
| Cholesterol | 15.9 mg | 5% |
| Sodium | 81.5 mg | 3% |
| Total Carbohydrate | 42.6 g | 14% |
| Dietary Fiber | 0.8 g | 3% |
| Sugars | 28.8 g | 115% |
| Protein | 2.4 g | 4% |
| Calories from Fat | 83 g | |
| % Daily Value | 32 % |
Note: The ‘Calories from Fat’ and ‘% Daily Value for Fat’ figures in the original data appeared to be intertwined and were interpreted to provide a clearer nutritional breakdown.
Variations & Substitutions
While this recipe is a beloved classic as is, there are always fun ways to adapt it!
- Nutty Addition: For an extra layer of texture and flavor, add ½ cup of chopped walnuts or pecans along with the raisins.
- Spice It Up: If you enjoy a warmer spice profile, consider adding ¼ teaspoon of nutmeg or ground cloves to the dry ingredients.
- Citrus Zest: A teaspoon of orange zest or lemon zest added to the batter can brighten the flavors and complement the sweetness of the raisins.
- Alternative Fat: While shortening provides a classic tender crumb, you could experiment with using half shortening and half unsalted butter for a richer flavor.
FAQs
Q: Why is the batter so thin?
A: The use of boiling water in the batter creates a very fluid consistency, which is essential for achieving the cake’s signature moist and tender crumb.
Q: Can I use dried cranberries or other dried fruit instead of raisins?
A: Absolutely! Dried cranberries, currants, or even chopped dried apricots would be delicious substitutions for the raisins.
Q: My icing seems too thick/thin. What should I do?
A: Adjust the consistency by adding more boiling water a tiny bit at a time if it’s too thick, or sifted powdered sugar if it’s too thin, until you reach a drizzling consistency.
Q: How can I make sure the raisins don’t all sink to the bottom?
A: Coating the raisins lightly with a tablespoon of the all-purpose flour from the recipe before adding them to the batter can help suspend them throughout the cake.
Q: Is this cake suitable for a crowd?
A: Yes, it bakes in a large sheet pan and yields 24 servings, making it an excellent choice for parties, potlucks, or bake sales.
Final Thoughts
There’s a quiet joy in recreating a dish that holds such personal significance. This Raisin Bar Sheet Cake is a testament to the power of simple ingredients and time-honored techniques to evoke warmth and happiness. I encourage you to bake it, to share it, and to perhaps even create new memories around its comforting sweetness. It’s a perfect treat to enjoy with loved ones, a slice of edible nostalgia that always tastes like home.