
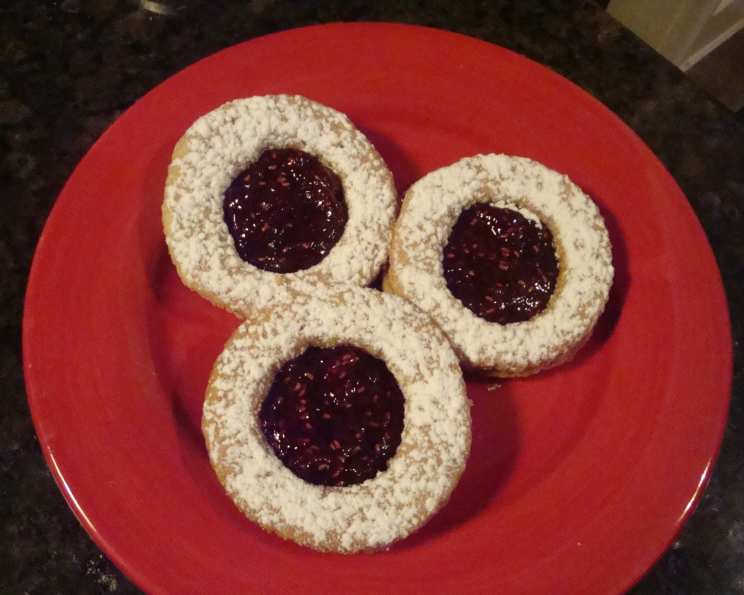
The Art of the Linzer: Crafting Exquisite Raspberry Linzer Cookies
There’s a certain magic that happens in the kitchen when flour, butter, sugar, and nuts come together to create something truly special. For me, Raspberry Linzer Cookies evoke a deep sense of nostalgia, a connection to elegant afternoon teas with my grandmother and the comforting aroma of toasted nuts and sweet jam that used to fill her home. These aren’t just cookies; they are edible jewels, meticulously crafted and deeply satisfying, embodying a dedication to quality and a love for traditional baking. They require patience, yes, but the reward of holding a perfectly formed, jam-filled cookie, dusted with a delicate veil of powdered sugar, is immeasurable.
Recipe Overview
- Prep Time: 4 hours (includes chilling time)
- Cook Time: 15 minutes
- Total Time: 4 hours 15 minutes
- Yields: 32 cookies
- Servings: N/A
- Dietary Type: Contains Nuts, Dairy, Gluten
Ingredients
For the Cookie Dough:
- 2 1⁄2 ounces sliced almonds (approximately 1/2 cup)
- 2 1⁄2 ounces coarsely chopped hazelnuts (approximately 1/2 cup)
- 9 1⁄2 ounces all-purpose flour (2 cups plus 1 tablespoon)
- 3⁄4 cup granulated sugar
- 2 teaspoons lemon zest (or 2 teaspoons orange zest)
- 1⁄2 teaspoon baking powder
- 1⁄2 teaspoon salt
- 1⁄2 teaspoon ground cinnamon
- 1⁄4 teaspoon ground cloves
- 7 ounces chilled unsalted butter, cut into 1/2-inch cubes (14 tablespoons)
- 1 large egg
- 1 tablespoon cold water
For Assembly:
- 1⁄2 cup raspberry preserves (or any other flavor of jam you prefer)
- Confectioners’ sugar, for dusting
Equipment Needed
- Cookie sheets
- Parchment paper
- Food processor
- Plastic wrap
- Two cookie cutters of the same shape: one larger (approximately 2 1/2-inch diameter) and one smaller (approximately 1 1/4-inch diameter)
- Rolling pin
- Wire cooling racks
Instructions
The creation of these exquisite Linzer cookies is a process that rewards careful attention to detail. It begins with preparing the nut flour, a crucial step that imparts a distinctive richness and texture.
Several hours before baking:
-
Prepare the Nut Flour: In a food processor, combine the sliced almonds and coarsely chopped hazelnuts with 1/2 cup of the all-purpose flour. Process until the nuts are finely textured, but be careful not to overprocess into a powder. To gauge this, stop the machine occasionally and feel the texture of the nuts. They may appear to be clumping together, but this is often a sign of a good, fine grind rather than an over-processed paste.
-
Combine Dry Ingredients: Add the remaining all-purpose flour, granulated sugar, lemon zest (or orange zest), baking powder, salt, ground cinnamon, and ground cloves to the food processor. Pulse a few times to combine these dry ingredients with the nut mixture.
-
Incorporate the Butter: Add the chilled unsalted butter, cut into 1/2-inch cubes, to the flour and nut mixture. Pulse until the entire mixture resembles coarse meal. Again, resist the urge to overprocess; the goal is a crumbly, meal-like consistency.
-
Add Wet Ingredients: Transfer the mixture to a large bowl. In a small separate bowl, whisk together the large egg and cold water. Sprinkle this egg mixture evenly over the flour mixture in the bowl.
-
Form the Dough: Gently toss the ingredients with a fork or your hands to combine. The dough should begin to come together and hold its shape when pinched. If the dough seems excessively dry and crumbly, you can sprinkle on a little more cold water, a teaspoon at a time, until it just holds together.
-
Knead and Chill: Gather the dough into two balls. Knead briefly, just enough to blend everything thoroughly. Do not over-knead. Wrap each ball tightly in plastic wrap, flatten them slightly into discs, and chill in the refrigerator until firm. This chilling process is essential for easy handling and will take approximately 2 to 3 hours.
TO BAKE:
-
Preheat the Oven: Preheat your oven to 325 degrees F (160 degrees C). Line your cookie sheets with parchment paper.
-
Roll the Dough: Generously flour a clean work surface. Take one ball of chilled dough and roll it out to a thickness of 3/16 inch. Work efficiently to prevent the dough from warming up too much. If the dough becomes sticky while you are working with it, return it to the refrigerator to chill briefly.
-
Cut the Cookies: Using the larger cookie cutter, cut out as many rounds as possible from the rolled dough. Reroll the dough scraps carefully to make more rounds, ensuring you maintain the 3/16-inch thickness. Arrange these dough rounds on the prepared cookie sheets, spacing them about 3/4 inch apart.
-
Create the Tops: Take the smaller cookie cutter and cut holes in the center of half of the dough rounds. These will be your top cookies. Reroll any small scraps from these cut-outs to create additional cookies.
-
Bake the Cookies: Bake the cookies in the preheated oven until the edges are lightly brown. This usually takes about 15 minutes. Keep a close eye on them, as oven temperatures can vary.
-
Cool the Cookies: Once baked, let the cookies cool on the baking sheets for a few minutes before carefully transferring them to wire cooling racks to cool completely.
-
Repeat: Repeat the rolling, cutting, and baking process with the remaining dough.
To Assemble:
-
Dust the Tops: Once all the cookies are completely cooled, take the cookies with the holes cut in the center and sift confectioners’ sugar generously over them.
-
Fill the Bottoms: On the whole cookie rounds (those without holes), spread a heaping 1/2 teaspoon of raspberry preserves (or your chosen jam) evenly.
-
Sandwich the Cookies: Carefully sandwich the dusted top cookies onto the jam-filled bottom cookies, aligning the edges.
NOTE: These cookies are best served the day they are assembled. You can, however, bake the cookies up to a week in advance. Store them in airtight containers once completely cooled. Then, assemble them just a few hours before you plan to serve them.
NOTE 2: The dough for this cookie can be somewhat temperamental and requires patience to work with, especially during the rolling and cutting stages. However, the effort is undeniably worth the exquisite end result.
Expert Tips & Tricks
The Linzer cookie is a classic for a reason, and a few small techniques can elevate it even further. For an even more refined texture in the nut flour, you can lightly toast the almonds and hazelnuts before chopping and processing them. This deepens their flavor beautifully. When rolling out the dough, consider using parchment paper both above and below the dough. This makes for incredibly easy transfer to the baking sheets and minimizes the need for extra flour, preventing a dry cookie. If your kitchen is warm and the dough becomes difficult to handle, don’t hesitate to re-chill it. A slightly firmer dough is always easier to cut cleanly. For a more professional finish, use a small offset spatula to spread the preserves evenly on the bottom cookies before sandwiching.
Serving & Storage Suggestions
Raspberry Linzer cookies are best enjoyed at room temperature, allowing their delicate flavors and textures to shine. Serve them as a beautiful accompaniment to coffee, tea, or a glass of milk. Their elegance makes them perfect for special occasions, holiday cookie platters, or as a thoughtful gift.
Storage: Baked cookie components (before assembly) can be stored in airtight containers at room temperature for up to a week. Once assembled, the cookies are best consumed within 24 hours for optimal texture. If you find yourself with assembled cookies needing to be stored longer, refrigerating them will preserve them for a few days, but the cookie may soften slightly. Freezing assembled cookies is generally not recommended as the jam can affect the crispness of the cookie.
Nutritional Information
This nutritional breakdown is an estimation and can vary based on specific ingredient brands and exact measurements.
| Nutrient | Amount per Serving | % Daily Value |
|---|---|---|
| Calories | 136.6 kcal | – |
| Calories from Fat | – | 69 g |
| Total Fat | 7.7 g | 11 % |
| Saturated Fat | 3.4 g | 17 % |
| Cholesterol | 19.9 mg | 6 % |
| Sodium | 46.7 mg | 1 % |
| Total Carbohydrate | 15.5 g | 5 % |
| Dietary Fiber | 0.8 g | 3 % |
| Sugars | 7.4 g | 29 % |
| Protein | 1.9 g | 3 % |
Variations & Substitutions
The beauty of the Linzer cookie lies in its adaptability. While raspberry is a classic pairing, feel free to explore other fruit preserves. Apricot, strawberry, or even a tart cherry preserve would be delightful. For a different nutty profile, you could substitute walnuts for the hazelnuts, or even use all almonds. If you’re looking for a gluten-free option, you would need to find a reliable gluten-free flour blend that performs well in shortbread-style cookies and ensure your nuts are certified gluten-free. For a richer flavor, you could experiment with browning the butter before adding it to the dough, though this will alter the color and texture slightly.
FAQs
Q: Why is chilling the dough so important for Linzer cookies?
A: Chilling solidifies the butter within the dough, making it easier to roll out evenly and cut cleanly without becoming sticky or spreading excessively during baking.
Q: Can I make these cookies without a food processor?
A: Yes, you can. You would need to finely chop the nuts by hand, and then whisk together all the dry ingredients in a large bowl. The butter would then be cut into the flour mixture using a pastry blender or your fingertips until it resembles coarse meal.
Q: My cookies spread too much during baking. What went wrong?
A: This could be due to the dough being too warm when it went into the oven, or if the butter was not sufficiently chilled. Ensuring your oven is at the correct temperature is also crucial.
Q: How can I get perfectly uniform holes in the top cookies?
A: Using a sharp, appropriately sized cutter and pressing straight down without twisting will give you the cleanest cut. If the dough is well-chilled, it will hold its shape better.
Q: Can I make the dough ahead of time and freeze it?
A: Yes, the dough freezes well. Wrap the discs tightly in plastic wrap and then in foil. Thaw in the refrigerator before proceeding with the recipe.
Final Thoughts
The journey of creating Raspberry Linzer Cookies is a testament to the joy of slow baking. It’s an opportunity to engage your senses, to feel the texture of the dough, to inhale the warm, nutty aroma, and to experience the quiet satisfaction of crafting something truly beautiful. They are a reminder that sometimes, the most rewarding endeavors are those that require a little extra time and a lot of love. Gather your ingredients, embrace the process, and savor the delightful results. These cookies are perfect for sharing with loved ones, a testament to the idea that good food, made with care, truly nourishes the soul.