
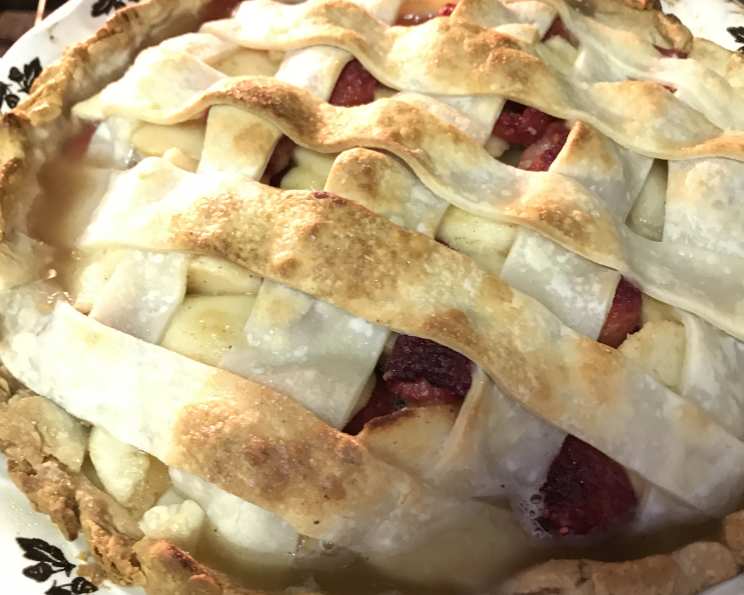
A Taste of Autumn’s Embrace: The Raspberry-Pear Pie
There are some flavor combinations that just feel like a warm hug on a crisp autumn day. The tartness of raspberries, the gentle sweetness of ripe pears, all encased in a buttery, golden crust – it’s a symphony of autumnal delight. This particular Raspberry-Pear Pie holds a special place in my heart, not just for its exquisite taste, but for the memory of the first time I encountered it. It was at a small, local bake sale, a humble affair that belied the sophistication of the pie presented. The unusual pairing intrigued me, and one bite transported me to a place of pure culinary bliss, inspiring me to recreate its magic in my own kitchen and share it with others.
Recipe Overview
- Prep Time: 40 minutes
- Cook Time: 40 to 50 minutes
- Total Time: 1 hour 20 minutes to 1 hour 30 minutes (plus cooling time)
- Servings: 6 to 8
- Yield: 1 pie
- Dietary Type: Vegetarian
Ingredients
This pie is a celebration of fresh, seasonal flavors, and it comes together with a surprisingly manageable list of ingredients.
For the Crust:
- One (15-ounce) box refrigerated pie crusts, softened according to package directions
For the Filling:
- 3 firm and ripe pears, peeled, cored, and cut into 1/2-inch slices
- 1 tablespoon fresh lemon juice
- 1/2 teaspoon almond extract
- 3/4 cup granulated sugar
- 3 tablespoons all-purpose flour
- 1 cup fresh raspberries (or frozen whole raspberries without syrup, partially thawed)
For the Lattice Topping:
- 1 tablespoon butter, melted
- 1 tablespoon granulated sugar
Equipment Needed
To bring this delightful pie to life, you’ll want to have a few essential kitchen tools at the ready:
- A standard 9-inch glass pie plate
- A large mixing bowl
- A measuring cup and measuring spoons
- A cutting board and sharp knife for preparing the fruit
- A rolling pin (if your crusts need a little coaxing)
- A pastry brush for applying the butter
- An oven or baking sheet to place under the pie for easy cleanup
- A wire cooling rack
Instructions
Crafting this Raspberry-Pear Pie is a journey filled with delightful aromas and satisfying steps. Follow these instructions carefully, and you’ll be rewarded with a truly exceptional dessert.
-
Preheat and Prepare the Crust: Begin by preheating your oven to 400°F (200°C). Take one of the refrigerated pie crusts and carefully place it into your 9-inch glass pie plate. Gently press it into the bottom and up the sides of the plate, following the package directions for a “One-Crust Filled Pie.” Set the second pie crust aside; this will be used for the decorative topping.
-
Assemble the Fruit Filling: In a large mixing bowl, combine the prepared pear slices, lemon juice, and almond extract. Toss them gently to ensure each slice is lightly coated. This step not only adds a hint of brightness but also helps prevent the pears from browning.
-
Incorporate Sugar and Flour: To the pear mixture, stir in the 3/4 cup of granulated sugar and the 3 tablespoons of all-purpose flour. The flour will act as a thickener, absorbing some of the juices released by the fruit as it bakes, preventing a watery filling. Mix everything thoroughly but gently to avoid breaking the pear slices.
-
Layer the Filling: Spoon about half of the pear mixture into the prepared pie crust-lined pie plate. Nestling the fruit evenly is key to a beautiful and delicious pie. Next, carefully arrange the fresh raspberries over this first layer of pear mixture. Finally, spoon the remaining pear mixture over the raspberries, creating a delightful layered effect.
-
Prepare the Decorative Topping: Unroll the second pie crust onto a lightly floured cutting board. Using a floured 2 1/2-inch round cutter, cut out 9 rounds from the crust. These will form a beautiful, rustic decorative element on top of your pie.
-
Adorn the Pie: Using your pastry brush, lightly brush each of the 9 pie crust rounds with the melted butter. This will help them brown beautifully and add a lovely richness. Arrange 8 of these buttered rounds in a circle on the outer edge of the fruit filling, overlapping them slightly as needed to create a cohesive border. Place the final pie crust round in the very center of the pie.
-
Add the Finishing Touch: Sprinkle the pie crust rounds on top with the 1 tablespoon of granulated sugar. This final touch adds a touch of sparkle and a delightful crunch to the crust.
-
Bake to Perfection: Place the pie on a baking sheet (to catch any potential drips) and bake in the preheated 400°F (200°C) oven for 40 to 50 minutes. You are looking for a pie where the crust is a beautiful golden brown and the filling is visibly bubbling.
-
Prevent Over-Browning (Optional but Recommended): About 15 to 20 minutes into the baking process, you may notice the edges of the crust starting to brown too quickly. If this happens, you can gently cover the crust edge with strips of foil. This allows the rest of the pie to cook through without the edges becoming burnt.
-
Cool Completely: This is perhaps the most challenging, yet most crucial, step! Once baked, remove the pie from the oven and place it on a wire cooling rack. Allow the pie to cool completely, which will take approximately 3 hours. This resting period is essential for the filling to set properly, ensuring clean slices and preventing a runny pie.
Expert Tips & Tricks
- Pear Selection is Key: For the best results, choose pears that are firm to the touch but have just begun to yield to gentle pressure. Varieties like Bosc, Anjou, or even Bartlett are excellent choices. Overly ripe pears can become mushy, while underripe pears may remain too firm.
- The Almond Extract Nuance: The almond extract might seem like a small addition, but it plays a significant role in enhancing the natural sweetness of the pears and adding a subtle, sophisticated note that complements the raspberries beautifully. If you don’t have almond extract, a tiny drop of pure vanilla extract can be substituted, but almond truly shines here.
- Frozen Raspberries: If using frozen raspberries, ensure they are only partially thawed. This prevents them from releasing too much juice into the filling before baking, which can lead to a soggy bottom crust.
- Rustic Charm: Don’t stress about perfectly uniform pie crust cutouts. The beauty of this pie lies in its rustic charm. Overlapping them slightly and embracing a less-than-perfect arrangement will only add to its homemade appeal.
Serving & Storage Suggestions
This Raspberry-Pear Pie is a true showstopper and is best served at room temperature or slightly warm.
- Serving: Allow the pie to cool completely (at least 3 hours) before slicing. This allows the filling to set. Serve plain to truly appreciate the delicate balance of flavors, or pair it with a dollop of freshly whipped cream or a scoop of vanilla bean ice cream for an indulgent treat. A dusting of powdered sugar can also add a touch of elegance.
- Storage: Leftover pie can be stored loosely covered at room temperature for up to 2 days. For longer storage, cover the pie tightly with plastic wrap and refrigerate for up to 4 days. To reheat a slice, place it in a warm oven (around 300°F or 150°C) for about 10-15 minutes, or until warmed through.
Nutritional Information
Here is an estimated nutritional breakdown for a slice of this delicious Raspberry-Pear Pie. Please note that these values are approximate and can vary based on specific ingredients used.
| Nutrient | Amount per Serving | % Daily Value |
|---|---|---|
| Calories | 560 kcal | |
| Calories from Fat | 228 kcal | |
| Total Fat | 25.4 g | 39% |
| Saturated Fat | 8.7 g | 43% |
| Cholesterol | 5.1 mg | 1% |
| Sodium | 473.4 mg | 19% |
| Total Carbohydrate | 80.7 g | 26% |
| Dietary Fiber | 4.7 g | 18% |
| Sugars | 39.2 g | 156% |
| Protein | 4.1 g | 8% |
Variations & Substitutions
While this recipe is wonderful as is, feel free to explore these variations:
- Gluten-Free Crust: For a gluten-free version, use your favorite store-bought or homemade gluten-free pie crust. Ensure it’s prepared according to its specific instructions.
- Seasonal Fruit Swaps: In late summer or early fall, you could swap some of the pears for apples, or even add a handful of fresh blackberries alongside the raspberries for an extra layer of berry goodness.
- Spice it Up: For a warmer, more spiced flavor, you could add 1/4 teaspoon of ground cinnamon and a pinch of ground nutmeg to the pear filling mixture.
FAQs
Q: Why do I need to cool the pie for so long?
A: Cooling allows the filling’s thickeners to set properly. Cutting into a warm pie will result in a runny filling and messy slices.
Q: Can I use canned pears instead of fresh?
A: While fresh pears offer the best texture and flavor, you can use canned pears packed in juice (not syrup). Drain them very well and pat them dry before slicing and using.
Q: My pie crust is browning too quickly, what should I do?
A: As mentioned in the instructions, you can cover the edges of the crust with strips of foil to prevent over-browning while the rest of the pie bakes.
Q: Can I make the pie crust from scratch?
A: Absolutely! If you have a favorite homemade pie crust recipe, feel free to use it. Just ensure it’s enough for a double-crust pie.
Q: What’s the best way to store leftover pie?
A: Store leftovers loosely covered at room temperature for up to 2 days, or tightly covered and refrigerated for up to 4 days.
Final Thoughts
This Raspberry-Pear Pie is more than just a dessert; it’s an experience. It’s a testament to the magic that happens when simple, quality ingredients are brought together with a little care and creativity. The interplay of the tart raspberries and the sweet, tender pears, all cradled by that perfectly baked crust, is simply sublime. I encourage you to gather your ingredients, embrace the process, and share this delightful creation with your loved ones. Serve it after a cozy family dinner, bring it to a potluck, or simply enjoy a quiet moment of pure bliss with a slice and a cup of tea. I’d love to hear about your baking adventures!