
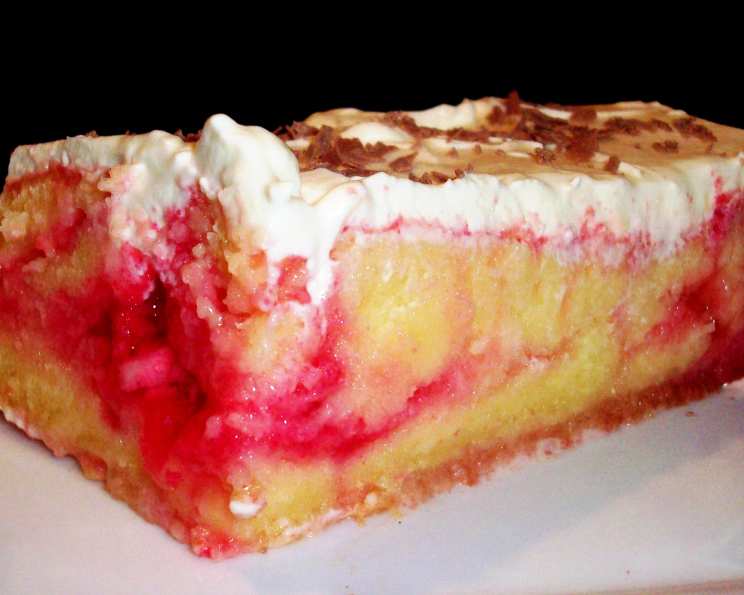
Raspberry Ripple Poke Cake: A Summer Dream
There are certain desserts that just scream summer, and for me, the Raspberry Ripple Poke Cake is absolutely one of them. I still remember the first time I encountered this vibrant beauty. It was at a neighborhood potluck, a sweltering July afternoon where the air hung thick and sweet with the scent of blooming jasmine. This cake, with its deep crimson blush peeking through fluffy white topping, was a revelation. It wasn’t just a dessert; it was a cooling, refreshing embrace, a burst of fruity sunshine that cut through the heat like a cool breeze. Every forkful was a delightful surprise, a perfect marriage of tender cake, tangy raspberry, and cloud-like cream. It’s a cake that embodies simple pleasures and shared joy, a dessert that always brings a smile to my face and a sense of pure, unadulterated happiness.
Recipe Overview
- Prep Time: 15 minutes
- Cook Time: 33 minutes
- Total Time: 3 hours 45 minutes (includes cooling and chilling)
- Servings: 12
- Yield: 1 (13×9-inch) cake
- Dietary Type: Vegetarian
Ingredients
This recipe is wonderfully straightforward, relying on pantry staples and the bounty of fresh raspberries when they’re at their peak.
- 1 (18-ounce) box white cake mix with pudding
- 1 ¼ cups water
- ⅓ cup vegetable oil
- 3 egg whites
- 1 (3-ounce) box raspberry Jell-O gelatin, 4-serving size
- 1 cup boiling water
- ½ cup cold water
- 2 cups frozen whipped topping, thawed
- Fresh raspberries (for garnish)
Equipment Needed
- 13×9-inch baking pan
- Measuring cups and spoons
- Mixing bowls (at least two)
- Whisk or electric mixer
- Fork or skewer for poking holes
- Oven
- Cooling rack
- Spatula
Instructions
Crafting this delightful Raspberry Ripple Poke Cake is a journey of simple steps that lead to an exceptionally rewarding result. Follow these instructions carefully, and you’ll be met with a dessert that’s as beautiful as it is delicious.
-
Preheat and Prepare the Pan: Begin by preheating your oven to 350 degrees Fahrenheit. Next, grease the bottom only of your 13×9-inch baking pan using shortening or a light spray of cooking spray. It’s crucial to only grease the bottom to allow the cake to adhere slightly to the sides, which helps with structure.
-
Prepare the Cake Batter: In a large mixing bowl, combine the white cake mix with pudding, 1 ¼ cups of water, ⅓ cup of vegetable oil, and the 3 egg whites. Mix these ingredients according to the directions on the cake mix box. Typically, this involves mixing on low speed for a minute or two, then increasing to medium speed for another couple of minutes until the batter is smooth and well-combined.
-
Bake the Cake: Pour the prepared cake batter evenly into the greased 13×9-inch pan. Bake for 28 to 33 minutes, or until a toothpick inserted into the center of the cake comes out clean. This is your indicator that the cake is fully baked through.
-
Cool the Cake: Once baked, remove the cake from the oven and let it cool completely. This cooling process is vital and should take about 1 hour. Ensure it’s fully cooled before proceeding to the next step; a warm cake can cause the gelatin to melt too quickly.
-
Create the Raspberry Infusion: While the cake is cooling, prepare the raspberry gelatin mixture. In a small bowl, stir together the raspberry Jell-O gelatin and the 1 cup of boiling water. Whisk until the gelatin is completely smooth and dissolved. Then, stir in the ½ cup of cold water.
-
Poke the Cake: Once the cake has completely cooled, it’s time to create the “poke” part of this delightful dessert. Using a fork or a skewer, pierce the cake every ½ inch all over the surface. Go deep enough to allow the gelatin to seep into the cake layers.
-
Infuse the Cake: Carefully pour the prepared raspberry gelatin mixture evenly over the entire surface of the poked cake. You’ll see it begin to fill the holes and coat the top.
-
Loosen and Chill: To ensure easy removal later, gently run a knife around the side of the pan to loosen the cake from the edges. Then, refrigerate the cake for at least 2 hours. This chilling time is essential for the gelatin to set properly and for the flavors to meld.
-
Top and Garnish: After the chilling period, spread the thawed frozen whipped topping evenly over the top of the chilled cake, creating a smooth, cloud-like layer. Finally, garnish the top generously with fresh raspberries. This adds a beautiful visual appeal and a burst of fresh flavor.
-
Serve and Store: Your Raspberry Ripple Poke Cake is now ready to be served! Store any leftover cake covered in the refrigerator.
A delightful variation to consider is a strawberry poke cake. Simply substitute strawberry gelatin for the raspberry, and garnish with fresh strawberries for a delightful twist!
Expert Tips & Tricks
- Cake Mix Matters: Using a cake mix with pudding already incorporated is a secret weapon for an extra moist and tender cake crumb. Don’t shy away from it; it’s designed to make your life easier and your cake more delicious.
- Don’t Overmix: When preparing the cake batter, resist the urge to overmix once the dry and wet ingredients are combined. Overmixing can develop the gluten too much, resulting in a tougher cake.
- Complete Cooling is Key: I can’t stress enough the importance of letting the cake cool completely before poking. If it’s even slightly warm, the gelatin might not set correctly, leading to a gooey mess rather than delightful pockets of flavor.
- Uniform Poking: Try to poke holes that are roughly the same depth and spacing. This ensures an even distribution of the raspberry goodness throughout the cake.
- Thawed Whipped Topping: Make sure your frozen whipped topping is fully thawed but not melted. If it’s too liquidy, it will run off the cake; if it’s still too icy, it will be difficult to spread smoothly.
- Fresh vs. Jell-O: While the fresh raspberries for garnish are a must for that beautiful finish and burst of freshness, the Jell-O is crucial for creating those distinct pockets of raspberry flavor that permeate the cake.
Serving & Storage Suggestions
This Raspberry Ripple Poke Cake is best served chilled, allowing the flavors to fully meld and the textures to shine. Cut into generous squares and present with pride. The vibrant red of the raspberries against the creamy white topping is a feast for the eyes.
Leftovers should be stored covered tightly in the refrigerator. This cake will keep well for 3 to 4 days in the fridge. Due to the whipped topping and gelatin, it is not recommended for freezing.
Nutritional Information
Here’s an estimated nutritional breakdown for a single serving of this delicious cake. Please note that these are approximate values and can vary based on specific brands of ingredients used.
| Nutrient | Amount per Serving | % Daily Value |
|---|---|---|
| Calories | 304.4 kcal | |
| Total Fat | 13.3 g | 20% |
| Saturated Fat | 4.5 g | 22% |
| Cholesterol | 0 mg | 0% |
| Sodium | 333.7 mg | 13% |
| Total Carbohydrate | 43.8 g | 14% |
| Dietary Fiber | 0.3 g | 1% |
| Sugars | 29.9 g | 119% |
| Protein | 3.3 g | 6% |
Note: The “Calories from Fat” information provided in the original data was a bit unconventional. The values listed above for total fat and saturated fat are standard and are used to calculate the overall nutritional profile.
Variations & Substitutions
The beauty of a poke cake lies in its versatility! While this raspberry version is a classic, don’t hesitate to experiment:
- Other Flavors: As mentioned, strawberry is a fantastic substitute. You could also try cherry, lime, or even a tropical fruit flavor like mango or pineapple for a different seasonal feel.
- Chocolate Lover’s Dream: Use a chocolate cake mix and a complementary gelatin flavor like raspberry or even a dark cherry.
- Citrus Zing: Opt for a lemon cake mix and lemon Jell-O, garnished with lemon zest and perhaps some fresh blueberries.
- Cream Cheese Swirl: For an added layer of richness, consider folding a softened block of cream cheese into the whipped topping before spreading it over the cake. This will create a more decadent, cheesecake-like frosting.
- Whipped Cream: If you prefer, you can whip your own heavy cream with a touch of powdered sugar and vanilla extract to use as the topping instead of the frozen whipped topping.
FAQs
Q: Can I make this cake ahead of time?
A: Yes, you can bake and poke the cake and pour the gelatin over it a day in advance. Add the whipped topping and fresh raspberries just before serving for the freshest appearance.
Q: Why do I only grease the bottom of the pan?
A: Greasing only the bottom allows the cake batter to slightly adhere to the sides of the pan as it bakes. This helps to prevent the cake from shrinking away from the edges and ensures better structure when you add the gelatin.
Q: What is the best way to store leftovers?
A: Leftovers should be stored in an airtight container or covered tightly with plastic wrap and kept in the refrigerator. The cake is best enjoyed within 3-4 days.
Q: Can I use homemade whipped cream instead of frozen?
A: Absolutely! You can whip 2 cups of heavy cream with about ¼ cup of powdered sugar and 1 teaspoon of vanilla extract until stiff peaks form. This will give you a slightly less sweet, more authentic whipped cream topping.
Q: My gelatin seems a bit lumpy after adding it to the cake. What did I do wrong?
A: Ensure you stirred the gelatin with the boiling water until it was completely smooth before adding the cold water. If you still have lumps, gently warm the gelatin mixture slightly (do not boil) and whisk again until smooth before pouring over the cake.
Final Thoughts
The Raspberry Ripple Poke Cake is a testament to how simple ingredients and straightforward techniques can create something truly magical. It’s the kind of cake that disappears quickly, leaving behind happy memories and satisfied smiles. Whether you’re celebrating a special occasion or simply craving a taste of summer sunshine, this cake is sure to be a hit. I encourage you to gather your ingredients, invite some friends or family, and embark on this delightful culinary adventure. Serve it with a cool glass of iced tea or a crisp white wine, and savor every delicious, raspberry-infused bite. Don’t forget to share your creations and any delightful variations you discover!