
A Hug in a Dish: My Raspberry Pudding Embrace
There’s a certain magic in the humble act of transforming frozen fruit into something warm, comforting, and utterly delightful. For me, raspberry pudding is more than just a dessert; it’s a nostalgic whisper from my grandmother’s kitchen, a beacon of warmth on a chilly afternoon. I remember one particularly grey winter day, the kind that presses in on you, when she pulled this very dish from the oven. The scent of sweet raspberries and warm cake enveloped the small room, chasing away the gloom. That first spoonful, with its burst of tangy fruit and tender cake, was pure bliss – a testament to how simple ingredients, prepared with love, can create such profound comfort. This raspberry pudding has since become my go-to for when I need a culinary hug, a reliable reminder of cherished moments and the enduring sweetness of home.
Recipe Snapshot
- Prep Time: 15 minutes
- Cook Time: 50 minutes
- Total Time: 1 hour 5 minutes
- Servings: 8
- Yield: 1 (8-inch square) pudding
- Dietary Type: Dessert
The Heart of the Matter: Ingredients
This raspberry pudding is a beautiful symphony of simple ingredients, coming together to create something truly special. The contrast between the tart raspberries and the sweet, tender cake is what makes this dessert so captivating.
-
For the Raspberry Layer:
- 300 grams frozen raspberries, thawed
- 1/4 cup sugar (or 1/4 cup Splenda)
-
For the Cake Topping:
- 1/2 cup butter or margarine, softened (the recipe notes Becel margarine works wonderfully)
- 3/4 cup sugar (or 3/4 cup Splenda)
- 2 large eggs
- 1/2 teaspoon vanilla extract
- 1 1/4 cups all-purpose flour
- 1 1/2 teaspoons baking powder
- 1 pinch salt
- 1/2 cup milk
-
For the Raspberry Syrup:
- Reserved juice from thawed raspberries (plus enough water to make 1 cup liquid)
- 1/4 cup sugar (or 1/4 cup Splenda)
Essential Tools
To bring this comforting pudding to life, you’ll need a few basic kitchen staples:
- An 8-inch square metal cake pan
- A liquid measuring cup
- A small saucepan
- A large bowl for mixing the cake batter
- A separate bowl for dry ingredients
- A whisk or electric mixer
- A spatula
- An oven
- A cooling rack
The Art of Assembly: Step-by-Step Instructions
Crafting this raspberry pudding is a joy, a straightforward process that rewards you with a truly delightful outcome. Follow these steps carefully, and you’ll be rewarded with a dessert that’s both elegant and deeply satisfying.
-
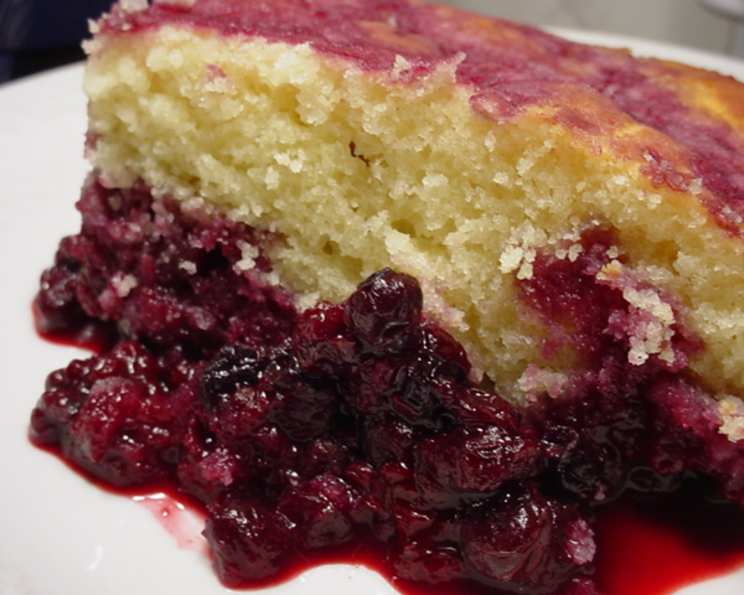
Prepare the Raspberry Base: Begin by draining your thawed frozen raspberries. It’s crucial to reserve the juice that collects. Pour this juice into a liquid measuring cup. If you don’t have a full cup of juice, add enough water to bring the total liquid up to 1 cup. Set this raspberry liquid aside. Now, take your greased 8-inch square metal cake pan. Gently toss the drained raspberries with 1/4 cup of sugar (or Splenda if you’re using it). Spread this raspberry mixture evenly across the bottom of the prepared pan. Set the pan aside while you prepare the cake topping.
-
Create the Cake Topping: In a large bowl, cream together the softened butter (or margarine) and 3/4 cup of sugar (or Splenda) until the mixture is wonderfully light and fluffy. This creaming process is key to a tender cake. Next, beat in the eggs, one at a time, ensuring each is fully incorporated before adding the next. Stir in the vanilla extract.
-
Combine Dry Ingredients: In a separate bowl, whisk together the all-purpose flour, baking powder, and salt. This ensures that the leavening agent and salt are evenly distributed throughout the flour.
-
Alternate Dry and Wet Ingredients: Now, begin adding the dry ingredients to the butter-egg mixture alternately with the milk. You’ll add the dry ingredients in three additions and the milk in two. Start by adding about one-third of the flour mixture and mix until just combined. Then, add half of the milk and mix until incorporated. Continue this pattern: another third of the flour mixture, the remaining milk, and finally, the last third of the flour mixture. Scrape down the sides of the bowl as needed to ensure everything is incorporated. Be careful not to overmix; just mix until no streaks of flour remain.
-
Assemble the Pudding: Carefully scrape the cake batter evenly over the raspberry mixture in the prepared pan. Use your spatula to smooth the top of the batter, creating a level surface.
-
Prepare the Raspberry Syrup: In a small saucepan, combine the reserved raspberry liquid (that you measured out to 1 cup) with the remaining 1/4 cup of sugar (or Splenda). Place the saucepan over medium heat and bring the mixture to a boil, stirring occasionally until the sugar has dissolved.
-
Pour the Syrup: Once the raspberry syrup is boiling, carefully pour it evenly over the cake batter in the pan. This step is quite dramatic and is what creates the unique texture of this pudding.
-
Bake to Perfection: Place the pan in the center of a preheated oven set to 350°F (175°C). Bake for approximately 50 minutes, or until the pudding is bubbly at the edges and the cake is firm to the touch. You can insert a toothpick into the cake portion; it should come out with moist crumbs attached, but not wet batter.
-
Cool and Serve: Once baked, remove the pudding from the oven and let it cool slightly in the pan on a cooling rack before serving. This allows the pudding to set up and makes it easier to serve.
Chef’s Secrets for Raspberry Pudding Success
To elevate your raspberry pudding experience, here are a few insider tips:
- Berry Choice: While frozen raspberries are called for and work beautifully, if you have fresh raspberries available, they can also be used. Just ensure they are at room temperature before proceeding with the recipe.
- Margarine vs. Butter: The recipe specifically mentions using Becel margarine as a successful alternative to butter. This can contribute to a lighter texture. Experiment to see which you prefer!
- Sweetener Swap: For those looking to reduce refined sugar, using Splenda in place of both the granulated sugar and brown sugar is noted as yielding a nice, light result.
- Oven Variations: Ovens can be finicky! If your oven tends to run hot or cold, keep a closer eye on the pudding during the last 15-20 minutes of baking. It’s better to err on the side of caution than to overbake.
- Doneness Test: The “firm to the touch” test is a good indicator, but a toothpick inserted into the cake portion should come out with just a few moist crumbs. If it comes out with wet batter, it needs more time.
Serving and Storing Your Creation
This warm raspberry pudding is best enjoyed fresh from the oven or slightly cooled. It’s divine served on its own, but for an extra touch of indulgence, consider a dollop of whipped cream, a scoop of vanilla ice cream, or a drizzle of crème anglaise.
Make Ahead and Storage: This pudding is remarkably forgiving. It can be made ahead and stored at room temperature for up to 8 hours. If you prefer it warm, you can gently reheat it in a low oven or microwave. For longer storage, refrigerate the cooled pudding in an airtight container for up to 2-3 days. Reheat individual portions in the microwave or oven.
Nutritional Snapshot (Approximate)
Here’s a glimpse into the nutritional profile of this delightful pudding. Please note that these values are estimates and can vary based on specific ingredients used.
| Nutrient | Amount per Serving | % Daily Value |
|---|---|---|
| Calories | 361.7 kcal | – |
| Calories from Fat | 13.6 g | – |
| Total Fat | 13.6 g | 20% |
| Saturated Fat | 8.1 g | 40% |
| Cholesterol | 85.5 mg | 28% |
| Sodium | 194.9 mg | 8% |
| Total Carbohydrate | 57 g | 19% |
| Dietary Fiber | 2.2 g | 8% |
| Sugars | 39.6 g | 158% |
| Protein | 4.5 g | 8% |
Variations and Creative Twists
While this raspberry pudding is perfection as is, feel free to play with its delightful framework:
- Mixed Berry Magic: Swap out half of the raspberries for other berries like blueberries, blackberries, or even cherries for a delightful medley of flavors.
- Citrus Zest: Add the zest of one lemon or orange to the cake batter for a bright, fragrant lift that complements the raspberries beautifully.
- Nutty Crunch: Fold in 1/4 cup of chopped almonds or walnuts into the cake batter for an added textural element.
- Spice It Up: A pinch of cinnamon or nutmeg in the dry ingredients can add a subtle warmth and complexity.
Frequently Asked Questions
Q: Can I use fresh raspberries instead of frozen?
A: Absolutely! If using fresh raspberries, ensure they are at room temperature before tossing them with sugar and placing them in the pan.
Q: My pudding seems a bit wet on top. What went wrong?
A: This can sometimes happen if the syrup isn’t fully incorporated or the cake is slightly underbaked. Ensure you pour the hot syrup evenly over the batter and bake until the cake is firm to the touch and a toothpick comes out with moist crumbs.
Q: Can I make this pudding in a different sized pan?
A: Yes, but you will need to adjust the baking time. A smaller pan might require a longer bake, while a larger, shallower pan might bake faster. Keep an eye on it for doneness.
Q: Is it possible to make this gluten-free?
A: You can try substituting the all-purpose flour with a good quality gluten-free all-purpose flour blend. You may need to experiment with the liquid amounts as gluten-free flours can absorb moisture differently.
Q: How do I prevent the raspberries from sinking to the bottom?
A: Tossing the raspberries with sugar and ensuring the cake batter is adequately mixed and then carefully spread over the fruit helps prevent them from sinking completely. The syrup pouring over also helps bind everything together.
A Sweet Ending
There’s a profound comfort in a dish like this raspberry pudding – a testament to the power of simple, honest ingredients. It’s the kind of dessert that brings people together, sparking conversations and creating warm memories. Whether you’re looking for a comforting treat on a quiet evening or a delightful finale to a family meal, this raspberry pudding is sure to bring a smile. I encourage you to try it, to savor each spoonful, and perhaps, to share a little bit of that warmth with someone you love. Enjoy!