
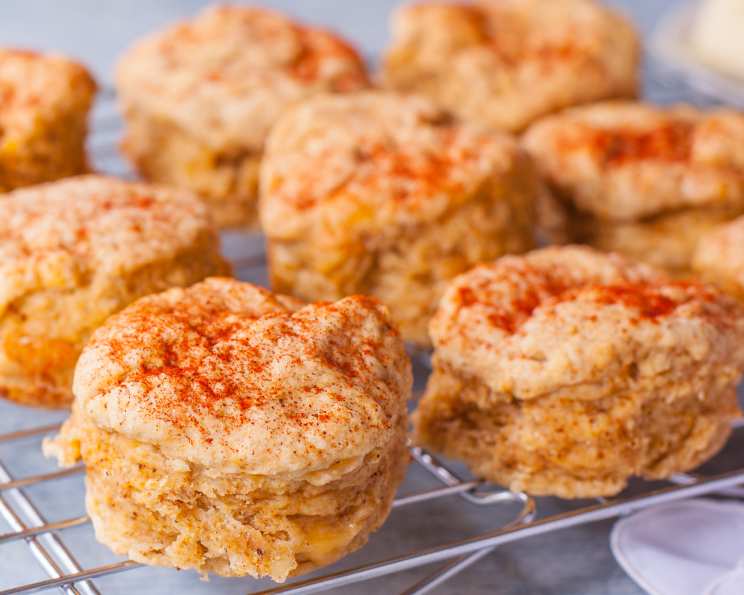
Red Chili Biscuits: A Spicy Kick to Comfort Food
There’s a unique joy that comes from a perfectly baked biscuit – that golden crust giving way to a cloud-like interior, just begging to be slathered with butter. For me, that joy is amplified when there’s a whisper of warmth, a subtle heat that dances on the tongue. These red chili biscuits were born from a desire to elevate the humble biscuit, to give it a personality beyond its buttery, tender self. The first time I pulled a batch from the oven, the aroma of toasted chili powder mingled with the scent of baking butter, and I knew I’d stumbled upon something special. They are, quite simply, a delightful surprise, a familiar comfort with a playful, spicy twist that makes them utterly irresistible.
Recipe Overview
- Prep Time: 15 minutes
- Cook Time: 25 minutes
- Total Time: 40 minutes
- Servings: 8
- Yield: 8 biscuits
- Dietary Type: Vegetarian
Ingredients
Here’s what you’ll need to create these wonderfully spiced biscuits:
- 2 cups all-purpose flour
- 1 tablespoon baking powder
- 1/2 teaspoon baking soda
- 1 tablespoon granulated sugar
- 1 teaspoon kosher salt
- 6 tablespoons chilled unsalted butter, cut into small cubes
- 1 cup cheddar cheese, shredded
- 1 tablespoon chili powder
- 1 cup chilled buttermilk (you may need to add a little more to achieve the right consistency)
- 2 tablespoons melted butter, for brushing the tops
Equipment Needed
To bring these red chili biscuits to life, you’ll want to have the following on hand:
- A large mixing bowl
- A pastry blender or your fingertips
- Measuring cups and spoons
- A baking sheet
- A biscuit cutter (approximately 3 1/2 inches in diameter, or your preferred size)
- A pastry brush
Instructions
Crafting these flavorful biscuits is a straightforward process, yielding delicious results with a touch of heat. Follow these steps carefully for perfection:
-
Preheat and Prepare: Begin by preheating your oven to 400 degrees Fahrenheit (200 degrees Celsius). Lightly grease a baking sheet, or line it with parchment paper for easier cleanup.
-
Combine Dry Ingredients: In your large mixing bowl, whisk together the all-purpose flour, baking powder, baking soda, granulated sugar, kosher salt, and chili powder. Ensure these dry ingredients are thoroughly combined, as this forms the flavor base of your biscuits.
-
Cut in the Butter: Add the chilled unsalted butter, cut into small cubes, to the dry ingredients. Using a pastry blender, two knives, or your fingertips, cut the butter into the flour mixture. Continue this process until the mixture resembles coarse crumbs or fine meal, with some pea-sized pieces of butter still visible. This is crucial for creating tender, flaky layers.
-
Incorporate Cheese and Buttermilk: Stir in the shredded cheddar cheese. Then, gradually add the chilled buttermilk. Begin with the 1 cup measurement. Mix gently until the flour is just moistened. It’s important to note that you might need to add a little more buttermilk to achieve the right consistency; the batter should be moist but not overly wet or sticky. The goal is a cohesive dough that just comes together.
-
Knead Lightly: Turn the dough out onto a lightly floured surface. Knead the dough lightly for about 15 turns. Avoid overworking the dough, as this can result in tough biscuits. The kneading process helps to develop just enough gluten for structure without making them dense.
-
Roll and Cut: Roll out the dough to a thickness of 3/4 inch. Using your biscuit cutter, cut out the biscuits. Press the cutter straight down without twisting to ensure the biscuits rise evenly.
-
Utilize Scraps: Gather the dough scraps and gently form them into a ball. Roll out the dough again to 3/4 inch thick and cut additional biscuits. Continue this process until all the dough is used. The texture of these secondary biscuits might be slightly different, but they will still be delicious.
-
Arrange and Brush: Place the cut biscuits onto the prepared greased baking sheet. Ensure they are close enough to touch each other slightly, which helps them rise upwards rather than spreading outwards. Brush the tops of the biscuits with the melted butter. This step adds a lovely richness and helps them achieve a beautiful golden-brown finish.
-
Bake to Perfection: Bake in the preheated oven at 400 degrees Fahrenheit (200 degrees Celsius) for approximately 25 minutes. Keep an eye on them; they should be puffed, golden brown on top, and cooked through. A wooden skewer inserted into the center of a biscuit should come out clean.
Expert Tips & Tricks
- Keep it Cold: The key to flaky biscuits lies in keeping your butter and buttermilk chilled. Cold butter creates steam pockets as it bakes, resulting in those coveted layers. If your kitchen is warm, briefly chill your flour and other dry ingredients as well.
- Don’t Overmix: Overmixing the dough after adding the liquid is a common mistake that leads to tough biscuits. Mix just until the dry ingredients are moistened; a slightly shaggy dough is perfectly acceptable.
- Gentle Kneading: When kneading, think “gentle.” You’re not making bread; you’re just bringing the dough together. Light, quick turns are all that’s needed.
- Straight Cuts: For the tallest, most evenly risen biscuits, press your biscuit cutter straight down without any twisting. Twisting can seal the edges, preventing the dough from rising properly.
- Baking Sheet Arrangement: Placing your biscuits so they are touching on the baking sheet encourages them to bake upwards, creating taller, more voluminous biscuits. If you prefer biscuits that spread outwards, leave more space between them.
Serving & Storage Suggestions
These red chili biscuits are incredibly versatile. Serve them warm, straight from the oven, alongside your favorite chili, stew, or hearty soup for a comforting meal. They are also delightful on their own, perhaps with a dollop of honey or a smear of good butter.
Leftover biscuits can be stored in an airtight container at room temperature for up to 2 days. For longer storage, you can freeze them. Once completely cooled, wrap them tightly in plastic wrap and then in aluminum foil or place them in a freezer-safe bag. They will keep in the freezer for up to 2–3 months. To reheat, place frozen biscuits on a baking sheet and warm in a 350-degree Fahrenheit (175-degree Celsius) oven for about 10–15 minutes, or until heated through and slightly crisp.
Nutritional Information
Here’s an estimated nutritional breakdown per biscuit:
| Nutrient | Amount per Serving | % Daily Value |
|---|---|---|
| Calories | 294.5 kcal | |
| Calories from Fat | 52% | |
| Total Fat | 16.9 g | 26% |
| Saturated Fat | 10.5 g | 52% |
| Cholesterol | 46.6 mg | 15% |
| Sodium | 668.9 mg | 27% |
| Total Carbohydrate | 28 g | 9% |
| Dietary Fiber | 1.2 g | 4% |
| Sugars | 3.3 g | 13% |
| Protein | 8 g | 16% |
Note: Nutritional values are estimates and can vary based on specific ingredients and brands used.
Variations & Substitutions
While this recipe is fantastic as is, feel free to experiment!
- Cheese Varieties: If cheddar cheese isn’t your favorite, try a sharp Monterey Jack, a spicy Pepper Jack for even more heat, or a blend of cheeses.
- Herbaceous Notes: For an added layer of flavor, consider adding a teaspoon or two of finely chopped fresh chives or parsley to the dough along with the cheese.
- Spice Level: If you prefer a milder heat, reduce the chili powder to 1/2 tablespoon. For a bolder kick, you could increase it slightly or add a pinch of cayenne pepper.
- Buttermilk Substitute: If you don’t have buttermilk on hand, you can make a substitute by adding 1 tablespoon of lemon juice or white vinegar to 1 cup of milk and letting it sit for 5–10 minutes until it slightly curdles.
FAQs
Q: Why are my biscuits tough?
A: Tough biscuits are usually the result of overmixing the dough after the liquid is added or overworking the dough during kneading. Mix until just combined and knead very lightly.
Q: Can I use a food processor to make these biscuits?
A: Yes, you can use a food processor to cut in the butter. Pulse the dry ingredients first, then add the cold butter and pulse until it reaches a coarse crumb consistency. Be careful not to over-process.
Q: My buttermilk isn’t curdling when I try to make a substitute. What should I do?
A: Ensure you are using slightly warmed milk (not hot) and allow it to sit for the recommended time. The curdling might be subtle. The slight acidity is what’s important for reacting with the baking soda.
Q: How can I get my biscuits to rise taller?
A: Ensure your baking powder and baking soda are fresh, keep your ingredients cold, don’t twist your biscuit cutter, and place your biscuits close together on the baking sheet.
Q: Can I make the dough ahead of time?
A: You can prepare the dry ingredients and cut in the butter ahead of time. However, it’s best to add the buttermilk and bake the biscuits relatively soon after for the best texture.
Final Thoughts
These red chili biscuits are more than just a side dish; they’re an experience. They offer that comforting familiarity of a classic biscuit, elevated by a gentle warmth that awakens the palate. Whether you’re pairing them with a hearty bowl of soup or enjoying them with a smear of butter and honey, they are sure to become a favorite. I encourage you to try this recipe, to embrace the subtle kick, and to discover the delightful twist it brings to your table. Let me know how they turn out for you – happy baking!