
Red Velvet Bars: A Shortcut to Decadence
There’s something about red velvet that evokes a sense of nostalgia and celebratory indulgence. I remember as a child, the vibrant crimson hue of red velvet cake was always a signal that a special occasion was upon us – birthdays, holidays, or just a particularly joyful weekend. While the classic layered cake is magnificent, sometimes life calls for something a little more… accessible. That’s where these red velvet bars come in. They capture all the beloved flavor and iconic color of the original but in a format that’s perfect for a casual afternoon treat or a potluck where elegance meets ease. The first time I whipped these up, the speed and simplicity were astounding, yet the resulting bar was every bit as rich and satisfying as its more elaborate counterpart.
Recipe Overview
- Prep Time: 15 minutes
- Cook Time: 40 to 45 minutes
- Total Time: 55 minutes (plus cooling time)
- Servings: 9-12
- Yield: 13×9 inch pan of bars
- Dietary Type: Classic (can be adapted)
Ingredients
This recipe streamlines the classic red velvet experience with a clever shortcut that doesn’t compromise on flavor or texture.
-
For the Red Velvet Base:
- 1 (18 ounce) box red velvet cake mix (Duncan Hines is my go-to for its reliable results)
- 1 egg
- 1/2 cup butter or margarine, softened
- 3 tablespoons water
-
For the Cream Cheese Swirl:
- 16 ounces cream cheese, softened
- 1/2 cup sugar
- 1 teaspoon vanilla
- 2 eggs
Equipment Needed
To create these delightful bars, you’ll want to have these essential kitchen tools on hand:
- A 13×9 inch baking pan
- Cooking spray or parchment paper for lining
- A large mixing bowl
- An electric mixer (handheld or stand mixer) or a sturdy whisk for the cream cheese filling
- A rubber spatula
- Measuring cups and spoons
- Gloves (optional, but highly recommended for handling the cake mix)
- A cooling rack
Instructions
Let’s get baking! Follow these steps for perfectly balanced red velvet bars with a luscious cream cheese topping.
-
Preheat and Prepare: Begin by preheating your oven to 350 degrees Fahrenheit (175 degrees Celsius). Next, generously spray your 13×9 inch baking pan with cooking spray to ensure your bars release beautifully. For extra insurance against sticking, you can also line the pan with parchment paper, leaving an overhang on the sides to easily lift the bars out later.
-
Crafting the Red Velvet Base: In a large mixing bowl, combine the red velvet cake mix, 1 egg, the softened butter (or margarine), and the 3 tablespoons of water. Mix these ingredients together. Be prepared: this mixture will form a very stiff dough. It’s quite dense and requires a bit of effort to bring together.
-
The Gloves are Recommended: At this stage, I strongly recommend wearing gloves. The vibrant red food coloring in the cake mix is notorious for staining hands, and gloves will save you from an impromptu, albeit temporary, tie-dye effect.
-
Pressing the Base: Transfer this stiff dough into your prepared 13×9 inch pan. Using your hands (or a spatula) and a little pressure, pat the dough into an even layer across the bottom of the pan. Ensure it’s distributed uniformly for consistent baking.
-
Whipping Up the Cream Cheese Swirl: In a separate bowl, begin by creaming together the softened cream cheese and the sugar until the mixture is wonderfully smooth. This step is crucial for a silky texture in the topping.
-
Adding the Finishing Touches to the Swirl: Next, add the 2 eggs and the 1 teaspoon of vanilla to the cream cheese mixture. Mix everything together until just combined. Be careful not to overmix at this point.
-
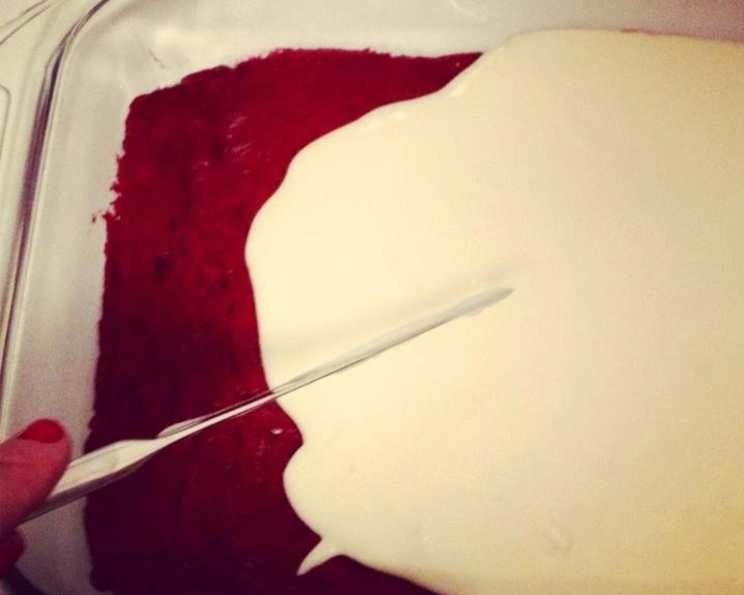
Layering for Flavor: Gently spread the cream cheese mixture evenly on top of the red velvet dough layer in the pan. Try to create a smooth, unbroken surface for the topping.
-
Baking to Perfection: Place the pan in your preheated oven. Bake for 40 to 45 minutes. You’ll know the bars are ready when the edges are set and lightly golden, and the cream cheese topping is mostly set with just a slight jiggle in the very center. A toothpick inserted near the center should come out with moist crumbs, not wet batter.
-
The Crucial Cooling Period: Once baked, carefully remove the pan from the oven. This is a critical step for achieving clean slices: allow the bars to cool completely in the pan on a wire rack. Rushing this process can lead to crumbly bars. Patience is key here!
-
Slicing and Serving: After the bars have cooled entirely, you can proceed to slicing. For the neatest cuts, you might want to chill the bars for a bit in the refrigerator before slicing. Cut them into your desired bar size – squares are common, but rectangles work just as well.
Expert Tips & Tricks
As a chef, I’m always looking for ways to elevate a recipe, even a simple one. These tips will help you achieve outstanding results with your red velvet bars.
- Soften Cream Cheese Properly: Ensure your cream cheese is truly softened to room temperature. This means it should yield easily to gentle pressure. Hard cream cheese will result in a lumpy filling. If you’re in a pinch, you can microwave it in very short bursts (10-15 seconds), but be careful not to melt it.
- Don’t Overmix the Cream Cheese: While you want the cream cheese and sugar to be smooth, overmixing after adding the eggs can incorporate too much air, potentially causing the topping to puff up excessively and then crack as it cools. Mix just until combined.
- The Power of Parchment Paper: While cooking spray is effective, lining your pan with parchment paper and leaving an overhang is a game-changer for removal. It allows you to lift the entire slab of bars out of the pan as one piece, making slicing much easier and cleaner.
- Cooling is Non-Negotiable: I cannot stress this enough: cool the bars completely. If you try to cut them while they’re warm, they’ll be gooey and fall apart. A fully cooled bar will slice cleanly and hold its shape beautifully. Chilling them for an hour or two in the refrigerator after they’ve reached room temperature will make slicing even easier.
- Uniformity in Size: When pressing the cake mix base, try to get it as even as possible. This ensures that both the base and the topping bake at a similar rate, preventing undercooked or overcooked sections.
Serving & Storage Suggestions
These red velvet bars are incredibly versatile, perfect for a simple dessert or a celebratory spread.
- Serving: These bars are delightful on their own, showcasing their rich flavor and creamy topping. For an extra touch of elegance, consider dusting them lightly with powdered sugar or serving with a dollop of whipped cream. They pair wonderfully with a cup of coffee or a glass of cold milk.
- Storage: Once completely cooled, store the red velvet bars in an airtight container. They will keep well at room temperature for up to 2 days. For longer storage, refrigerate them in an airtight container for up to 5 days. The cream cheese topping makes them best enjoyed chilled.
- Freezing: These bars also freeze beautifully, making them an excellent make-ahead option for parties or to have on hand for a craving. Cool completely before wrapping them tightly in plastic wrap, then in aluminum foil, or place them in a freezer-safe container. They can be frozen for up to 3 months. Thaw overnight in the refrigerator before serving.
Nutritional Information
Please note that these values are approximate and can vary based on specific brands and ingredient substitutions.
| Nutrient | Amount per Serving | % Daily Value |
|---|---|---|
| Calories | 331.3 | |
| Calories from Fat | 144.3 | |
| Total Fat | 16.0 g | 21% |
| Saturated Fat | 9.4 g | 47% |
| Cholesterol | 76.7 mg | 26% |
| Sodium | 222.6 mg | 10% |
| Total Carbohydrate | 35.9 g | 13% |
| Dietary Fiber | 0.6 g | 2% |
| Sugars | 25.8 g | 51% |
| Protein | 4.3 g | 9% |
Variations & Substitutions
While this recipe is fantastic as is, here are a few ideas to personalize your red velvet bars:
- White Chocolate Chip Swirl: Fold about 1/2 cup of white chocolate chips into the cream cheese mixture before spreading it over the base for an extra layer of sweetness and texture.
- Mini Chocolate Chips: For a more classic red velvet flavor profile, add about 1/2 cup of mini chocolate chips to the red velvet cake mix dough.
- Cream Cheese Frosting Topping: If you want a truly decadent experience, after the bars have cooled completely, you can whip up a simple cream cheese frosting (cream cheese, powdered sugar, vanilla, a splash of milk) and spread it over the cooled bars.
- Gluten-Free Adaptation: Use a gluten-free red velvet cake mix and ensure your other ingredients are certified gluten-free. The texture might vary slightly, but the flavor will still be wonderful.
FAQs
Q: Why is the cake mix dough so stiff?
A: The combination of cake mix, one egg, and softened butter creates a dense, almost cookie-like dough that is designed to hold up as a base for the creamy topping.
Q: Can I use a different brand of red velvet cake mix?
A: Yes, you can use other brands, but be aware that the texture and amount of moisture in different mixes can vary slightly, potentially affecting the dough’s stiffness.
Q: My cream cheese topping cracked. What did I do wrong?
A: Cracking can happen if the topping is overbaked, mixed with too much air, or cooled too rapidly. Ensure you bake just until set and allow for gradual cooling.
Q: How can I make the red color even more vibrant?
A: While the cake mix provides a good color, you can add a few drops of red food coloring to the cream cheese mixture if you desire a more intense hue.
Q: Can I make these without a mixer for the cream cheese filling?
A: Absolutely! While a mixer makes it easier, you can achieve a smooth cream cheese filling by using a sturdy whisk and a bit of elbow grease. Ensure the cream cheese is very soft.
Final Thoughts
These red velvet bars are a testament to how simple ingredients and a clever approach can yield incredibly satisfying results. They offer a welcome shortcut to enjoying the beloved flavors of red velvet without the fuss of layering and frosting a traditional cake. Whether you’re a seasoned baker or just starting out, these bars are a guaranteed crowd-pleaser. They’re perfect for sharing, for that moment you need a comforting treat, or for simply bringing a touch of joy to your day. I encourage you to give them a try, and I’d love to hear how you enjoy them! Perhaps with a warm beverage on a cozy afternoon, or as a delightful addition to your next gathering.