
The Enchanting Allure of Red Velvet Cheesecake
There are certain desserts that evoke a specific time, a feeling, a memory so vividly that a single bite can transport you. For me, red velvet cheesecake is one of those culinary time capsules. I remember the first time I encountered it, not as a humble home bake, but as a showstopper at a family gathering. The deep, almost jewel-toned crimson against the creamy ivory of the cheesecake filling was a visual feast, a promise of indulgence. That first taste – the subtle cocoa, the tang of the cream cheese, the hint of something mysterious and comforting – was pure revelation. It wasn’t just a dessert; it was an experience, a testament to the artistry of Southern baking, and it cemented my lifelong love affair with this iconic confection.
Recipe Overview
- Prep Time: Approximately 30 minutes
- Cook Time: 1 hour and 55 minutes (including initial bake and oven-off time)
- Chill Time: 8 hours
- Total Time: Approximately 10 hours 25 minutes (includes chilling)
- Servings: 8
- Yield: 1 (9-inch) cheesecake
- Dietary Type: Standard
Ingredients
For the Graham Cracker Crust:
- 1 1⁄2 cups graham cracker crumbs
- 1⁄4 cup butter or margarine, melted
- 1 tablespoon granulated sugar
For the Red Velvet Cheesecake Filling:
- 3 (8-ounce) packages cream cheese, softened
- 1 1⁄2 cups granulated sugar
- 4 large eggs, lightly beaten
- 3 tablespoons unsweetened cocoa
- 1 cup sour cream
- 1⁄2 cup whole buttermilk
- 2 teaspoons vanilla extract
- 1 teaspoon distilled white vinegar
- 2 (1-ounce) bottles red food coloring
For the Cream Cheese Frosting:
- 3 ounces cream cheese, softened
- 1⁄4 cup butter, softened
- 2 cups powdered sugar
- 1 teaspoon vanilla extract
Equipment Needed
To bring this magnificent Red Velvet Cheesecake to life, you’ll want to have these essential tools at the ready:
- A 9-inch springform pan is crucial for easy removal of the finished cheesecake.
- A food processor or rolling pin and plastic bag for crushing graham crackers.
- Mixing bowls in various sizes.
- An electric mixer (stand mixer or hand mixer) for achieving a smooth, creamy filling and frosting.
- A whisk and rubber spatula.
- Measuring cups and spoons.
- Your oven.
- A wire cooling rack.
- A sharp knife for loosening the edges.
Instructions
Creating this Red Velvet Cheesecake is a layered process, each step building upon the last to achieve that perfect balance of textures and flavors. Patience is key, especially during the chilling and resting phases, which are vital for the cheesecake’s signature silken texture.
-
Prepare the Crust: Begin by combining the graham cracker crumbs, melted butter (or margarine), and 1 tablespoon of granulated sugar in a medium bowl. Stir until the crumbs are evenly moistened. Press this mixture firmly and evenly into the bottom of your 9-inch springform pan. This forms the sturdy foundation for our decadent creation.
-
Begin the Filling: In a large mixing bowl, beat the 3 packages of cream cheese and 1 1⁄2 cups of granulated sugar together. Do this at a medium-low speed for about 1 minute, or until the mixture is smooth and well combined, ensuring no lumps remain.
-
Incorporate Wet and Dry Ingredients: Gradually add the eggs to the cream cheese mixture, mixing on low speed just until they are fully incorporated. Next, add the unsweetened cocoa, sour cream, whole buttermilk, vanilla extract, and distilled white vinegar. Continue to mix on low speed, being careful not to overmix, until all these ingredients are just blended into a smooth, homogenous batter.
-
Achieve the Signature Color: Now for the magical transformation. Add the 2 (1-ounce) bottles of red food coloring to the batter. Mix on low speed until the color is uniform and you have achieved that deep, vibrant red velvet hue. The color should be rich and consistent throughout the batter.
-
Assemble the Cheesecake: Carefully pour the red velvet batter over the prepared graham cracker crust in the springform pan. Gently tap the pan on the counter a couple of times to release any trapped air bubbles, ensuring a smooth top surface.
-
The Initial Bake: Preheat your oven to 325 degrees Fahrenheit. Place the cheesecake in the preheated oven and bake for 10 minutes.
-
Lower the Temperature and Continue Baking: After the initial 10 minutes, reduce the oven temperature to 300 degrees Fahrenheit. Continue to bake for 1 hour and 15 minutes, or until the center of the cheesecake is firm to the touch. You can test for doneness by gently jiggling the pan; the edges should be set, while the center might have a slight wobble.
-
The Gentle Cooling Phase (In Oven): Once the baking time is complete, run a knife along the outer edge of the cheesecake to loosen it from the sides of the springform pan. This step is crucial to prevent cracking as the cheesecake cools and contracts. Turn the oven off, but leave the cheesecake inside. Allow the cheesecake to stand in the oven for 30 minutes. This gradual cooling process helps prevent the drastic temperature change that can lead to cracks.
-
Cooling on a Rack: After its sojourn in the turned-off oven, remove the cheesecake from the oven. Let it cool in the pan on a wire rack for another 30 minutes. This further allows it to acclimate to room temperature before refrigeration.
-
Chill to Perfection: Once it has cooled on the rack, cover the cheesecake tightly (plastic wrap works well) and chill in the refrigerator for at least 8 hours, or preferably overnight. This extended chilling period is essential for the cheesecake to set properly and develop its signature dense, creamy texture.
-
Prepare the Cream Cheese Frosting: While the cheesecake is chilling, you can prepare the luscious topping. In a separate bowl, beat the 3 ounces of cream cheese and 1⁄4 cup of butter together at medium speed until they are completely smooth and creamy. Gradually add the 2 cups of powdered sugar and the 1 teaspoon of vanilla extract, beating until the frosting is smooth, fluffy, and well combined.
-
Frost and Serve: Once the cheesecake has thoroughly chilled, carefully spread the cream cheese frosting evenly over the top of the chilled cheesecake. Finally, remove the sides of the springform pan to reveal your stunning Red Velvet Cheesecake.
Expert Tips & Tricks
- Room Temperature is Key: For the smoothest cheesecake filling, ensure your cream cheese, eggs, and sour cream are all at room temperature. This allows them to emulsify more effectively, preventing lumps and creating a silken texture.
- Don’t Overmix: While you want a smooth batter, overmixing the filling after adding the eggs can incorporate too much air, leading to cracks. Mix on low speed and only until just combined.
- Water Bath (Optional but Recommended): For an even more foolproof, crack-free cheesecake, consider baking it in a water bath. Wrap the outside of your springform pan tightly with heavy-duty aluminum foil (several layers). Place this wrapped pan inside a larger baking pan. Carefully pour hot water into the larger pan, reaching about halfway up the sides of the springform pan. This creates a humid environment that promotes even baking and prevents the edges from overcooking.
- Checking for Doneness: The wobble test is your best friend. When the cheesecake is ready to come out of the oven, the edges should look set, and the center should still have a slight jiggle, like Jell-O. It will continue to set as it cools.
- Preventing Cracks: Besides the oven-off resting and loosening the sides, avoid opening the oven door frequently during baking. This sudden temperature fluctuation can cause cracks.
Serving & Storage Suggestions
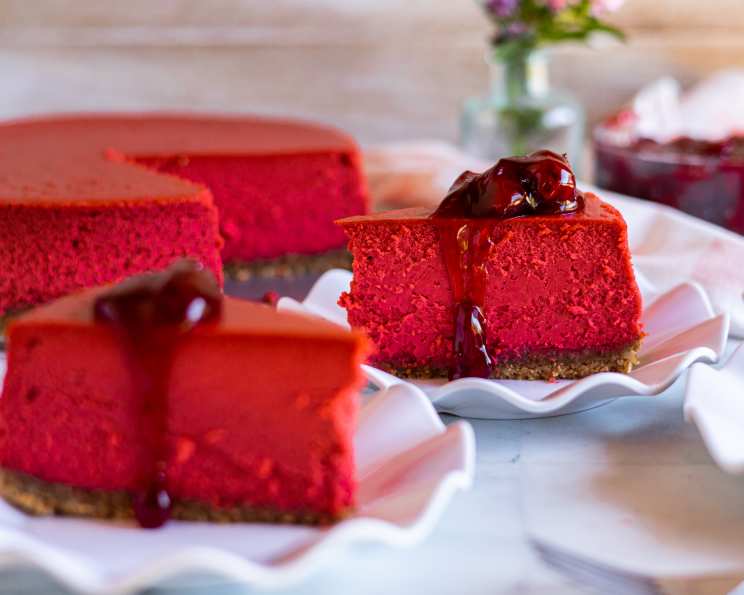
This Red Velvet Cheesecake is a showstopper on its own, but a few simple touches can elevate its presentation. Serve it chilled, allowing the vibrant red color to pop against a dark plate. For a touch of elegance, consider garnishing with a few fresh raspberries or a drizzle of chocolate sauce.
Leftovers can be stored, covered tightly with plastic wrap, in the refrigerator for up to 3 to 4 days. Due to its creamy nature, it’s best enjoyed chilled. While freezing cheesecake is possible, it can sometimes alter the texture, making it a bit more crumbly upon thawing. If you do choose to freeze it, ensure it is well-wrapped to prevent freezer burn and thaw it slowly in the refrigerator overnight.
Nutritional Information
| Nutrient | Amount per Serving | % Daily Value |
|---|---|---|
| Calories | 864.6 kcal | 43% |
| Total Fat | 54.2 g | 83% |
| Saturated Fat | 30.3 g | 151% |
| Cholesterol | 243.9 mg | 81% |
| Sodium | 544.2 mg | 22% |
| Total Carbohydrate | 87.4 g | 29% |
| Dietary Fiber | 1.1 g | 4% |
| Sugars | 77.7 g | 310% |
| Protein | 11 g | 22% |
| Calories from Fat | 488 g | 56% |
Note: Nutritional values are estimates and can vary based on specific ingredients and brands used.
Variations & Substitutions
While this recipe is a classic for a reason, here are a few ways to put your own spin on it:
- Crust Options: If graham crackers aren’t your favorite, consider a chocolate cookie crust. Simply substitute chocolate sandwich cookies (like Oreos, processed without the filling) for the graham crackers. A vanilla wafer crust also works beautifully.
- Flavor Boosts: For an added layer of flavor, a touch of espresso powder in the filling can deepen the chocolate notes. For a hint of spice, a pinch of cinnamon can be added to the crust.
- Decadent Topping: Beyond the cream cheese frosting, consider a rich ganache or a dollop of freshly whipped cream for serving.
FAQs
Q: Why is my red velvet cheesecake cracked?
A: Cracks often occur due to overmixing, baking at too high a temperature, or rapid cooling. Following the gentle cooling steps in the oven and on the counter can significantly reduce the chance of cracking.
Q: Can I make this cheesecake ahead of time?
A: Absolutely! In fact, it’s highly recommended. The cheesecake needs to chill for at least 8 hours, so making it the day before is ideal. The frosting can also be made ahead and stored in the refrigerator.
Q: What is the purpose of the distilled white vinegar in the filling?
A: The vinegar acts as a tenderizer and helps to enhance the red color. It doesn’t impart a noticeable vinegary taste when baked.
Q: How do I know when the cheesecake is fully baked?
A: The edges of the cheesecake should be set, but the center should still have a slight jiggle. It will continue to set as it cools.
Q: Can I use a different type of food coloring?
A: While liquid food coloring works, gel food coloring is more concentrated and will provide a more vibrant red without thinning the batter. You may need less gel coloring to achieve the desired shade.
A Slice of Southern Charm
There’s a reason red velvet has captured hearts for generations. This Red Velvet Cheesecake is more than just a dessert; it’s a celebration of texture, flavor, and that inimitable Southern hospitality. It’s the perfect centerpiece for holidays, birthdays, or simply a moment when you crave something truly special. Gather your ingredients, embrace the process, and prepare to fall in love with every glorious, velvety bite. Your guests, and your taste buds, will thank you.