
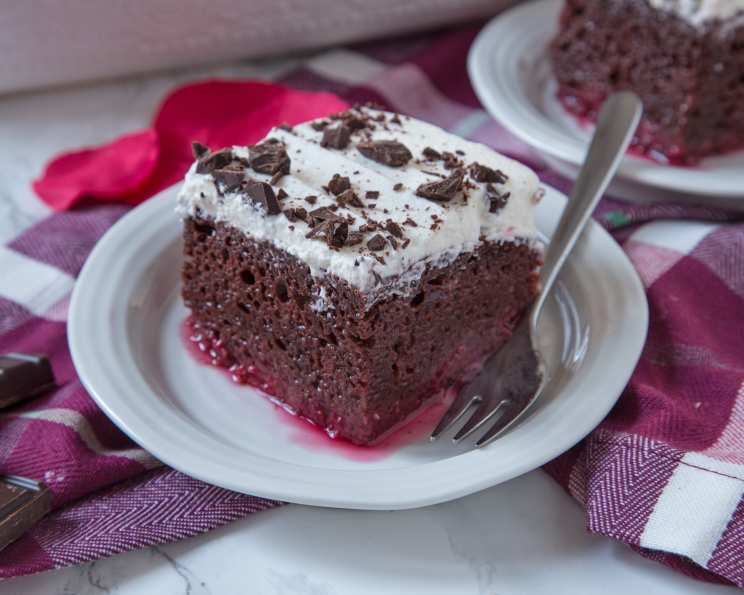
The Enchanting Red Velvet Pudding Cake: A Symphony of Chocolate and Raspberry
There are some recipes that just feel like a warm hug on a cool evening. This Red Velvet Pudding Cake is one of them. I remember the first time I encountered this dessert; it was at a friend’s Pampered Chef demonstration party, a vibrant gathering filled with the aroma of chocolate and anticipation. She described it as a chocolate cake with a “raspberry pudding,” and frankly, my mind conjured images of something rich and decadent, almost like eating a giant chocolate truffle. When I finally tasted it, I was struck by the unique textural interplay – the moist, tender cake giving way to that luscious, slightly tart raspberry layer, all crowned with a delicate dusting of powdered sugar. It’s a dessert that’s both comforting and sophisticated, a true showstopper that never fails to impress.
Recipe Overview
- Prep Time: 20 minutes
- Cook Time: 40-45 minutes
- Total Time: About 1 hour to 1 hour 5 minutes
- Servings: 16
- Yield: 1 Rectangular Baking Pan (approximately 9×13 inches)
- Dietary Type: Can be adapted (refer to Variations section)
Ingredients
This recipe is wonderfully straightforward, relying on pantry staples and a few key flavor components to create its magic.
- 1 (12 ounce) package whole frozen raspberries (ensure they are not packed in syrup)
- 1 (18 ounce) package devil’s food cake mix
- 3 eggs (or as many as called for by your cake mix instructions)
- 1⁄3 cup oil (or as much as called for by your cake mix instructions)
- 1 1⁄3 cups water (or as much as called for by your cake mix instructions)
- 2 cups water
- 1 (6 ounce) package raspberry gelatin powder
- 1 tablespoon cornstarch
- 2 ounces semisweet chocolate, finely chopped
- Powdered sugar, for dusting
- 1 (16 ounce) container frozen whipped topping (optional, for serving)
Equipment Needed
- A rectangular baking pan (approximately 9×13 inches)
- A non-stick cooking spray
- A mixing bowl
- A whisk or electric mixer (for preparing cake batter)
- A saucepan
- A measuring cup
- A tablespoon
- A knife and cutting board (for chopping chocolate)
- A toothpick or skewer (for testing doneness)
- A sieve or fine-mesh strainer (optional, for dusting powdered sugar)
- A cooling rack
Instructions
The beauty of this Red Velvet Pudding Cake lies in its layered construction, achieved through a series of simple yet effective steps.
- Preheat your oven to 375 degrees Fahrenheit (190 degrees Celsius). This consistent temperature is crucial for even baking.
- Prepare your baking pan. Lightly spray a rectangular baking pan (approximately 9×13 inches) with non-stick cooking spray. This will ensure your cake releases cleanly.
- Layer the raspberries. Evenly spread the whole frozen raspberries over the bottom of the prepared baking pan. These will create the luscious raspberry layer as the cake bakes.
- Prepare the cake batter. Following the directions on your devil’s food cake mix package, prepare the cake batter. This typically involves combining the cake mix with eggs, oil, and water as specified on the box. Once the batter is smooth, pour it evenly over the layer of raspberries in the baking pan.
- Create the pudding mixture. In a saucepan, heat the 2 cups of water until it reaches a boiling point. While the water is heating, in a separate mixing bowl, whisk together the raspberry gelatin powder and cornstarch.
- Combine and pour. Once the water is boiling, carefully pour the hot water into the gelatin and cornstarch mixture. Whisk vigorously until everything is well combined and smooth.
- Pour the gelatin mixture over the cake batter. Gently and evenly pour this vibrant raspberry gelatin mixture over the cake batter. You’ll notice it will create a distinct layer.
- Bake the cake. Bake in the preheated oven for 40-45 minutes, or until a toothpick or skewer inserted into the center of the cake comes out clean. This indicates that the cake has fully cooked through.
- Add the chocolate. Once the cake is baked, remove it from the oven. While the cake is still warm, chop the semisweet chocolate into small pieces. Sprinkle these chocolate pieces evenly over the surface of the hot cake. The residual heat will begin to melt the chocolate, creating a glossy, decadent topping.
- Dust with powdered sugar. Once the cake has cooled slightly, dust the top generously with powdered sugar. You can use a sieve or a fine-mesh strainer for an even, professional-looking finish.
- Serve. This cake is delicious served warm, but it also sets up beautifully as it cools.
Expert Tips & Tricks
- Raspberry Selection: Using frozen raspberries is key here. They release their juices as they bake, creating a delightful sauce. If you use fresh raspberries, the texture might be slightly different, and you might need to adjust baking time.
- Uniformity is Key: When preparing the cake batter, ensure you follow the package directions precisely. Over-mixing can lead to a tough cake, while under-mixing can result in an uneven bake.
- Gentle Pouring: When pouring the gelatin mixture over the cake batter, do so slowly and evenly. This helps to maintain the distinct layers.
- Chocolate Meltdown: Don’t be tempted to stir the chocolate into the cake. Allowing it to melt naturally on top creates a beautiful, glossy finish.
- Dusting for Drama: A light and even dusting of powdered sugar truly elevates the presentation. Don’t skip this final flourish!
Serving & Storage Suggestions
This Red Velvet Pudding Cake is a dream to serve. It’s wonderfully versatile.
- Warm: For an immediate treat, serve warm directly from the pan. The melted chocolate will be gooey, and the cake will be incredibly moist.
- Chilled: As the cake cools, the raspberry layer will set into a delightful pudding-like consistency. Serve chilled for a firmer texture.
- With Whipped Topping: For an extra touch of indulgence, serve with a generous dollop of frozen whipped topping. This adds a creamy counterpoint to the rich chocolate and tart raspberry.
- Storage: Store any leftovers in an airtight container at room temperature for up to 2 days, or in the refrigerator for up to 5 days. The texture might change slightly in the refrigerator, becoming firmer. If refrigerated, let it come to room temperature for about 30 minutes before serving for the best texture. This cake does not freeze particularly well due to the pudding layer, but if you must, wrap it tightly in plastic wrap and then foil, and consume within 1 month.
Nutritional Information
Here’s an approximate breakdown of the nutritional content per serving. Please note that these are estimates and can vary based on specific ingredient brands and preparation.
| Nutrient | Amount per Serving | % Daily Value |
|---|---|---|
| Calories | 272.7 kcal | |
| Calories from Fat | ||
| Total Fat | 12.3 g | 18% |
| Saturated Fat | 3.1 g | 15% |
| Cholesterol | 34.9 mg | 11% |
| Sodium | 329 mg | 13% |
| Total Carbohydrate | 40.1 g | 13% |
| Dietary Fiber | 2.3 g | 9% |
| Sugars | 26.1 g | 104% |
| Protein | 4.5 g | 9% |
Variations & Substitutions
While this recipe is fantastic as is, here are a few ideas to tailor it to your preferences:
- Berry Bliss: Experiment with other frozen berries like blackberries or mixed berries instead of raspberries. The tartness of the berries will create a similar delightful contrast.
- Chocolate Chip Swirl: For an extra chocolatey kick, consider folding mini chocolate chips into the cake batter before pouring it over the raspberries.
- White Chocolate Drizzle: Instead of dusting with powdered sugar, melt some white chocolate and drizzle it artfully over the top for a different visual and flavor profile.
- Gluten-Free Option: To make this gluten-free, you would need to use a gluten-free devil’s food cake mix. Be sure to check the package instructions for any adjustments to liquid or oil amounts.
- Dairy-Free Option: If you need a dairy-free version, opt for a dairy-free devil’s food cake mix, and ensure the oil and eggs (if applicable to the mix) are dairy-free. For serving, use a dairy-free whipped topping.
FAQs
Q: Can I use fresh raspberries instead of frozen?
A: Yes, you can use fresh raspberries, but they may not release as much juice during baking, potentially leading to a slightly different texture in the pudding layer.
Q: My cake seems a little wet in the center. What did I do wrong?
A: This can happen if the cake isn’t baked long enough. Always test with a toothpick and ensure it comes out clean. The pudding layer can also hold some moisture.
Q: How do I prevent the gelatin from clumping when mixing?
A: Ensure the water is truly boiling when you add it to the gelatin and cornstarch mixture. Whisking vigorously immediately will help prevent clumping.
Q: Can I make this in a different pan size?
A: You can, but it will affect baking time. A smaller pan will require a longer baking time, and a larger pan will require a shorter one. Monitor closely for doneness.
Q: Is the chocolate layer essential?
A: The chopped chocolate is a wonderful addition that melts into the warm cake, adding another layer of flavor and texture. While not strictly essential, it significantly enhances the overall experience.
Final Thoughts
This Red Velvet Pudding Cake is more than just a dessert; it’s an experience. It’s a testament to how simple ingredients, combined with thoughtful preparation, can yield something truly spectacular. Whether you’re bringing it to a potluck, a special occasion, or simply craving a delightful treat, this cake is sure to be a hit. Pour yourself a glass of cold milk or a steaming cup of coffee, slice into this luscious creation, and let the symphony of chocolate and raspberry transport you. I’d love to hear about your own Red Velvet Pudding Cake adventures!