
The Crimson Delight: Mastering the Art of Red Velvet Waffles
There are moments in a chef’s life that etch themselves into memory, moments where a simple dish transcends its components to become something truly magical. I recall a time, years ago, when I was captivated by a television segment featuring the legendary Wolfgang Puck. He was creating red velvet waffles, and the visual alone – the deep, rich crimson hue, the promise of a tender crumb – sent a spark of culinary curiosity through me. It was an immediate siren call; I knew I had to recreate them. Finding the recipe felt like a culinary treasure hunt, and when I finally held it, I knew I was about to unlock a new favorite, especially with the delightful pairing of tart cherry pie filling and ethereal cool whip.
Recipe Overview
- Prep Time: 15 minutes
- Cook Time: 40 minutes
- Total Time: 55 minutes
- Servings: 4
- Yield: Approximately 4-6 waffles, depending on waffle iron size
- Dietary Type: Not specified (standard waffle ingredients)
Ingredients
Gather your ingredients for these exquisite Red Velvet Waffles. The secret to their signature color and flavor lies in the thoughtful combination of a few key components.
- 2 cups all-purpose flour
- 1 ¼ cups granulated sugar
- ¼ teaspoon salt
- 1 teaspoon baking soda
- 4 teaspoons unsweetened cocoa powder
- ¼ cup butter, melted and cooled
- 2 cups buttermilk
- 2 large eggs, separated
- 1 teaspoon vanilla extract
- 2 tablespoons red food coloring (gel or liquid)
Equipment Needed
A few trusty tools will make preparing these Red Velvet Waffles a breeze:
- Waffle iron
- Non-stick cooking spray
- Two mixing bowls
- A whisk
- A spatula or rubber scraper
- A measuring cup and measuring spoons
- An electric mixer (handheld or stand mixer) for whipping egg whites
Instructions
Embarking on the creation of these Red Velvet Waffles is a rewarding journey, promising a visually stunning and palate-pleasing result. Follow these steps carefully to achieve waffle perfection.
- Preheat your waffle iron. Ensure it is set to the appropriate temperature for your model.
- Lightly spray the waffle iron with non-stick cooking spray. This is crucial to prevent sticking and ensure your beautiful waffles release cleanly.
- Separate the eggs. Carefully divide the egg yolks from the egg whites into two separate, clean mixing bowls.
- Beat the egg whites until stiff peaks form. Using an electric mixer, whip the egg whites until they are light, airy, and hold their shape when the beaters are lifted. This will lend a wonderful lightness to your waffles.
- Combine the dry ingredients. In a large mixing bowl, whisk together the flour, sugar, salt, baking soda, and unsweetened cocoa powder. Ensure there are no lumps.
- Incorporate the wet ingredients (part 1). To the bowl with the dry ingredients, add the melted and cooled butter, buttermilk, egg yolks, vanilla extract, and red food coloring.
- Mix all ingredients together. Stir the wet and dry ingredients until just combined. Be careful not to overmix; a few small lumps are perfectly fine and will contribute to a tender waffle. The batter should now possess a vibrant red hue.
- Gently fold in the egg whites. Carefully add the whipped egg whites to the batter. Using a spatula, fold them in with a light, sweeping motion. The goal is to incorporate the air from the egg whites without deflating them, which will give your waffles their characteristic fluffy texture.
- Pour into the waffle iron and cook until done. Ladle the batter onto the preheated waffle iron, filling it to your desired level according to the manufacturer’s instructions. Close the lid and cook until the waffles are golden brown and cooked through. Cooking times will vary depending on your waffle iron, but typically range from 3 to 5 minutes per waffle.
Expert Tips & Tricks
To elevate your Red Velvet Waffle game, consider these professional insights:
- Don’t Overmix: The cardinal rule of waffle making, and indeed many baked goods, is to mix the batter until just combined. Overmixing develops the gluten in the flour too much, leading to tough, dense waffles. A few small lumps are your friends here!
- Room Temperature Buttermilk: While the recipe calls for melted butter, having your buttermilk at room temperature can help it emulsify more easily into the batter, creating a smoother, more homogenous mixture.
- Gel vs. Liquid Food Coloring: For a more intense and consistent red color, I often recommend gel food coloring. It’s more concentrated than liquid versions, meaning you might need less to achieve the desired hue, and it adds less liquid to your batter. Start with the specified amount and add a tiny bit more if you desire a deeper shade.
- Waffle Iron Maintenance: Always ensure your waffle iron is clean before use. Any residual batter from previous uses can burn and affect the taste and appearance of your new waffles. A good non-stick spray is your best friend for a perfect release.
- Don’t Crowd the Waffle Iron: Resist the temptation to overfill your waffle iron. Too much batter will ooze out, creating a mess and potentially leading to uneven cooking.
Serving & Storage Suggestions
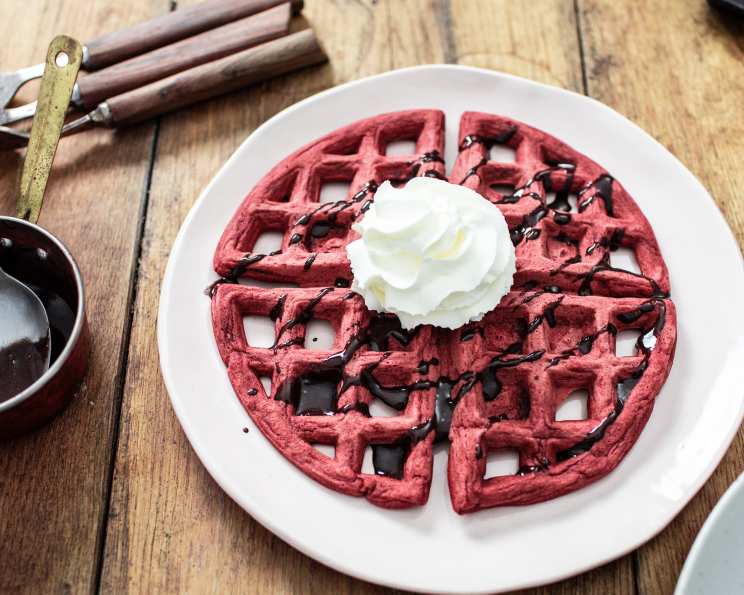
These Red Velvet Waffles are a showstopper on their own, but they truly shine when adorned with complementary toppings.
Serving:
The classic pairing with Red Velvet Waffles, as inspired by the original anecdote, is cherry pie filling and cool whip. The sweet-tartness of the cherries cuts beautifully through the richness of the waffle, while the cool whip adds a creamy, airy contrast. Other excellent accompaniments include:
- A dusting of powdered sugar
- Fresh berries (strawberries, raspberries)
- A drizzle of maple syrup
- Whipped cream
- A dollop of cream cheese frosting (a nod to red velvet cake!)
Storage:
- Leftovers: Once cooled completely, store any leftover Red Velvet Waffles in an airtight container at room temperature for up to 2 days. For longer storage, place them in a single layer on a baking sheet, freeze until solid, then transfer to a freezer-safe bag or container. They will keep in the freezer for up to 1-2 months.
- Reheating: To reheat, toast them lightly in a toaster or toaster oven until warm and crisp. You can also gently warm them in a preheated oven at 300°F (150°C) for a few minutes.
Nutritional Information
This information is an estimate and can vary based on specific ingredients and portion sizes.
| Nutrient | Amount per Serving (approx. 1 waffle) | % Daily Value (approx.) |
|---|---|---|
| Calories | 663 kcal | 33% |
| Calories from Fat | 142 kcal | – |
| Total Fat | 15.8 g | 24% |
| Saturated Fat | 9 g | 44% |
| Cholesterol | 128.4 mg | 42% |
| Sodium | 727.8 mg | 30% |
| Total Carbohydrate | 117.4 g | 39% |
| Dietary Fiber | 2.3 g | 9% |
| Sugars | 68.7 g | 274% |
| Protein | 14.1 g | 28% |
Note: The high sugar content is largely due to the significant amount of sugar in the batter, a characteristic of this particular recipe.
Variations & Substitutions
While these Red Velvet Waffles are delightful as is, feel free to experiment with these variations:
- Gluten-Free: Substitute a high-quality gluten-free all-purpose flour blend for the all-purpose flour. You may need to adjust the liquid slightly, so start with the full amount and add more if the batter seems too thick.
- Dairy-Free: Replace the buttermilk with a dairy-free alternative like unsweetened almond milk or soy milk with a tablespoon of lemon juice or vinegar added and let sit for 5 minutes to curdle. Use a dairy-free butter substitute for the melted butter.
- Spiced Red Velvet: Add a pinch of cinnamon or nutmeg to the dry ingredients for a subtle warmth that complements the cocoa.
- Chocolate Chip Red Velvet: Fold in a handful of mini chocolate chips into the batter just before cooking.
FAQs
Q: Why are my waffles not red enough?
A: The intensity of the red color depends on the food coloring used. Gel food coloring typically provides a more vibrant hue than liquid. Ensure you are using the recommended amount and consider using a gel variety for a deeper color.
Q: My waffles are sticking to the iron. What should I do?
A: This is usually due to insufficient non-stick spray or an old, worn-out waffle iron. Ensure you are liberally spraying with non-stick cooking spray each time you add batter. If the problem persists, it might be time to invest in a new waffle iron.
Q: Can I make the batter ahead of time?
A: It’s best to make the batter just before cooking for optimal results. While the dry ingredients can be pre-mixed, adding the wet ingredients and folding in the egg whites is best done immediately before using.
Q: What is the role of separating the eggs?
A: Separating the eggs allows you to whip the egg whites to stiff peaks. These airy whites are then gently folded into the batter, introducing air that contributes to a lighter, fluffier waffle texture.
Q: How do I ensure my waffles are cooked through but not burnt?
A: Pay attention to your waffle iron’s indicator lights or steam production. As the waffle cooks, the amount of steam will decrease. When the steam has largely stopped and the indicator light signals “done,” your waffle is likely ready. Adjust cooking time based on your specific waffle iron’s performance.
Final Thoughts
These Red Velvet Waffles are more than just a breakfast item; they are an experience. The striking color, the tender crumb, and the subtle hint of cocoa make them a truly special treat. Whether you’re seeking to impress guests, indulge in a luxurious weekend brunch, or simply bring a little joy to your morning, this recipe delivers. Give them a try, embrace the vibrant crimson hue, and savor every delightful bite. Don’t forget to share your creations and your favorite topping combinations – I always love hearing how these recipes come to life in your kitchens!