
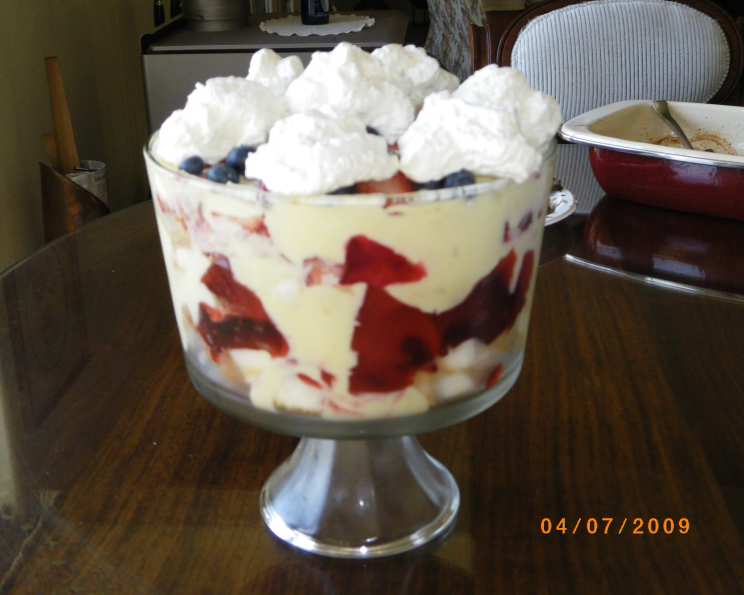
A Symphony of Flavors and Colors: My Red, White, and Blue Trifle
There’s a certain magic that happens when simple ingredients come together to create something truly spectacular. For me, the Red, White, and Blue Trifle is one of those dishes. I first stumbled upon a version of this recipe online years ago, while frantically searching for a show-stopping dessert to anchor a Fourth of July barbecue. The idea of a layered dessert, bursting with vibrant colors and fresh fruit, immediately captivated me. It wasn’t just about assembling ingredients; it was about building an experience, a delicious edible flag that would evoke summer picnics, backyard fireworks, and the sweet, carefree days of July. That first attempt, filled with a joyful anticipation and a slight sprinkle of nerves (would the layers hold? would it set properly?), was a resounding success, and it’s become a cherished part of my summer entertaining repertoire ever since. The beauty of this trifle lies in its simplicity, its adaptability, and the sheer joy it brings to the table.
Recipe Overview
This delightful trifle is as straightforward as it is stunning, a testament to how uncomplicated ingredients can create something truly memorable.
- Prep Time: 15 minutes
- Cook Time: 0 minutes (primarily chilling time)
- Total Time: 2 hours 20 minutes (including chilling)
- Servings: 12
- Yield: 1 Trifle
- Dietary Type: Dessert
Ingredients
The beauty of this Red, White, and Blue Trifle lies in its accessible ingredients, each playing a vital role in the final, harmonious creation.
- 1 1/2 cups cold milk: This forms the base for our creamy pudding layer, providing a smooth canvas for the flavors.
- 1 (4-ounce) package cheesecake flavor instant pudding and pie filling mix: The secret to effortless flavor and perfect texture, this mix transforms the milk into a luscious, tangy cream.
- 1 (8-ounce) container frozen whipped topping, thawed: This adds a cloud-like lightness and subtle sweetness, ensuring our trifle is wonderfully airy.
- 16 ounces frozen pound cake, thawed, cut into 1/2-inch cubes: The sturdy, slightly sweet foundation of our trifle, providing a satisfying chew and a delightful textural contrast.
- 2 cups sliced strawberries: These vibrant red jewels bring a burst of fresh, tart sweetness.
- 1 cup blueberries: The deep, rich blue of these berries adds a pop of color and a delicate sweetness.
- 1 cup sliced banana: Adding a creamy, mellow sweetness and a soft texture that complements the other fruits beautifully.
Equipment Needed
While this recipe doesn’t require any complex culinary tools, a few key items will make the assembly process smooth sailing.
- A large mixing bowl for preparing the pudding.
- A wire whisk for thoroughly combining the pudding mix and milk.
- A large, clear glass serving bowl or trifle dish: This is crucial for showcasing the beautiful layers of your creation.
- A spatula or large spoon for gently layering the ingredients.
Instructions
Crafting this Red, White, and Blue Trifle is a delightful exercise in layering, where each step builds towards a visually stunning and deliciously layered dessert.
- Prepare the Pudding Mixture: In a large mixing bowl, combine the 1 1/2 cups cold milk with the 1 (4-ounce) package cheesecake flavor instant pudding and pie filling mix. Beat with a wire whisk for 1-2 minutes, or until the mixture is well blended and begins to thicken. It’s important to whisk thoroughly to ensure there are no lumps and the pudding achieves a smooth consistency.
- Incorporate the Whipped Topping: Gently stir the thawed whipped topping into the thickened milk and pudding mixture. Use a spatula or large spoon for this step, folding the whipped topping in with a light hand. The goal is to combine it thoroughly without deflating the airy texture of the whipped topping. This creates a luxuriously creamy and light pudding layer.
- Begin Layering the Trifle: Select your large glass bowl or trifle dish. Begin by placing 1/2 of the pound cake cubes in the bottom of the bowl.
- Add the Fruit Layer: Next, evenly scatter 1/2 of the sliced strawberries and 1/2 of the blueberries over the pound cake. Ensure the fruit is distributed somewhat evenly to bring color and flavor to this first layer.
- Introduce the Pudding: Spoon 1/2 of the pudding mixture over the fruit and cake layer. Gently spread it with your spatula to create an even layer.
- Repeat the Layers: Now, repeat the process. Add the remaining 1/2 of the pound cake cubes on top of the pudding.
- Continue with Fruit: Scatter the remaining 1/2 of the sliced strawberries and 1/2 of the blueberries over the second pound cake layer.
- Add the Final Pudding Layer: Finally, spoon the remaining 1/2 of the pudding mixture over the fruit. Gently spread it to cover all the ingredients and create a smooth, inviting top layer.
- Chill to Perfection: Cover the trifle dish tightly with plastic wrap. Chill at least 2 hours in the refrigerator. This crucial chilling time allows the flavors to meld together beautifully and the pudding to set properly, ensuring the layers hold their structure.
Expert Tips & Tricks
To elevate your Red, White, and Blue Trifle from delicious to truly unforgettable, consider these chef-inspired insights:
- Thawing the Pound Cake: Ensure your pound cake is fully thawed but not overly soggy. A slightly firmer pound cake will hold its shape better within the trifle. You can thaw it at room temperature for a few hours or overnight in the refrigerator.
- Fruit Freshness: While frozen fruits can be used, for the most vibrant colors and freshest taste, I always opt for fresh strawberries and blueberries when in season. If using frozen, make sure to drain any excess liquid after thawing.
- Banana Browning: To prevent the banana slices from browning, toss them with a tiny squeeze of lemon or lime juice immediately after slicing, right before adding them to the trifle. This small step makes a big visual difference.
- Layering Technique: When spooning the pudding mixture, try to do so in dollops rather than pouring. This makes it easier to distribute evenly without disturbing the layers beneath.
- Make-Ahead Magic: This trifle is a wonderful make-ahead dessert. You can assemble it up to 24 hours in advance. The chilling time actually helps the flavors meld even further. However, for the freshest banana flavor, it’s best to add the banana slices just a few hours before serving if possible, or ensure they are treated with citrus juice.
Serving & Storage Suggestions
Presenting this Red, White, and Blue Trifle is as simple as bringing it directly to your table. Its inherent beauty lies in its layered composition. Serve chilled, allowing guests to scoop through the delightful strata of cake, pudding, and fruit. The clear glass dish truly showcases the patriotic colors, making it a natural centerpiece.
Leftovers can be stored, covered tightly with plastic wrap, in the refrigerator for up to 2 days. Be aware that the pound cake may soften slightly over time as it absorbs moisture from the pudding. For the best texture, it’s ideal to consume it within the first day. This trifle is not recommended for freezing, as the texture of the whipped topping and pound cake can be negatively affected by the freezing and thawing process.
Nutritional Information
Here’s an estimated breakdown of the nutritional content per serving of this delightful trifle.
| Nutrient | Amount per Serving | % Daily Value |
|---|---|---|
| Calories | 254 | 13% |
| Total Fat | 12.9 g | 17% |
| Saturated Fat | 6.6 g | 33% |
| Cholesterol | 26.4 mg | 9% |
| Sodium | 172.6 mg | 7% |
| Total Carbohydrate | 32.3 g | 12% |
| Dietary Fiber | 1.5 g | 5% |
| Sugars | 8.2 g | 16% |
| Protein | 3.6 g | 7% |
(Note: Nutritional values are approximate and can vary based on specific ingredient brands and exact measurements used.)
Variations & Substitutions
While this recipe is a classic for a reason, it’s wonderfully adaptable for different tastes and dietary needs.
- Berry Bounty: Feel free to swap out or add other berries like raspberries for an extra pop of red. Blackberries can also be a lovely addition.
- Cake Alternatives: Instead of pound cake, consider using cubes of angel food cake for a lighter texture or even vanilla or yellow cake. Ensure they are slightly stale or lightly toasted to prevent them from becoming too mushy.
- Pudding Flavors: While cheesecake flavor is delightful, you could experiment with white chocolate, vanilla, or even a pistachio instant pudding mix for a different twist.
- Dairy-Free/Vegan Options: For a dairy-free or vegan version, use a plant-based milk (like almond or soy milk) and a dairy-free instant pudding mix. Substitute the frozen whipped topping with a vegan whipped topping alternative and use a dairy-free pound cake or a vegan cake.
FAQs
Q: Why is chilling the trifle so important?
A: Chilling allows the pudding to set properly, ensuring the layers maintain their structure, and it also gives the flavors time to meld together, creating a more harmonious taste.
Q: Can I use fresh pudding instead of instant?
A: While possible, using instant pudding significantly simplifies the process and guarantees a consistent creamy texture without the need for cooking and cooling.
Q: My pound cake seems a bit dry. Will it still work?
A: A slightly drier pound cake is actually beneficial as it will absorb moisture from the pudding without becoming overly soggy.
Q: How far in advance can I prepare this trifle?
A: You can prepare this trifle up to 24 hours in advance, though adding the bananas closer to serving time is recommended for optimal texture and color.
Q: Can I make this trifle in individual servings?
A: Absolutely! Layering the ingredients in small glasses or ramekins creates charming individual trifles that are perfect for parties.
A Sweet Conclusion
The Red, White, and Blue Trifle is more than just a dessert; it’s an edible celebration. It’s a dish that embodies the spirit of summer gatherings – vibrant, joyful, and meant to be shared. Whether you’re assembling it for a backyard barbecue, a picnic, or simply a special occasion, its effortless beauty and delightful taste are sure to impress. So gather your ingredients, embrace the layering process, and enjoy the sweet satisfaction of creating something truly spectacular. I encourage you to whip up this patriotic delight and share your own beautiful creations with friends and family. Happy baking, and happy celebrating!