
Rendering Beef Fat: The Secret to Superior Homemade Suet Cakes and Cones for Our Feathered Friends
My earliest memories of winter involve the comforting sight of my grandmother’s bird feeders, perpetually laden with homemade suet cakes. There was a particular joy in watching the cardinals and chickadees, their bright plumage a vibrant contrast against the stark winter landscape, flock to her offerings. She’d often speak of the importance of suet for the birds’ survival, a concentrated source of energy they desperately needed to navigate the cold. While I enjoyed the convenience of store-bought suet cakes, the thought of crafting my own, using the very best ingredients, always held a special appeal. The key, she’d reveal with a twinkle in her eye, lay in rendering beef fat from scratch – a process that not only purifies the fat but also imbues it with a superior texture, making it a more stable and desirable food for our avian visitors.
Recipe Overview
- Prep Time: 30 minutes
- Cook Time: 8-10 minutes (per batch of rendered fat)
- Total Time: Approximately 1 hour (for rendering and preparing cakes/cones)
- Yields: Approximately 12 cups of rendered fat (yielding about 14 cakes and 12 cones, depending on mold size and seed inclusion)
- Dietary Type: Not applicable for consumption by humans.
Ingredients
The foundation of truly exceptional homemade suet cakes and cones begins with the purest form of rendered beef fat. This fat, specifically the suet found around the kidneys of beef, is distinct from the trimmed bits of fat found on cuts of meat. It has a higher melting point and a cleaner flavor profile, making it ideal for our purpose.
For Rendering Beef Fat:
- 2 lbs beef suet, raw
For Peanut Butter Suet Cakes:
- 2 cups rendered beef fat, from the above process
- ½ cup peanut butter, crunchy
- ½ cup unsalted peanuts, chopped
- 2 cups mixed bird seed
For Fruit and Nut Suet Cakes:
- 2 ½ cups rendered beef fat, from the above process
- ½ cup unsalted peanuts, chopped
- ½ cup unsweetened dried cranberries, chopped
- ½ cup dried apple, chopped
- 2 ½ cups mixed bird seed
Equipment Needed
- Large knife
- Cutting board
- Heatproof containers (glass or ceramic bowls, glass measuring cups)
- Microwave
- Fine-mesh sieve or cheesecloth (optional, for straining)
- Small bowls or containers for molds (e.g., 250ml dairy containers, like those from sour cream or cottage cheese)
- Thin wire or sturdy string (for cone hangers)
- Pine cones (cleaned and dried)
- Spatula or spoon for mixing
Instructions
The process of rendering beef fat is straightforward and remarkably rewarding. It requires patience, but the result is a high-quality base for your suet creations that will be far superior to commercial alternatives.
-
Prepare the Suet: Begin by freezing the raw beef suet. This is a crucial step, as raw suet cuts much easier when frozen. Once frozen solid, use a large knife to cut the frozen suet into manageable chunks, roughly 1-inch pieces.
-
Render the Fat (Batch by Batch): Place approximately 2 cups of these suet chunks into a heatproof container. It’s important to use a container that can withstand microwave heat, such as a glass or ceramic bowl. Cover the container with a lid or dinner plate. Microwave on HIGH for 5 to 8 minutes. Keep a close eye on it during this stage to prevent scorching.
-
Strain the Rendered Fat: Carefully remove the hot container from the microwave. You will see that the suet has melted into a liquid fat. Pour or strain the liquid fat into another heatproof container. Glass measuring cups are excellent for this purpose as they allow you to easily measure the rendered fat later. You can use a fine-mesh sieve if you wish to remove any small solids, or line the sieve with cheesecloth for extra purity.
-
Repeat Until All Suet is Processed: Continue this rendering process with the remaining suet chunks, working in batches of approximately 2 cups at a time. This ensures the fat renders efficiently and prevents overheating.
-
Discard Solids: Once all the suet has been rendered, you will be left with solid pieces of meat and connective tissue in your sieve or container. Discard what is left of the ‘chunks’. You should now have several containers filled with beautiful, clear rendered beef fat. The yield from 2 lbs of raw suet is approximately 12 cups of rendered fat.
-
Cool and Store (Optional): At this point, you can either proceed immediately with making your suet cakes and cones, or you can allow the rendered fat to cool slightly and then refrigerate it for another time. Properly stored, it will keep well.
-
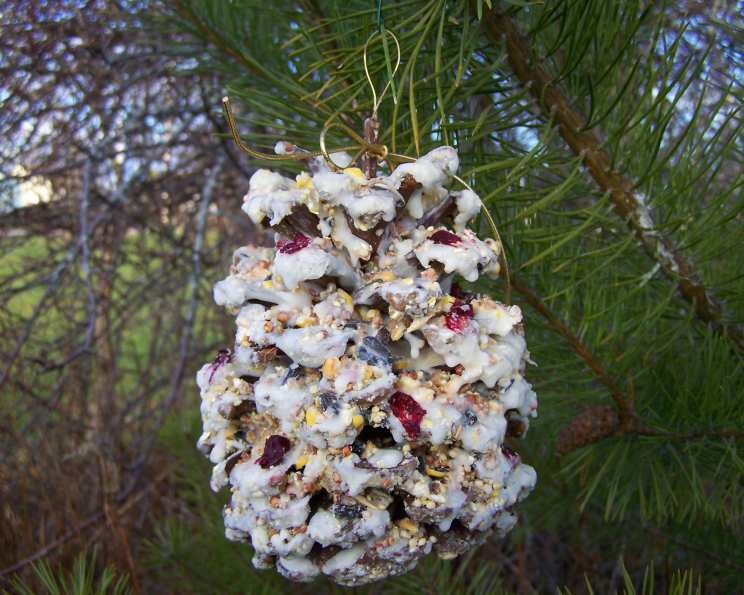
Prepare for Cones: If you are making suet cones, you’ll need to prepare them for hanging. Use lengths of thin wire or sturdy string to make a hanger. Starting at the base of the pine cone, weave the wire around the cone towards the top. Leave enough wire to form a loop at the top for hanging, then weave back down to the base, tying securely to fasten.
-
Melt the Rendered Fat for Mixtures: For each batch of suet cakes or cones, you will need to melt the specified amount of rendered fat in the microwave. Refer to the ingredient lists for the exact quantities needed for the Peanut Butter or Fruit and Nut suet mixtures.
-
Combine Ingredients: As the fat begins to cool, it will start to become cloudy and thicken. This is the perfect stage to add the remaining ingredients for your chosen suet mixture (peanut butter, nuts, dried fruit, and bird seed). Stir thoroughly to ensure all the dry ingredients are well incorporated into the thickening fat.
-
Mold the Suet Creations: Working quickly while the mixture is still pliable, press the suet mixture into your prepared molds. For cakes, use your recycled dairy containers (which are conveniently about 4-½ inches in diameter, similar to purchased suet cakes). For cones, firmly pack the mixture onto and into the surfaces of the pine cones, ensuring good coverage.
-
Harden in the Freezer: Once your suet cakes and cones are molded, place them in the freezer for 30 minutes. This will allow them to harden completely.
-
Wrap and Store: When the suet cakes and cones have hardened, unmold them from their containers. Wrap each cake and cone individually in waxed paper. These can now be stored indefinitely in the freezer, ready to be hung out for your feathered visitors whenever the need arises.
Expert Tips & Tricks
The beauty of rendering your own beef fat lies in the control it gives you over the quality. Unlike some commercial products that might include fillers or less desirable fats, you are starting with a pure, high-quality ingredient. This purity is what allows the rendered fat to harden beautifully, making your suet cakes and cones more resilient to warmer weather. When adding the dry ingredients, don’t overmix once the fat starts to significantly solidify, as this can create a less uniform texture. Aim for a thick, paste-like consistency before molding. For the cones, really push the mixture into the nooks and crannies of the pine cone scales to ensure the birds have plenty of access to the nutritious blend.
Serving & Storage Suggestions
These homemade suet cakes and cones are designed for outdoor enjoyment, specifically for feeding wild birds. Once hardened and wrapped, they can be hung from tree branches, shepherd’s hooks, or placed in suet feeders. They are best enjoyed fresh from the freezer, especially in milder weather, to maintain their firmness. Because they are stored frozen, they will last indefinitely until placed outdoors. Once outside, their longevity will depend on the ambient temperature and the activity of the birds. In very hot weather, even rendered beef fat can soften, so it’s advisable to hang them in a shaded location if possible.
Nutritional Information
It’s important to note that the nutritional information below is an estimation for a substantial portion of the rendered fat and seed mixture, intended as a general guideline for the energy content provided to birds.
| Nutrient | Amount per Estimated Portion (approx. 1 cake/cone) | % Daily Value (for birds – theoretical) |
|---|---|---|
| Calories | 500-700 kcal | N/A |
| Total Fat | 50-70 g | N/A |
| Saturated Fat | 20-30 g | N/A |
| Cholesterol | 100-150 mg | N/A |
| Sodium | 5-15 mg | N/A |
| Total Carbohydrate | 10-20 g | N/A |
| Dietary Fiber | 2-5 g | N/A |
| Sugars | 5-10 g | N/A |
| Protein | 10-20 g | N/A |
Note: Nutritional values are estimations and will vary based on the specific type and amount of birdseed used.
Variations & Substitutions
While the rendered beef suet is the unparalleled base for long-lasting suet cakes, you can certainly play with the additions to cater to different bird preferences.
- Seed Variety: Experiment with different mixed bird seed blends. Some birds are particularly fond of sunflower seeds, millet, or cracked corn.
- Dried Fruits: Besides cranberries and apples, consider adding finely chopped raisins, blueberries, or cherries. Ensure they are unsweetened.
- Insects: For insectivorous birds, you can mix in a small amount of dried mealworms or crickets into the suet mixture before molding.
- Nuts: Beyond chopped peanuts, chopped almonds, walnuts, or sunflower seeds can be added for extra protein and fat.
FAQs
Q: Can I use other types of beef fat for rendering?
A: It is best to use raw beef suet, the hard fat found around the kidneys, as it renders cleanly and hardens effectively. Other beef fats may not have the same properties.
Q: How long does it take to render all the suet?
A: Rendering takes about 5-8 minutes per 2-cup batch. For 2 lbs of suet, which yields about 12 cups of fat, this would be approximately 30 minutes of active microwaving, plus time for cooling and straining between batches.
Q: My rendered fat seems cloudy, is that normal?
A: Yes, as the rendered fat cools and thickens, it will naturally become cloudy. This is the stage when it’s perfect for mixing with your suet cake ingredients.
Q: Can I make these suet cakes indoors for immediate feeding?
A: While the rendered fat is safe, the unmolded, soft suet mixture is not ideal for indoor feeding and can be quite messy. It’s best to freeze them solid before feeding outdoors.
Q: Why is frozen suet easier to cut?
A: Freezing makes the fat very firm and less pliable, allowing for cleaner, more precise cuts with a knife. This prevents the suet from becoming a gummy mess as you try to chop it.
Final Thoughts
There’s a profound satisfaction in creating something from scratch that not only nourishes but also delights. These homemade suet cakes and cones are a testament to that. They are more than just bird food; they are an extension of our care and a way to actively participate in the natural world around us. The act of rendering the fat, of mixing the ingredients, and finally of hanging the finished product is a small ritual that connects us to the changing seasons and the resilient lives of our feathered companions. I encourage you to try this process; the joy of watching a bird happily peck away at a creation you’ve made with your own hands is truly unparalleled.