
Rice Krispie Turkey: A Nostalgic Delight with a Fun, Edible Twist
There’s a certain magic that happens when familiar flavors are presented in unexpected, whimsical ways. For me, this Rice Krispie Turkey embodies that very spirit. I can vividly recall chilly autumn evenings, the scent of cinnamon and woodsmoke hanging in the air, and the sheer delight of creating these edible little characters. It wasn’t just about the sweet, gooey treat; it was about the shared laughter, the sticky fingers, and the pride of transforming a simple cereal into a festive centerpiece. This year, as I embarked on a fun “animal” theme for my Wednesday night culinary adventures, this charming turkey recipe immediately sprang to mind, promising to bring a smile to everyone’s face, just as it did for me, year after year.
Recipe Overview
- Prep Time: 30 minutes
- Cook Time: 0 minutes (chilling/setting time not included)
- Total Time: 30 minutes (plus chilling/setting time)
- Servings: 6-8
- Yield: About six to eight turkeys
- Dietary Type: Vegetarian
Ingredients
This recipe relies on the classic Rice Krispie Treats base, with a few playful additions to bring our turkeys to life.
- 3 tablespoons butter or 3 tablespoons margarine
- 10 ounces miniature marshmallows
- 6 cups plain Rice Krispies cereal or 6 cups COCOA KRISPIES® cereal (for a chocolatey variation)
- Red licorice (for the wattle and potentially tail feathers)
- Fruit licorice (for the tail feathers)
- Candy corn (for beaks and feet)
- 1 cup chocolate chips, melted (for “glue” and decorative details)
- Wooden skewers or toothpicks (for supporting the tail feathers)
Equipment Needed
The beauty of this recipe lies in its simplicity, requiring very few specialized tools.
- Large saucepan (for melting butter and marshmallows)
- Spatula or wooden spoon (for stirring)
- Waxed paper or parchment paper (for shaping and cooling)
- Small bowl (for melting chocolate chips)
- Microwave-safe bowl or double boiler (for melting chocolate chips)
- Ziploc bag (for piping melted chocolate)
- Scissors or knife (for snipping the ziploc bag)
Instructions
The magic unfolds as we transform a beloved cereal into a festive, edible creation. The process is straightforward, building upon the familiar steps of making Rice Krispie Treats.
-
Prepare Your Workspace: Line a large baking sheet or clean countertop with waxed paper or parchment paper. This will be your staging area for shaping and cooling the turkey bodies and heads.
-
Melt the Base: In a large saucepan, melt the butter or margarine over low heat. Once melted, add the miniature marshmallows. Stir continuously until the marshmallows are completely melted and smooth. Be patient and keep the heat low to prevent scorching.
-
Incorporate the Cereal: Remove the saucepan from the heat. Add the plain Rice Krispies cereal (or COCOA KRISPIES® cereal) to the melted marshmallow mixture. Stir gently but thoroughly until the cereal is evenly coated. Ensure every crispy piece is embraced by the gooey sweetness.
-
Shape the Turkey Bodies and Heads: This is where the fun really begins! Drop heaping spoonfuls of the Rice Krispie mixture onto the prepared waxed paper. For each turkey body, create a ball roughly the size of a fist. For the heads, form smaller balls, about the size of golf balls. If the mixture becomes too sticky to handle, you can lightly coat your hands with butter or cooking spray to make shaping easier.
-
Assemble the Turkeys: Once the bodies and heads are shaped, gently press a head ball onto each body ball to create the basic turkey form.
-
Create the Tail Feathers: For the vibrant tail feathers, thread pieces of red licorice and fruit licorice onto the wooden skewers or toothpicks. Aim for about six pieces of licorice per skewer/toothpick to create a fan-like effect.
-
Attach the Tail Feathers: Carefully poke about six of the prepared licorice feather skewers into the back of each turkey body. Arrange them so they fan out attractively.
-
Prepare the “Glue”: Melt the chocolate chips in a microwave-safe bowl in 30-second intervals, stirring between each, until smooth and pourable. Alternatively, you can use a double boiler. Once melted, pour the chocolate into a Ziploc bag. Snip a tiny corner off the bag to create a fine-tipped piping tool.
-
Decorate Your Turkeys: Now, it’s time for the artistic touches using your melted chocolate as glue:
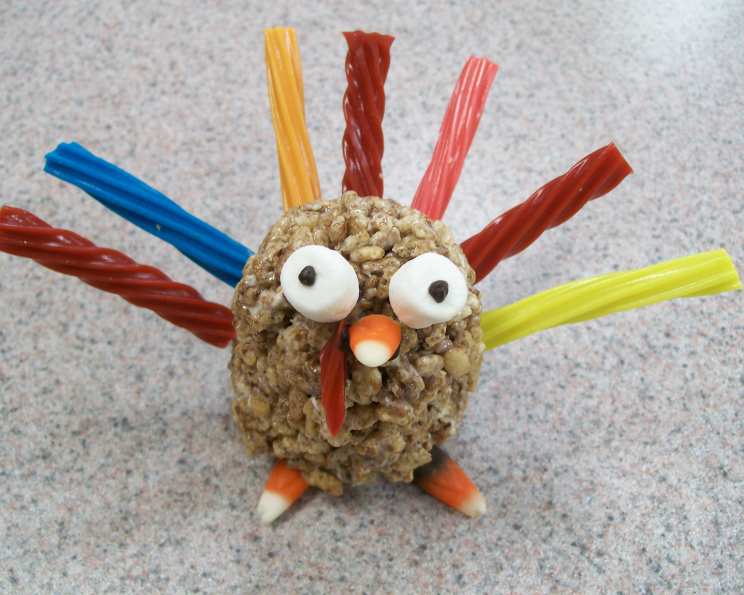
- Eyes: Use small dabs of melted chocolate to attach miniature marshmallows to the turkey heads. Then, use a tiny dot of chocolate as the “pupil” on each marshmallow eye.
- Beak: Attach a piece of candy corn to the front of each turkey head for the beak.
- Feet: Use two pieces of candy corn, positioned side-by-side at the bottom of the turkey body, to create the feet.
- Wattle: Pipe a small piece of red licorice or a dab of melted chocolate under the chin to represent the wattle.
-
Let Them Set: Allow the melted chocolate to set completely. This will help all the decorative elements stay firmly in place. This usually takes about 15-20 minutes at room temperature.
Expert Tips & Tricks
To elevate your Rice Krispie Turkey game, consider these professional insights:
- Marshmallow Mastery: For the smoothest texture, ensure your marshmallows are fresh. Older, hardened marshmallows can result in a tougher treat. Melting them slowly over low heat prevents them from becoming tough or burnt.
- Stickiness Solution: The butter or cooking spray trick is invaluable. Keep a small bowl of it near your workspace for quick hand-greasing when the mixture becomes unmanageable.
- Cereal Choice: While classic Rice Krispies are a go-to, don’t shy away from variations! COCOA KRISPIES® add a delightful chocolatey dimension, and even other crisped rice cereals can work, though they might affect the final texture slightly.
- Feather Flair: Get creative with your licorice! You can use different colors and even cut them into leaf shapes for more intricate feather designs. For an even more robust tail, you can use wider strips of fruit leather.
- Chocolate Application: If you find piping with a ziploc bag tricky, you can also use a small spoon or even a toothpick to apply the melted chocolate. Just work quickly before it cools.
- Make-Ahead Magic: The Rice Krispie mixture can be made a day in advance and stored in an airtight container at room temperature. However, it’s best to shape and decorate them on the day you plan to serve them for optimal freshness and appearance.
Serving & Storage Suggestions
These Rice Krispie Turkeys are delightful served on their own as a sweet treat or as part of a festive dessert platter. They make fantastic edible decorations for Thanksgiving tables or Halloween parties.
For storage, keep any uneaten turkeys in an airtight container at room temperature. They will maintain their best quality for 2-3 days. Avoid refrigerating them, as this can make the Rice Krispie treats hard and less enjoyable. If you need to store them for a longer period, you can freeze them, well-wrapped, for up to a month, though the texture might change slightly upon thawing.
Nutritional Information
Here is an estimated nutritional breakdown for one serving of a Rice Krispie Turkey, based on the recipe’s ingredients. Please note that these are approximate values and can vary based on specific ingredient brands and portion sizes.
| Nutrient | Amount per Serving | % Daily Value |
|---|---|---|
| Calories | 443.9 kcal | |
| Calories from Fat | ||
| Total Fat | 14.5 g | 22% |
| Saturated Fat | 8.7 g | 43% |
| Cholesterol | 15.3 mg | 5% |
| Sodium | 248.7 mg | 10% |
| Total Carbohydrate | 80.2 g | 26% |
| Dietary Fiber | 1.9 g | 7% |
| Sugars | 45.1 g | 180% |
| Protein | 4 g | 8% |
Note: The “Calories from Fat” and “% Daily Value” for “Calories from Fat” were not explicitly provided with numerical values in the original data, hence the empty fields.
Variations & Substitutions
While this recipe is a classic for a reason, feel free to inject your own creativity:
- Chocolate Lover’s Dream: As mentioned, using COCOA KRISPIES® cereal is a fantastic variation. You can also mix in a tablespoon or two of cocoa powder into the marshmallow mixture for an even richer chocolate flavor.
- Fruity Fun: Experiment with different colors and flavors of fruit licorice for the tail feathers. You could even use thinly sliced fruit roll-ups cut into feather shapes.
- Alternative Eyes: Instead of marshmallows, try using small dots of white icing with tiny black sprinkles for the eyes.
- Seasonal Flair: For a Halloween twist, use orange and black candy corn and black licorice. For Christmas, consider red and green candies.
- Gluten-Free Option: Ensure you use a certified gluten-free crisped rice cereal. Most marshmallows are naturally gluten-free, but it’s always good to check the packaging.
FAQs
Q: Can I make the Rice Krispie mixture ahead of time?
A: Yes, the base Rice Krispie mixture can be made a day in advance and stored in an airtight container at room temperature. However, it’s best to shape and decorate the turkeys on the day of serving.
Q: My Rice Krispie mixture is too sticky to handle. What should I do?
A: Lightly coat your hands with butter or cooking spray. This will create a barrier and make the mixture much easier to shape.
Q: What kind of licorice works best for the tail feathers?
A: Both red and fruit licorice work well. Wider strips or different colored varieties can add more visual appeal.
Q: Can I use a different type of cereal?
A: While the recipe specifically calls for Rice Krispies, other crisped rice cereals will work, though they might alter the final texture slightly.
Q: How long do these Rice Krispie Turkeys last?
A: They are best enjoyed within 2-3 days when stored in an airtight container at room temperature. Avoid refrigeration, as it can harden the treats.
As the crisp air of autumn descends, or whenever a touch of whimsical joy is needed, these Rice Krispie Turkeys are a guaranteed hit. They’re a testament to how simple ingredients can be transformed into something truly special, sparking delight in both the maker and the eater. Gather your loved ones, embrace the sticky fun, and create a flock of these charming edible birds. Happy cooking, and even happier snacking!