
The Art of the Rice Paper Roll: Freshness Wrapped with Flair
There’s a certain magic that happens when simple ingredients come together to create something utterly delightful and surprisingly elegant. For me, rice paper rolls are precisely that magic. I remember the first time I attempted them, a little intimidated by the delicate rice paper and the art of the perfect roll. It was during a sweltering summer afternoon, and the promise of something cool, crisp, and bursting with fresh flavors was exactly what we needed. My children, usually hesitant with anything unfamiliar, were captivated by the translucent wrappers and the vibrant colors of the fillings laid out before them. Watching their little hands carefully select ingredients and attempt their first rolls, a mix of concentration and playful mess, became a cherished memory. Now, these rolls are a staple in our kitchen, a testament to how healthy eating can also be incredibly fun and delicious, perfect for any occasion from a quick lunch to a festive gathering.
Recipe Overview
- Prep Time: 20 minutes
- Cook Time: 0 minutes
- Total Time: 20 minutes
- Servings: 2-4
- Yield: 12 rolls
- Dietary Type: Gluten-Free, Dairy-Free (depending on fillings)
Ingredients
The beauty of rice paper rolls lies in their adaptability. You can truly customize them to your heart’s content. Here’s a foundation for a delicious classic, but don’t be afraid to experiment!
- 12 sheets rice paper
- 1 medium carrot, peeled and cut into thin ribbons or julienne strips
- 1 medium red capsicum (bell pepper), deseeded and cut into thin strips
- 200 grams shaved ham or 200 grams smoked salmon (for a vegetarian or vegan option, consider firm tofu strips marinated and pan-fried, or cooked shrimp)
- 1 ripe avocado, pitted, peeled, and sliced
- 2 spring onions (scallions), trimmed and cut into strips (use the white and green parts)
- 4 medium mushrooms, thinly sliced (button or cremini work well)
For Dipping:
- Sweet chili sauce
- Soy sauce (or tamari for gluten-free)
- Thai barbecue sauce
Equipment Needed
- A large, shallow dish or bowl (wide enough to fit a rice paper sheet)
- A clean, damp kitchen towel or a cutting board for assembly
- A sharp knife for preparing the fillings
Instructions
The process of making rice paper rolls is more about assembly than cooking, making it an ideal activity for a lazy afternoon or a fun family project. The key is to work with the rice paper gently.
- Prepare Your Workspace: Lay out your ingredients within easy reach. You’ll want your prepared vegetables, ham/salmon, and avocado sliced and ready to go. Have your dipping sauces nearby.
- Warm the Water: Fill your shallow dish or bowl with warm (not hot) water. The temperature is crucial – too hot and the rice paper will disintegrate, too cold and it will remain stiff.
- Soak the Rice Paper: Take one rice paper sheet and carefully dip it into the warm water. Let it soak for approximately 30 seconds. You want it to become pliable and slightly softened, but not overly sticky or torn. Some brands might require slightly more or less time, so keep an eye on it.
- Transfer to Assembly Surface: Gently lift the softened rice paper out of the water, allowing any excess water to drip off, and lay it flat on your damp kitchen towel or clean cutting board. It will continue to soften slightly as it sits.
- Arrange the Fillings: In the center of the rice paper, towards the bottom third (the side closest to you), arrange a selection of your prepared ingredients. Don’t overfill, as this will make rolling difficult. Aim for a colorful and balanced mix of textures and flavors. For instance, place some carrot ribbons, red capsicum strips, a piece of ham or smoked salmon, a few slices of avocado, some spring onion strips, and a few mushroom slices.
- Begin Rolling: This is where the technique comes in.
- First, fold the bottom edge of the rice paper (the edge closest to you) up and over the fillings.
- Next, fold in the two side edges of the rice paper towards the center, creating a neat package.
- Finally, roll the entire parcel tightly upwards, away from you, to form a compact log. The natural stickiness of the rice paper will help seal the roll.
- Repeat and Chill: Place the finished roll seam-side down on a clean plate or serving platter. Repeat steps 3-6 with the remaining rice paper sheets and fillings until all ingredients are used.
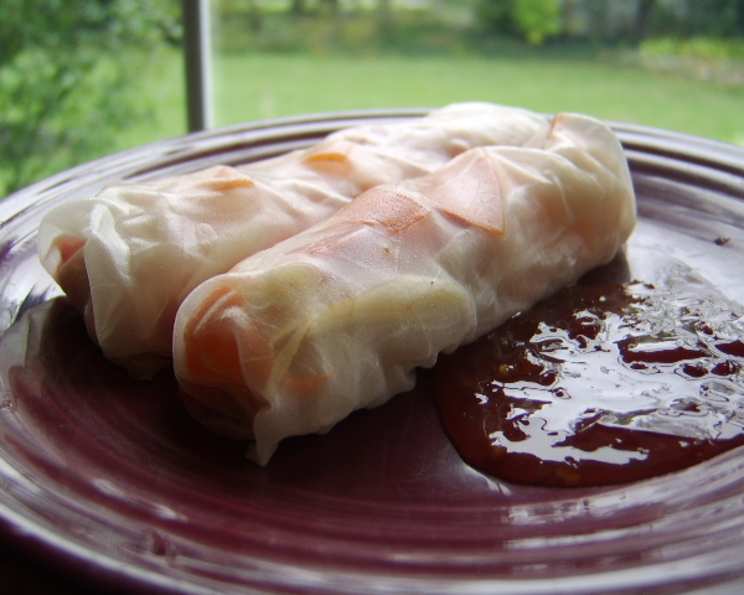
- Serve: It is best to serve the rolls chilled. If you are making them ahead of time, you can cover the platter with plastic wrap and refrigerate them. Be sure to arrange them so they aren’t sticking to each other too much, as they can become quite delicate. Serve with the sweet chili sauce, soy sauce, and Thai barbecue sauce for dipping.
Expert Tips & Tricks
- The Water Temperature is Key: If you’re unsure about the water temperature, do a test run with one sheet. It should feel warm to the touch, like a comfortable bath, not scalding or icy.
- Don’t Over-Soak: A slightly under-soaked rice paper can be gently massaged with wet fingers to help it become more pliable. An over-soaked one is harder to salvage.
- Neatly Prepared Fillings: Ensure your vegetables are cut into uniform, thin strips. This not only makes rolling easier but also contributes to a more attractive presentation.
- Balance is Beautiful: Think about the textures and flavors you’re combining. The crispness of the carrot and capsicum, the creaminess of the avocado, the savory protein, and the fresh herbs all play a role.
- Don’t Overstuff: Resist the temptation to pack too much filling into each roll. This is the most common mistake and leads to tearing or unwieldy rolls.
- Practice Makes Perfect: Your first few rolls might not be perfectly shaped, and that’s absolutely fine! You’ll quickly get the hang of the rolling technique. The taste will be delicious regardless of the appearance.
Serving & Storage Suggestions
These rolls are best served fresh and chilled. Arrange them attractively on a platter, perhaps with a few extra sprigs of cilantro or mint for garnish. They make for a stunning appetizer or a light, healthy lunch.
If you have leftovers, they can be stored in an airtight container in the refrigerator for up to 24 hours. However, it’s important to note that the rice paper can toughen and become less appealing the longer it sits. For the best texture, they are truly at their peak when consumed within a few hours of being made. Do not freeze rice paper rolls, as the freezing and thawing process will damage the texture of the rice paper.
Nutritional Information
Here’s an estimated nutritional breakdown, which can vary significantly based on the specific fillings and portion sizes used. This calculation is based on approximately 3 rolls per serving, using ham and common vegetable fillings.
| Nutrient | Amount per Serving (approx.) | % Daily Value |
|---|---|---|
| Calories | 120 kcal | 6% |
| Total Fat | 3 g | 4% |
| Saturated Fat | 1 g | 5% |
| Cholesterol | 10 mg | 3% |
| Sodium | 300 mg | 13% |
| Total Carbohydrate | 20 g | 7% |
| Dietary Fiber | 3 g | 11% |
| Sugars | 5 g | 6% |
| Protein | 5 g | 10% |
Note: Percent Daily Values are based on a 2,000 calorie diet. Individual needs may be higher or lower depending on calorie needs.
Variations & Substitutions
The versatility of rice paper rolls is truly their superpower. Feel free to get creative:
- Vegetarian/Vegan Powerhouse: Swap the ham and salmon for firm tofu marinated in soy sauce, ginger, and garlic, then pan-fried or baked until golden. Add a generous portion of fresh herbs like mint, cilantro, and basil. You can also include finely shredded lettuce or bean sprouts for extra crunch.
- Seafood Sensation: Grilled shrimp, cooked crab meat, or even thin slices of seared tuna can be fantastic additions.
- Herbal Heaven: Don’t underestimate the power of fresh herbs. Mint, cilantro, Thai basil, and even a few delicate perilla leaves can elevate the flavor profile significantly.
- Fruity Twist: A few thin slices of mango or peach can add a delightful sweetness, especially when paired with spicy or savory fillings.
- Crunch Factor: For added texture, consider including finely shredded red cabbage, julienned jicama, or even crispy fried shallots.
- The Sauce Selection: Beyond the classics, explore peanut sauce, hoisin sauce, or a spicy lime dressing for your dipping pleasure.
FAQs
Q: Can I make rice paper rolls ahead of time?
A: Yes, you can prepare them a few hours in advance and store them covered in the refrigerator. However, they are best enjoyed within 24 hours for optimal texture, as the rice paper can become tough over time.
Q: My rice paper is tearing when I try to roll it. What am I doing wrong?
A: This usually happens if the rice paper is over-soaked, making it too fragile, or if you’re trying to fit too much filling. Ensure you’re only soaking for the recommended time and don’t overstuff the rolls.
Q: What is the best water temperature for softening rice paper?
A: Warm water is ideal. It should feel comfortable to the touch, like a warm bath, but not hot. Too hot and it will become sticky and tear easily; too cold and it will remain stiff.
Q: Can I use different vegetables in my rice paper rolls?
A: Absolutely! Rice paper rolls are incredibly versatile. Feel free to use ingredients like cucumber, bell peppers of any color, bean sprouts, lettuce, shredded cabbage, or edamame.
Q: How do I store leftover rice paper rolls?
A: Store them in an airtight container in the refrigerator for up to 24 hours. It’s best to place them in a single layer to prevent them from sticking together.
Final Thoughts
These rice paper rolls are more than just a recipe; they are an invitation to play with your food, to explore vibrant flavors and textures, and to create something truly nourishing and beautiful. They are a testament to the simple elegance of fresh ingredients, thoughtfully prepared. Whether you’re serving them as a light appetizer, a healthy lunch, or a fun family activity, I encourage you to embrace the process and make them your own. Don’t hesitate to experiment with your favorite fillings and dipping sauces. I often find myself pairing these with a refreshing glass of iced green tea or a chilled bottle of crisp white wine. Enjoy the journey of creation, and savor every fresh, delightful bite!